12c新特性:Recover Table

12c新特性:Recover Table

在版本12c之前单独恢复Oracle中某一张表,常规的方法是TSPITR或Flashback闪回。在版本12c中提供了Table Recovery单独恢复表的RMAN特性,该特性用以直接从RMAN backup中恢复table的方法,该特性的特点:

  • 不影响数据库中的其他数据库对象
  • 减少时间和磁盘空间的消耗,和早期的TSPIRT工作流程类似:
    • 从另一个磁盘路径恢复表空间
    • 导出想要的表数据
    • 导入到原数据库


在何种场景下值得考虑使用该rman table recovery特性恢复单个表或分区的数据:

  • 在下列场景中不建议使用TSPITR特性,但是建议用12c的table recovery特性:
    • 少数几个表需要恢复
    • 非子包含的表空间
  • 在下列条件中不可能使用闪回,但是可以用12c的table recovery特性:
    • purge掉的表,不再可能flashback drop
    • 必要的undo已经被覆盖的情况,不再可能flashback table
    • 经过一些结构化的DDL变更后,不再可能flashback table


Table Recovery的流程图:
Table Recovery Graphical Overview


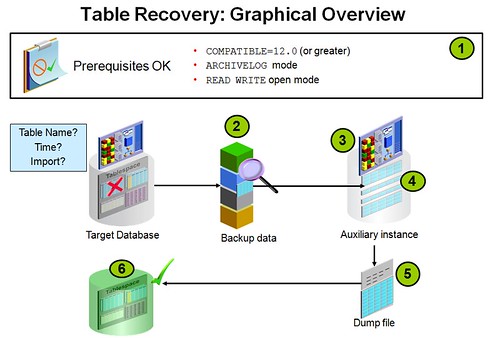
Table Recovery可客制化的选项不多,主要有一下2点:

  1. 你可以指定NOTABLEIMPORT参数让RMAN不导入恢复的数据到目标库中
  2. 若指定REMAP TABLE或REMAP TABLESPACE参数,RMAN可选地重命名recovered表或表分区


oracle@localhost:~$ sqlplus / as sysdba

SQL*Plus: Release 12.1.0.0.2 Beta on Mon Dec 24 01:46:37 2012

Copyright (c) 1982, 2012, Oracle. All rights reserved.
Connected to:
Oracle Database 12c Enterprise Edition Release 12.1.0.0.2 – 64bit Beta
With the Partitioning, OLAP, Data Mining and Real Application Testing options

SQL>
SQL>
SQL>
SQL>
SQL>
SQL>
SQL> archive log list
Database log mode No Archive Mode
Automatic archival Disabled
Archive destination USE_DB_RECOVERY_FILE_DEST
Oldest online log sequence 31
Current log sequence 33
SQL>
SQL>
SQL>
SQL> shutdown immediate;
Database closed.
Database dismounted.
ORACLE instance shut down.
SQL> startup mount;
ORACLE instance started.

Total System Global Area 626327552 bytes
Fixed Size 2263520 bytes
Variable Size 469763616 bytes
Database Buffers 150994944 bytes
Redo Buffers 3305472 bytes
Database mounted.
SQL>
SQL>
SQL>
SQL> alter database archivelog;

Database altered.

SQL> alter database open;

Database altered.


SQL> create user c##maclean identified by oracle;

User created.

SQL> grant dba to c##maclean;

Grant succeeded.

SQL>
SQL> conn c##maclean/oracle
Connected.
SQL>
SQL>
SQL>
SQL> create table recoverme as select * from dba_objects;

Table created.

SQL>
SQL> select current_scn from v$database;

CURRENT_SCN
———–
2164108

SQL>
SQL> select count(*) from recoverme;

COUNT(*)
———-
89112

SQL>
SQL> delete recoverme where rownum<2000;

1999 rows deleted.

SQL> commit;

Commit complete.

SQL> alter system checkpoint;

System altered.

oracle@localhost:~$ mkdir -p /tmp/oracle/recover
oracle@localhost:~$ mkdir -p /tmp/recover/dumpfiles
RECOVER TABLE “C##MACLEAN”.recoverme
UNTIL SCN 2164108
AUXILIARY DESTINATION ‘/tmp/oracle/recover’
DATAPUMP DESTINATION ‘/tmp/recover/dumpfiles’
DUMP FILE ‘recover.dat’
NOTABLEIMPORT;

ORA-29283: invalid file operation

RMAN-00571: ===========================================================
RMAN-00569: =============== ERROR MESSAGE STACK FOLLOWS ===============
RMAN-00571: ===========================================================
RMAN-03002: failure of recover command at 12/24/2012 02:47:17
RMAN-06962: Error received during export of metadata
RMAN-06960: EXPDP> ORA-31626: job does not exist
ORA-31633: unable to create master table “SYSBACKUP.TSPITR_EXP_jjFw_trsu”
ORA-01552: cannot use system rollback segment for non-system tablespace ‘USERS’

RECOVER TABLE ‘C##MACLEAN’.’RECOVERME’
UNTIL SCN 2164108
AUXILIARY DESTINATION ‘/tmp/oracle/recover’
REMAP TABLE ‘C##MACLEAN’.’RECOVERME’:’RECOVERME1′;

SQL>
SQL> drop table recoverme;

Table dropped.

SQL> create table recoverme tablespace system as select * from dba_objects;

Table created.

SQL>
SQL>
SQL> select current_scn from v$database;

CURRENT_SCN
———–
2167801

SQL> select count(*) from recoverme;

COUNT(*)
———-
89113

SQL> delete recoverme where rownum<2000;

1999 rows deleted.

SQL> commit;

Commit complete.

SQL> alter system checkpoint;

System altered.

SQL> select count(*) from recoverme;

COUNT(*)
———-
87114

RECOVER TABLE “C##MACLEAN”.recoverme
UNTIL SCN 2167801
AUXILIARY DESTINATION ‘/tmp/oracle/recover’
DATAPUMP DESTINATION ‘/tmp/recover/dumpfiles’
DUMP FILE ‘recover.dat’
NOTABLEIMPORT;

connected to target database: CDB1 (DBID=762218087)

RMAN> RECOVER TABLE “C##MACLEAN”.recoverme
2> UNTIL SCN 2167801
3> AUXILIARY DESTINATION ‘/tmp/oracle/recover’
4> DATAPUMP DESTINATION ‘/tmp/recover/dumpfiles’
5> DUMP FILE ‘recover.dat’
6> NOTABLEIMPORT;

Starting recover at 24-DEC-12
using target database control file instead of recovery catalog
current log archived
allocated channel: ORA_DISK_1
channel ORA_DISK_1: SID=47 device type=DISK
RMAN-05026: WARNING: presuming following set of tablespaces applies to specified Point-in-Time

List of tablespaces expected to have UNDO segments
Tablespace SYSTEM
Tablespace UNDOTBS1

Creating automatic instance, with SID=’BxCi’

initialization parameters used for automatic instance:
db_name=CDB1
db_unique_name=BxCi_pitr_CDB1
compatible=12.0.0.0.0
db_block_size=8192
db_files=200
sga_target=1G
processes=80
db_create_file_dest=/tmp/oracle/recover
log_archive_dest_1=’location=/tmp/oracle/recover’
_enable_pluggable_database=true
_clone_one_pdb_recovery=true
#No auxiliary parameter file used
starting up automatic instance CDB1

Oracle instance started

Total System Global Area 1068937216 bytes

Fixed Size 2268624 bytes
Variable Size 281018928 bytes
Database Buffers 780140544 bytes
Redo Buffers 5509120 bytes
Automatic instance created

contents of Memory Script:
{
# set requested point in time
set until scn 2167801;
# restore the controlfile
restore clone controlfile;
# mount the controlfile
sql clone ‘alter database mount clone database’;
# archive current online log
sql ‘alter system archive log current’;
}
executing Memory Script

executing command: SET until clause

Starting restore at 24-DEC-12
allocated channel: ORA_AUX_DISK_1
channel ORA_AUX_DISK_1: SID=19 device type=DISK

channel ORA_AUX_DISK_1: starting datafile backup set restore
channel ORA_AUX_DISK_1: restoring control file
channel ORA_AUX_DISK_1: reading from backup piece /u01/app/oracle/fast_recovery_area/CDB1/backupset/2012_12_24/o1_mf_ncsnf_TAG20121224T021238_8fhgvdp5_.bkp
channel ORA_AUX_DISK_1: piece handle=/u01/app/oracle/fast_recovery_area/CDB1/backupset/2012_12_24/o1_mf_ncsnf_TAG20121224T021238_8fhgvdp5_.bkp tag=TAG20121224T021238
channel ORA_AUX_DISK_1: restored backup piece 1
channel ORA_AUX_DISK_1: restore complete, elapsed time: 00:00:01
output file name=/tmp/oracle/recover/CDB1/controlfile/o1_mf_8fhlgy7g_.ctl
Finished restore at 24-DEC-12

sql statement: alter database mount clone database

sql statement: alter system archive log current

contents of Memory Script:
{
# set requested point in time
set until scn 2167801;
# set destinations for recovery set and auxiliary set datafiles
set newname for clone datafile 1 to new;
set newname for clone datafile 4 to new;
set newname for clone datafile 3 to new;
set newname for clone tempfile 1 to new;
# switch all tempfiles
switch clone tempfile all;
# restore the tablespaces in the recovery set and the auxiliary set
restore clone datafile 1, 4, 3;
switch clone datafile all;
}
executing Memory Script

executing command: SET until clause

executing command: SET NEWNAME

executing command: SET NEWNAME

executing command: SET NEWNAME

executing command: SET NEWNAME

renamed tempfile 1 to /tmp/oracle/recover/CDB1/datafile/o1_mf_temp_%u_.tmp in control file

Starting restore at 24-DEC-12
using channel ORA_AUX_DISK_1

channel ORA_AUX_DISK_1: starting datafile backup set restore
channel ORA_AUX_DISK_1: specifying datafile(s) to restore from backup set
channel ORA_AUX_DISK_1: restoring datafile 00001 to /tmp/oracle/recover/CDB1/datafile/o1_mf_system_%u_.dbf
channel ORA_AUX_DISK_1: restoring datafile 00004 to /tmp/oracle/recover/CDB1/datafile/o1_mf_undotbs1_%u_.dbf
channel ORA_AUX_DISK_1: restoring datafile 00003 to /tmp/oracle/recover/CDB1/datafile/o1_mf_sysaux_%u_.dbf
channel ORA_AUX_DISK_1: reading from backup piece /u01/app/oracle/fast_recovery_area/CDB1/backupset/2012_12_24/o1_mf_nnndf_TAG20121224T021238_8fhgjqd3_.bkp
channel ORA_AUX_DISK_1: piece handle=/u01/app/oracle/fast_recovery_area/CDB1/backupset/2012_12_24/o1_mf_nnndf_TAG20121224T021238_8fhgjqd3_.bkp tag=TAG20121224T021238
channel ORA_AUX_DISK_1: restored backup piece 1
channel ORA_AUX_DISK_1: restore complete, elapsed time: 00:02:35
Finished restore at 24-DEC-12

datafile 1 switched to datafile copy
input datafile copy RECID=4 STAMP=802840959 file name=/tmp/oracle/recover/CDB1/datafile/o1_mf_system_8fhlh4w6_.dbf
datafile 4 switched to datafile copy
input datafile copy RECID=5 STAMP=802840959 file name=/tmp/oracle/recover/CDB1/datafile/o1_mf_undotbs1_8fhlk5y4_.dbf
datafile 3 switched to datafile copy
input datafile copy RECID=6 STAMP=802840959 file name=/tmp/oracle/recover/CDB1/datafile/o1_mf_sysaux_8fhlh4w8_.dbf

contents of Memory Script:
{
# set requested point in time
set until scn 2167801;
# online the datafiles restored or switched
sql clone “alter database datafile 1 online”;
sql clone “alter database datafile 4 online”;
sql clone “alter database datafile 3 online”;
# recover and open database read only
recover clone database tablespace “SYSTEM”, “UNDOTBS1”, “SYSAUX”;
sql clone ‘alter database open read only’;
}
executing Memory Script

executing command: SET until clause

sql statement: alter database datafile 1 online

sql statement: alter database datafile 4 online

sql statement: alter database datafile 3 online

Starting recover at 24-DEC-12
using channel ORA_AUX_DISK_1

starting media recovery

archived log for thread 1 with sequence 34 is already on disk as file /u01/app/oracle/fast_recovery_area/CDB1/archivelog/2012_12_24/o1_mf_1_34_8fhgvg5r_.arc
archived log for thread 1 with sequence 35 is already on disk as file /u01/app/oracle/fast_recovery_area/CDB1/archivelog/2012_12_24/o1_mf_1_35_8fhhpg2f_.arc
archived log for thread 1 with sequence 36 is already on disk as file /u01/app/oracle/fast_recovery_area/CDB1/archivelog/2012_12_24/o1_mf_1_36_8fhhr5oz_.arc
archived log for thread 1 with sequence 37 is already on disk as file /u01/app/oracle/fast_recovery_area/CDB1/archivelog/2012_12_24/o1_mf_1_37_8fhj8nbh_.arc
archived log for thread 1 with sequence 38 is already on disk as file /u01/app/oracle/fast_recovery_area/CDB1/archivelog/2012_12_24/o1_mf_1_38_8fhk741v_.arc
archived log for thread 1 with sequence 39 is already on disk as file /u01/app/oracle/fast_recovery_area/CDB1/archivelog/2012_12_24/o1_mf_1_39_8fhlgnor_.arc
archived log file name=/u01/app/oracle/fast_recovery_area/CDB1/archivelog/2012_12_24/o1_mf_1_34_8fhgvg5r_.arc thread=1 sequence=34
archived log file name=/u01/app/oracle/fast_recovery_area/CDB1/archivelog/2012_12_24/o1_mf_1_35_8fhhpg2f_.arc thread=1 sequence=35
archived log file name=/u01/app/oracle/fast_recovery_area/CDB1/archivelog/2012_12_24/o1_mf_1_36_8fhhr5oz_.arc thread=1 sequence=36
archived log file name=/u01/app/oracle/fast_recovery_area/CDB1/archivelog/2012_12_24/o1_mf_1_37_8fhj8nbh_.arc thread=1 sequence=37
archived log file name=/u01/app/oracle/fast_recovery_area/CDB1/archivelog/2012_12_24/o1_mf_1_38_8fhk741v_.arc thread=1 sequence=38
archived log file name=/u01/app/oracle/fast_recovery_area/CDB1/archivelog/2012_12_24/o1_mf_1_39_8fhlgnor_.arc thread=1 sequence=39
media recovery complete, elapsed time: 00:00:11
Finished recover at 24-DEC-12

sql statement: alter database open read only

Removing automatic instance
shutting down automatic instance
Oracle instance shut down
Automatic instance removed
auxiliary instance file /tmp/oracle/recover/CDB1/datafile/o1_mf_sysaux_8fhlh4w8_.dbf deleted
auxiliary instance file /tmp/oracle/recover/CDB1/datafile/o1_mf_undotbs1_8fhlk5y4_.dbf deleted
auxiliary instance file /tmp/oracle/recover/CDB1/datafile/o1_mf_system_8fhlh4w6_.dbf deleted
auxiliary instance file /tmp/oracle/recover/CDB1/datafile/o1_mf_sysaux_8fhlh4w8_.dbf deleted
auxiliary instance file /tmp/oracle/recover/CDB1/datafile/o1_mf_undotbs1_8fhlk5y4_.dbf deleted
auxiliary instance file /tmp/oracle/recover/CDB1/datafile/o1_mf_system_8fhlh4w6_.dbf deleted
auxiliary instance file /tmp/oracle/recover/CDB1/controlfile/o1_mf_8fhlgy7g_.ctl deleted
RMAN-00571: ===========================================================
RMAN-00569: =============== ERROR MESSAGE STACK FOLLOWS ===============
RMAN-00571: ===========================================================
RMAN-03002: failure of recover command at 12/24/2012 03:23:04
RMAN-05063: Cannot recover specified tables
RMAN-05059: Table C##MACLEAN.RECOVERME resides in tablespace SYSTEM
RMAN-05003: Tablespace Point-in-Time Recovery is not allowed for tablespace SYSTEM
RECOVER TABLE “C##MACLEAN”.recoverme
UNTIL SCN 2164108
AUXILIARY DESTINATION ‘/tmp/oracle/recover’
DATAPUMP DESTINATION ‘/tmp/recover/dumpfiles’
DUMP FILE ‘recover.dat’
NOTABLEIMPORT;

需要明确使用SYS登录才能成功

oracle@localhost:~$ rman target sys/oracle

Recovery Manager: Release 12.1.0.0.2 – Beta on Mon Dec 24 07:41:36 2012

Copyright (c) 1982, 2012, Oracle and/or its affiliates. All rights reserved.

connected to target database: CDB1 (DBID=762218087)

RMAN> RECOVER TABLE “C##MACLEAN”.recoverme
2> UNTIL SCN 2164108
3> AUXILIARY DESTINATION ‘/tmp/oracle/recover’
4> DATAPUMP DESTINATION ‘/tmp/recover/dumpfiles’
5> DUMP FILE ‘recover.dat’
6> NOTABLEIMPORT;

Starting recover at 24-DEC-12
using target database control file instead of recovery catalog
allocated channel: ORA_DISK_1
channel ORA_DISK_1: SID=40 device type=DISK
RMAN-05026: WARNING: presuming following set of tablespaces applies to specified Point-in-Time

List of tablespaces expected to have UNDO segments
Tablespace SYSTEM
Tablespace UNDOTBS1

Creating automatic instance, with SID=’npaw’

initialization parameters used for automatic instance:
db_name=CDB1
db_unique_name=npaw_pitr_CDB1
compatible=12.0.0.0.0
db_block_size=8192
db_files=200
sga_target=1G
processes=80
db_create_file_dest=/tmp/oracle/recover
log_archive_dest_1=’location=/tmp/oracle/recover’
_enable_pluggable_database=true
_clone_one_pdb_recovery=true
#No auxiliary parameter file used
starting up automatic instance CDB1

Oracle instance started

Total System Global Area 1068937216 bytes

Fixed Size 2268624 bytes
Variable Size 281018928 bytes
Database Buffers 780140544 bytes
Redo Buffers 5509120 bytes
Automatic instance created

contents of Memory Script:
{
# set requested point in time
set until scn 2164108;
# restore the controlfile
restore clone controlfile;
# mount the controlfile
sql clone ‘alter database mount clone database’;
# archive current online log
sql ‘alter system archive log current’;
}
executing Memory Script

executing command: SET until clause

Starting restore at 24-DEC-12
allocated channel: ORA_AUX_DISK_1
channel ORA_AUX_DISK_1: SID=19 device type=DISK

channel ORA_AUX_DISK_1: starting datafile backup set restore
channel ORA_AUX_DISK_1: restoring control file
channel ORA_AUX_DISK_1: reading from backup piece /u01/app/oracle/fast_recovery_area/CDB1/backupset/2012_12_24/o1_mf_ncsnf_TAG20121224T021238_8fhgvdp5_.bkp
channel ORA_AUX_DISK_1: piece handle=/u01/app/oracle/fast_recovery_area/CDB1/backupset/2012_12_24/o1_mf_ncsnf_TAG20121224T021238_8fhgvdp5_.bkp tag=TAG20121224T021238
channel ORA_AUX_DISK_1: restored backup piece 1
channel ORA_AUX_DISK_1: restore complete, elapsed time: 00:00:01
output file name=/tmp/oracle/recover/CDB1/controlfile/o1_mf_8fj1t7s0_.ctl
Finished restore at 24-DEC-12

sql statement: alter database mount clone database

sql statement: alter system archive log current

contents of Memory Script:
{
# set requested point in time
set until scn 2164108;
# set destinations for recovery set and auxiliary set datafiles
set newname for clone datafile 1 to new;
set newname for clone datafile 4 to new;
set newname for clone datafile 3 to new;
set newname for clone tempfile 1 to new;
# switch all tempfiles
switch clone tempfile all;
# restore the tablespaces in the recovery set and the auxiliary set
restore clone datafile 1, 4, 3;
switch clone datafile all;
}
executing Memory Script

executing command: SET until clause

executing command: SET NEWNAME

executing command: SET NEWNAME

executing command: SET NEWNAME

executing command: SET NEWNAME

renamed tempfile 1 to /tmp/oracle/recover/CDB1/datafile/o1_mf_temp_%u_.tmp in control file

Starting restore at 24-DEC-12
using channel ORA_AUX_DISK_1

channel ORA_AUX_DISK_1: starting datafile backup set restore
channel ORA_AUX_DISK_1: specifying datafile(s) to restore from backup set
channel ORA_AUX_DISK_1: restoring datafile 00001 to /tmp/oracle/recover/CDB1/datafile/o1_mf_system_%u_.dbf
channel ORA_AUX_DISK_1: restoring datafile 00004 to /tmp/oracle/recover/CDB1/datafile/o1_mf_undotbs1_%u_.dbf
channel ORA_AUX_DISK_1: restoring datafile 00003 to /tmp/oracle/recover/CDB1/datafile/o1_mf_sysaux_%u_.dbf
channel ORA_AUX_DISK_1: reading from backup piece /u01/app/oracle/fast_recovery_area/CDB1/backupset/2012_12_24/o1_mf_nnndf_TAG20121224T021238_8fhgjqd3_.bkp


channel ORA_AUX_DISK_1: piece handle=/u01/app/oracle/fast_recovery_area/CDB1/backupset/2012_12_24/o1_mf_nnndf_TAG20121224T021238_8fhgjqd3_.bkp tag=TAG20121224T021238
channel ORA_AUX_DISK_1: restored backup piece 1
channel ORA_AUX_DISK_1: restore complete, elapsed time: 00:02:25
Finished restore at 24-DEC-12

datafile 1 switched to datafile copy
input datafile copy RECID=4 STAMP=802856672 file name=/tmp/oracle/recover/CDB1/datafile/o1_mf_system_8fj1thhh_.dbf
datafile 4 switched to datafile copy
input datafile copy RECID=5 STAMP=802856672 file name=/tmp/oracle/recover/CDB1/datafile/o1_mf_undotbs1_8fj1w5c5_.dbf
datafile 3 switched to datafile copy
input datafile copy RECID=6 STAMP=802856672 file name=/tmp/oracle/recover/CDB1/datafile/o1_mf_sysaux_8fj1thhj_.dbf

contents of Memory Script:
{
# set requested point in time
set until scn 2164108;
# online the datafiles restored or switched
sql clone “alter database datafile 1 online”;
sql clone “alter database datafile 4 online”;
sql clone “alter database datafile 3 online”;
# recover and open database read only
recover clone database tablespace “SYSTEM”, “UNDOTBS1”, “SYSAUX”;
sql clone ‘alter database open read only’;
}
executing Memory Script

executing command: SET until clause

sql statement: alter database datafile 1 online

sql statement: alter database datafile 4 online

sql statement: alter database datafile 3 online

Starting recover at 24-DEC-12
using channel ORA_AUX_DISK_1

starting media recovery

archived log for thread 1 with sequence 34 is already on disk as file /u01/app/oracle/fast_recovery_area/CDB1/archivelog/2012_12_24/o1_mf_1_34_8fhgvg5r_.arc
archived log for thread 1 with sequence 35 is already on disk as file /u01/app/oracle/fast_recovery_area/CDB1/archivelog/2012_12_24/o1_mf_1_35_8fhhpg2f_.arc
archived log file name=/u01/app/oracle/fast_recovery_area/CDB1/archivelog/2012_12_24/o1_mf_1_34_8fhgvg5r_.arc thread=1 sequence=34
archived log file name=/u01/app/oracle/fast_recovery_area/CDB1/archivelog/2012_12_24/o1_mf_1_35_8fhhpg2f_.arc thread=1 sequence=35
media recovery complete, elapsed time: 00:00:03
Finished recover at 24-DEC-12

sql statement: alter database open read only

contents of Memory Script:
{
sql clone “create spfile from memory”;
shutdown clone immediate;
startup clone nomount;
sql clone “alter system set control_files =
”/tmp/oracle/recover/CDB1/controlfile/o1_mf_8fj1t7s0_.ctl” comment=
”RMAN set” scope=spfile”;
shutdown clone immediate;
startup clone nomount;
# mount database
sql clone ‘alter database mount clone database’;
}
executing Memory Script

sql statement: create spfile from memory

database closed
database dismounted
Oracle instance shut down

connected to auxiliary database (not started)
Oracle instance started

Total System Global Area 1068937216 bytes

Fixed Size 2268624 bytes
Variable Size 285213232 bytes
Database Buffers 775946240 bytes
Redo Buffers 5509120 bytes

sql statement: alter system set control_files = ”/tmp/oracle/recover/CDB1/controlfile/o1_mf_8fj1t7s0_.ctl” comment= ”RMAN set” scope=spfile

Oracle instance shut down

connected to auxiliary database (not started)
Oracle instance started

Total System Global Area 1068937216 bytes

Fixed Size 2268624 bytes
Variable Size 285213232 bytes
Database Buffers 775946240 bytes
Redo Buffers 5509120 bytes

sql statement: alter database mount clone database

contents of Memory Script:
{
# set requested point in time
set until scn 2164108;
# set destinations for recovery set and auxiliary set datafiles
set newname for datafile 6 to new;
# restore the tablespaces in the recovery set and the auxiliary set
restore clone datafile 6;
switch clone datafile all;
}
executing Memory Script

executing command: SET until clause

executing command: SET NEWNAME

Starting restore at 24-DEC-12
allocated channel: ORA_AUX_DISK_1
channel ORA_AUX_DISK_1: SID=18 device type=DISK

channel ORA_AUX_DISK_1: starting datafile backup set restore
channel ORA_AUX_DISK_1: specifying datafile(s) to restore from backup set
channel ORA_AUX_DISK_1: restoring datafile 00006 to /tmp/oracle/recover/NPAW_PITR_CDB1/datafile/o1_mf_users_%u_.dbf
channel ORA_AUX_DISK_1: reading from backup piece /u01/app/oracle/fast_recovery_area/CDB1/backupset/2012_12_24/o1_mf_nnndf_TAG20121224T021238_8fhgjqd3_.bkp
channel ORA_AUX_DISK_1: piece handle=/u01/app/oracle/fast_recovery_area/CDB1/backupset/2012_12_24/o1_mf_nnndf_TAG20121224T021238_8fhgjqd3_.bkp tag=TAG20121224T021238
channel ORA_AUX_DISK_1: restored backup piece 1
channel ORA_AUX_DISK_1: restore complete, elapsed time: 00:00:55
Finished restore at 24-DEC-12

datafile 6 switched to datafile copy
input datafile copy RECID=8 STAMP=802856763 file name=/tmp/oracle/recover/NPAW_PITR_CDB1/datafile/o1_mf_users_8fj21sqp_.dbf

contents of Memory Script:
{
# set requested point in time
set until scn 2164108;
# online the datafiles restored or switched
sql clone “alter database datafile 6 online”;
# recover and open resetlogs
recover clone database tablespace “USERS”, “SYSTEM”, “UNDOTBS1”, “SYSAUX” delete archivelog;
alter clone database open resetlogs;
}
executing Memory Script

executing command: SET until clause

sql statement: alter database datafile 6 online

Starting recover at 24-DEC-12
using channel ORA_AUX_DISK_1

starting media recovery

archived log for thread 1 with sequence 34 is already on disk as file /u01/app/oracle/fast_recovery_area/CDB1/archivelog/2012_12_24/o1_mf_1_34_8fhgvg5r_.arc
archived log for thread 1 with sequence 35 is already on disk as file /u01/app/oracle/fast_recovery_area/CDB1/archivelog/2012_12_24/o1_mf_1_35_8fhhpg2f_.arc
archived log file name=/u01/app/oracle/fast_recovery_area/CDB1/archivelog/2012_12_24/o1_mf_1_34_8fhgvg5r_.arc thread=1 sequence=34
archived log file name=/u01/app/oracle/fast_recovery_area/CDB1/archivelog/2012_12_24/o1_mf_1_35_8fhhpg2f_.arc thread=1 sequence=35
media recovery complete, elapsed time: 00:00:01
Finished recover at 24-DEC-12

database opened

contents of Memory Script:
{
# create directory for datapump import
sql “create or replace directory TSPITR_DIROBJ_DPDIR as ”
/tmp/recover/dumpfiles””;
# create directory for datapump export
sql clone “create or replace directory TSPITR_DIROBJ_DPDIR as ”
/tmp/recover/dumpfiles””;
}
executing Memory Script

sql statement: create or replace directory TSPITR_DIROBJ_DPDIR as ”/tmp/recover/dumpfiles”

sql statement: create or replace directory TSPITR_DIROBJ_DPDIR as ”/tmp/recover/dumpfiles”

Performing export of tables…
EXPDP> Starting “SYS”.”TSPITR_EXP_npaw_sAzh”:
EXPDP> Estimate in progress using BLOCKS method…
EXPDP> Processing object type TABLE_EXPORT/TABLE/TABLE_DATA
EXPDP> Total estimation using BLOCKS method: 12 MB
EXPDP> Processing object type TABLE_EXPORT/TABLE/TABLE
EXPDP> Processing object type TABLE_EXPORT/TABLE/STATISTICS/TABLE_STATISTICS
EXPDP> Processing object type TABLE_EXPORT/TABLE/STATISTICS/MARKER
EXPDP> . . exported “C##MACLEAN”.”RECOVERME” 9.946 MB 89112 rows
EXPDP> Master table “SYS”.”TSPITR_EXP_npaw_sAzh” successfully loaded/unloaded
EXPDP> ******************************************************************************
EXPDP> Dump file set for SYS.TSPITR_EXP_npaw_sAzh is:
EXPDP> /tmp/recover/dumpfiles/recover.dat
EXPDP> Job “SYS”.”TSPITR_EXP_npaw_sAzh” successfully completed at Mon Dec 24 07:47:08 2012 elapsed 0 00:00:23
Export completed

Not performing table import after point-in-time recovery

Removing automatic instance
shutting down automatic instance
Oracle instance shut down
Automatic instance removed
auxiliary instance file /tmp/oracle/recover/CDB1/datafile/o1_mf_temp_8fj1z8p6_.tmp deleted
auxiliary instance file /tmp/oracle/recover/NPAW_PITR_CDB1/onlinelog/o1_mf_3_8fj220tk_.log deleted
auxiliary instance file /tmp/oracle/recover/NPAW_PITR_CDB1/onlinelog/o1_mf_2_8fj21zo9_.log deleted
auxiliary instance file /tmp/oracle/recover/NPAW_PITR_CDB1/onlinelog/o1_mf_1_8fj21y5n_.log deleted
auxiliary instance file /tmp/oracle/recover/NPAW_PITR_CDB1/datafile/o1_mf_users_8fj21sqp_.dbf deleted
auxiliary instance file /tmp/oracle/recover/CDB1/datafile/o1_mf_sysaux_8fj1thhj_.dbf deleted
auxiliary instance file /tmp/oracle/recover/CDB1/datafile/o1_mf_undotbs1_8fj1w5c5_.dbf deleted
auxiliary instance file /tmp/oracle/recover/CDB1/datafile/o1_mf_system_8fj1thhh_.dbf deleted
auxiliary instance file /tmp/oracle/recover/CDB1/controlfile/o1_mf_8fj1t7s0_.ctl deleted
Finished recover at 24-DEC-12

SQL> create directory temp as ‘/tmp/recover/dumpfiles’;

Directory created.

SQL> Disconnected from Oracle Database 12c Enterprise Edition Release 12.1.0.0.2 – 64bit Beta
With the Partitioning, OLAP, Data Mining and Real Application Testing options
oracle@localhost:~$ impdp system/oracle dumpfile=temp:recover.dat

Import: Release 12.1.0.0.2 – Beta on Mon Dec 24 07:51:28 2012

Copyright (c) 1982, 2012, Oracle and/or its affiliates. All rights reserved.

Connected to: Oracle Database 12c Enterprise Edition Release 12.1.0.0.2 – 64bit Beta
With the Partitioning, OLAP, Data Mining and Real Application Testing options
Master table “SYSTEM”.”SYS_IMPORT_FULL_01″ successfully loaded/unloaded
Starting “SYSTEM”.”SYS_IMPORT_FULL_01″: system/******** dumpfile=temp:recover.dat
Processing object type TABLE_EXPORT/TABLE/TABLE
Processing object type TABLE_EXPORT/TABLE/TABLE_DATA
. . imported “C##MACLEAN”.”RECOVERME” 9.946 MB 89112 rows
Processing object type TABLE_EXPORT/TABLE/STATISTICS/TABLE_STATISTICS
Processing object type TABLE_EXPORT/TABLE/STATISTICS/MARKER
Job “SYSTEM”.”SYS_IMPORT_FULL_01″ successfully completed at Mon Dec 24 07:51:38 2012 elapsed 0 00:00:09
SQL> select count(*) from “C##MACLEAN”.”RECOVERME” ;

COUNT(*)
———-
89112

Oracle Enterprise Manager Cloud Control 12c(12.1) OMS&Agent安装图文指南

第一次用百度文库的文档分享功能。

Oracle Enterprise Manager 12c 新特性:实时Real-Time Addm

在Oracle Enterprise Manager 12c中引入了Real-Time addm的新特性。 DBA可以直接从EM界面上启动实时ADDM(Automatic Database Diagnostic Monitor )信息收集, 也叫做Emergency ADDM。


Emergency ADDM adds performance diagnostics for databases suffering from severe performance problems. Real-time ADDM. You can connect to the database and investigate what is going on when you cannot connect to the database because it is hanging on


登录EM 12c后Target -> Database -> 选择指定的数据库 -> Performance -> Real-Time Addm:


进入”Real-Time ADDM”后点选start按钮,第一次使用会出现”Required PL/SQL package not installed. Use the link below to deploy the package. The error message from the server is:Package dbsnmp.prvt_eaddm is not found” 的错误:


使用Real-Time Addm要求预安装dbsnmp.prvt_eaddm包,点选下方的PL/SQL Package Deployment链接,进入Package Deployment页面,选择合适的身份认证,并install。


进入Job Run: DATABASE MANAGEMENT PL/SQL DEPLOYMENT JOB页面等待作业完成。

以测试为目的登录数据库并运行以下消耗CPU的SQL语句(不要用在生产库!):


 select count(1) from obj$,obj$,obj$;


回到”Real-Time ADDM”页面再次点击start , 等待一段时间后会自动stop,如下图:


Real-Time Addm有所发现,这里的Number of finding =1 ,点击Findings 可以看到Prority、Performance Impact、Finding Details等信息:


当出现服务进程hang的情况,例如进程因”enq: TM contention”  队列锁而长久等待,则可以从hang data栏获取hang analysis Final Blocker 和 blocking session的信息, 找出阻塞的源头:


上图中列出了Blocker chains ,一定程度上可以替代hanganalyze dump。

statistics栏给出了实例的一些属性和近期的系统度量system metrics:


Real-Time Addm可以帮助我们快速定位性能和挂起hang问题,而且给出初步的分析,这要比我们使用脚本一步步查来的快捷多了。

快速部署Enterprise Manager Cloud Control 12c(12.1) Agent

<OEL 5上快速部署Enterprise Manager Cloud Control 12c(12.1)>中我介绍了如何安装配置Oracle Enterprise Manager Cloud Control 12c(12.1) Server ,我们知道光有EM Server而不部署Agent是无法发挥其管理特性的。

接下来我们会再次通过实践了解Em 12c(12.1)中部署Agent代理程序的过程,整个过程和10g/11g Grid Control中的Deploy Agent有较大的区别。


这里我们要注意一点,OMS 12c(12.1) 只能和12.1 的Agent 代理程序配合工作,而不能使用之前任何版本的Agent。“Enterprise Manager Cloud Control can communicate only with Oracle Management Agent 12c and not with any other earlier release of the Management Agent. You can not configure your exising Agents to communicate with Enterprise Manager 12c OMS.”


系统和软件包要求


推荐在Oracle Enterprise Linux 5.7或6.1上安装EM 12c的agent , 可以从edelivery.oracle.com 下载到这2款操作系统的安装介质。

以下演示中的主机均采用Oracle Enterprise Linux 5.7 操作系统。

以下表格列出了在Oracle Linux 6或5.x上 安装EM 12c agent ,所要求预装的操作系统软件包,这些软件包可以直接从OS安装DVD介质中找到:


Platform 32-Bit Packages for 32-Bit Platform 64-Bit Packages for 64-Bit Platform
Oracle Linux 6
  • make-3.81
  • binutils-2.17.50.0.6
  • gcc-4.1.1
  • libstdc++ 4.1.1
  • make-3.81
  • binutils-2.17.50.0.6
  • gcc -4.1.1
  • libstdc++ -4.1.1
Oracle Linux 5.xRed Hat Enterprise Linux 5.x
  • make-3.81
  • binutils-2.17.50.0.6
  • gcc-4.1.1
  • libstdc++-4.1.1
Oracle Linux 5.6Red Hat Enterprise Linux 5.6

  • make-3.81
  • binutils-2.17.50.0.6
  • gcc -4.1.1
  • libaio-0.3.106
  • glibc-common-2.3.4
  • libstdc++ -4.1.1
  • setarch-1.6
  • sysstat-5.0.5
  • rng-utils-2

Oracle Linux 5.3 and 5.4

Red Hat Enterprise Linux 5.3 and 5.4

  • make-3.81
  • binutils-2.17.50.0.6
  • gcc -4.1.1
  • libstdc++ -4.1.1


更多关于OS软件要求的信息,可以直接访问EM 安装手册 <Meeting Package, Kernel Parameter, and Library Requirements>章节


准备工作


1. 12c 部署agent 要求在创建必要的credential profile,该credential profile将包含能够从OMS server ssh到目标节点target node的用户身份认证,且要求该用户能够在target node上以sudo执行root用户的权限。

这里我们以oracle用户为例,我们将以目标节点上的oracle用户身份创建credential profile,首先我们要确保oracle用户能够以sudo 执行root用户的权限,这需要用到/etc/sudoers配置文件:


!确保/usr/local/bin/sudo 这个符号链接存在

[root@vrh2 ~]# ln -s /usr/bin/sudo /usr/local/bin/sudo

[root@vrh2 m01]# ls -l /etc/sudoers
-r--r----- 1 root root 3407 Oct 18 19:30 /etc/sudoers

[root@vrh2 m01]# cp /etc/sudoers /etc/sudoers.bak 

打开/etc/sudoers 将以下三处修改

修改前:
Defaults   requiretty

修改后:
Defaults:oracle !requiretty

修改前:
Defaults   !visiblepw

修改后:
Defaults   visiblepw

修改前:
##
## Allow root to run any commands anywhere
root    ALL=(ALL)       ALL

修改后

##
## Allow root to run any commands anywhere
root    ALL=(ALL)       ALL
oracle  ALL=(ALL)       ALL                        --这里加一行

以上三处修改完成后,save 文件 

测试oracle 能否正常sudo 

[root@vrh2 m01]# su  - oracle

[oracle@vrh2 ~]$ ls -l /root
ls: /root: Permission denied

[oracle@vrh2 ~]$ sudo ls -l /root

[sudo] password for oracle:
total 88
-rw------- 1 root root  1832 Aug 11 05:26 anaconda-ks.cfg
drwxr-xr-x 2 root root  4096 Aug 10 21:31 Desktop
-rw-r--r-- 1 root root 56307 Aug 11 05:26 install.log
-rw-r--r-- 1 root root  4136 Aug 11 05:26 install.log.syslog


2. 在目标节点上创建必要的目录 :


[root@vrh2 m01]# mkdir /m01

[root@vrh2 m01]# chown oracle:oinstall /m01


3.  确保OMS server 和target server 间的通信畅通,如没有使用dns 服务 ,那么不要忘记将host/ip 信息写入到/etc/hosts文件中,如果漏掉这部将报target node can not be  reached 错误


正式安装


首先再次以sysman身份登录EM https console,如https://192.168.1.169:7799/em。

点击右上角的setup-> Add Target -> Add Targets Manually


进入Add Targets Manually页面,选择” Add Host Target” ,并点击Add Host …按钮:


在”add Target – Host and Platform “页面使用默认的”session name”即可,点选”+Add”按钮填入主机名和平台信息:

注意这里推荐填入规范的hostname,如”vrh2.oracle.com”, 注意主机名不能带下划线 “_”, 若Platform下拉列表中没有你要的平台那么说明在该平台上还没有12.1 的agent可用。


输入完成后点击Next进入”Add Target –  Installation Details ” 页面,点中deployment details 出现下来菜单选择Fresh Agent install ,并填入installation base directory 等目录信息。


接着在Named confidential 点击蓝色的”+” 图形按钮,会跳出 create new Named confidential 的窗口,填入之前配好的oracle用户的信息:


完成后点击Ok,回到原”Add Target –  Installation Details “界面,确认并点击Next:


进入Review页面,确认信息正确并点击Deploy Agent:


完成后会进入Agent Deployment summary 页面 ,这里存在三个阶段:

  1. Initialization    — 拷贝agent介质到目标服务器
  2. Remote Prerequisite Check   — 检测目标服务器的安装先决条件
  3. Agent Deployment             –具体的Installation Agent 、Secure Agent 和 执行root.sh


若一开始没有正确配置用户的sudo ,则可能在Remote Prerequisite Check阶段出现检测警告,例如下图:


如果一切顺利,以上三个阶段完成后Agent即在运作了:


Agent Deployment 的日志存放在 $OMS_HOME/sysman/prov/agentpush/$date目录下,也可以从EM的网页界面上找到这些日志的具体位置。


之后点击Target -> host可以看到新加入的主机:


之后点击Target -> Database  -> add 添加数据库配置信息:


在host栏填入新增加的目标服务器,并点击continue:


EM 会自动找出目标服务器上已有的数据库, 点击Configure 填入dbsnmp用户的密码后保存并Continue:


之后点击Target -> database 就可以看到新增的数据库了:


点击数据库名 -> 点击Performance -> Performance Home后可以看到新的12c   的性能总览图:


在OEL 5上快速部署Enterprise Manager Cloud Control 12c(12.1)

在OOW 2011期间甲骨文发布了新一代的企业管理器Enterprise Manager Cloud Control 12c,这里我们来介绍如何在Oracle Enterprise Linux 5上快速部署EM 12c和其Agent。


硬件要求

安装Enterprise Manager Cloud Control 12c的硬件要求如下表,推荐至少有4GB内存


Small Medium Large
(1 OMS, <=1000 targets, <100 agents) (2 OMSes for <=10,000 targets and <1000 agents) (> 2 OMSes, >=10,000 targets, >=1000 agents)
CPU Cores/Host 2 4 8
RAM 4 GB 6 GB 8 GB
RAM with ADPFoot 1 , JVMDFoot 2 6GB 10 GB 14 GB
Oracle WebLogic Server JVM Heap SizeFoot 3 512 MB 1 GB 2 GB
Hard Disk Space 7 GB 7 GB 7 GB
Hard Disk Space with ADP, JVMD 10 GB 12 GB 14 GB


Footnote 1 ADP Manager is Application Dependency and Performance

Footnote 2 JVMD is JVM Diagnostics

Footnote 3 Default heap size is 512 MB. For higher heap size, set the size manually.


系统和软件包要求


推荐在Oracle Enterprise Linux 5.7或6.1上安装EM 12c , 可以从edelivery.oracle.com 下载到这2款操作系统的安装介质。

以下演示中的主机均采用Oracle Enterprise Linux 5.7 操作系统。

以下表格列出了在Oracle Linux 6或5.x上 安装EM 12c ,所要求预装的操作系统软件包,这些软件包可以直接从OS安装DVD介质中找到:

Platform 32-Bit Packages for 32-Bit Platform 64-Bit Packages for 64-Bit Platform
Oracle Linux 6
  • make-3.81
  • binutils-2.17.50.0.6
  • gcc-4.1.1
  • libaio-0.3.106
  • glibc-common-2.3.4
  • compat-libstdc++296
  • libstdc++ 4.1.1
  • libstdc++devel 4.1.0
  • sysstat-5.0
  • compat-db 4.1.25
  • make-3.81
  • binutils-2.17.50.0.6
  • gcc -4.1.1
  • libaio-0.3.106
  • glibc-common-2.3.4
  • libstdc++ -4.1.1
  • sysstat-5.0.5

In addition, install the 32-bit version as well as the 64-bit version of glibc-devel-2.5-49.

Oracle Linux 5.xRed Hat Enterprise Linux 5.x
  • make-3.81
  • binutils-2.17.50.0.6
  • gcc-4.1.1
  • libaio-0.3.106
  • glibc-common-2.3.4
  • compat-libstdc++296-2.96
  • libstdc++ 4.1.1
  • libstdc++devel-4.1.0
  • setarch-1.6
  • sysstat-5.0.5
  • compat-db 4.1.25
  • rng_utils-2.0
  • make-3.81
  • binutils-2.17.50.0.6
  • gcc -4.1.1
  • libaio-0.3.106
  • glibc-common-2.3.4
  • libstdc++ -4.1.1
  • setarch-1.6
  • sysstat-5.0.5
  • rng-utils-2.0

In addition, install the 32-bit version as well as the 64-bit version of glibc-devel-2.5-49.


更多关于OS软件要求的信息,可以直接访问EM 安装手册 <Meeting Package, Kernel Parameter, and Library Requirements>章节


准备工作

在正式部署EM 12c 之前我们需要完成一系列的准备工作,包括:

1. 下载EM 12c(12.1) 安装介质

EM 12.1的安装介质可以从Oracle技术网络OTN上找到其下载页面,64位软件的具体下载地址:


介质包括 disk1和disk2 2个接近3GB的zip压缩包,其中em12_linux64_disk1of2.zip包含了主要的EM binary,而em12_linux64_disk2of2.zip包含了为EM扩展的插件,如支持Exadata、IBM DB2的插件等。


2. 在安装EM的Host上创建EM软件的拥有者OS账号

这里我创建oem用户来执行后续的安装操作:


groupadd -g 800 oinstall
useradd -g oinstall oem


3. 解压安装介质

创建存放解压后安装介质的目录并解压上述zip包:


su - oem
[oem@vrh5 tmp]$ mkdir em_cloud
[oem@vrh5 tmp]$ cd em_cloud/

[oem@vrh5 em_cloud]$ unzip ../V28375-01.zip
[oem@vrh5 em_cloud]$ unzip ../V28376-01.zip


4. 在EM主机上安装必要的rpm 软件包以及调整/etc/sysctl.conf中的内核参数,该步骤可以通过oracle-validated工具代劳,详见<Understand Oracle Validated Configurations>


5. 为 EM拥有者用户配置必要的ulimit 参数 , 需要修改/etc/security/limits.conf配置文件,如:

[root@vrh5 ~]# tail -10 /etc/security/limits.conf
#ftp             hard    nproc           0
#@student        -       maxlogins       4

# End of file

oem soft nofile 4096
oem hard nofile 4096


6. 为EM 12c配置合适的repository database以存放数据

这里可以在Metalink上的Certification Matrix中找到EM 12c已认证的数据库版本,如下图所示 11.2.0.2和11.2.0.3 均已通过该认证:


这里推荐新建一个11.2.0.2 版本的数据库作为EM Repository。

此外作为EM Repository的数据库还必须使用EM所要求的初始化参数,这些要求包括:

Check the CBO stats gathering job	Disable the stats gathering job

  1.Check the processes instance parameter value
  The processes instance parameter needs to be set to at least 300.

  2.Check the session_cached_cursors instance parameter value.
  The session_cached_cursors instance parameter should be set to 300.
  Any value between 200 and 500, inclusive, will be accepted.

 3.Check the job_queue_processes instance parameter value.
   The job_queue_processes instance parameter should be set to 20.

 4.Check the shared_pool_size instance parameter value.
   The shared_pool_size instance parameter should be set to
   at least 600 megabytes or roughly one third of the sga_target size.

 5. Check the redo log size.
    The size of the EM database instance should be 300 megabytes or greater.
    Generally, there should be 3 or more redo logs available of this size.

 6. Ensure that the EM tablespace has at least one datafile set to autoextensible
    Add at least one datafile with the autoextend attribute to the EM tablespace

 7.Check the open_cursors instance parameter value.
   The open_cursors instance parameter should be set between 300 and 400, inclusive.

 8.Check the sga_target instance parameter value.
   The sga_target instance parameter should be set to at least 2 gigabytes, and
   roughly twice the size of the pga_aggregate_target setting.

 9.Check for invalid objects in the EM repository
   Compile all invalid objects in the EM repository


可以通过以下命令满足上述的参数要求,当然参数的值还可以适当放大:


  alter system set processes= 500 scope=spfile;
  alter system set session_cached_cursors=500 scope=spfile;
  alter system set shared_pool_size=650M scope=spfile;
  alter system set job_queue_processes=22 scope=spfile;
  alter database add logfile size 320M;
  alter system set open_cursors=350 scope=spfile;
  alter system set sga_target=2g scope=spfile;
  ALTER SYSTEM SET pga_aggregate_target=1G SCOPE=SPFILE;


注意EM 要求 repository database没有配置DB control ,如果有的话需要通过下列命令drop 掉:


export ORACLE_HOME= $YOUR_ORACLE_HOME
export ORACLE_SID= $Repository_SID

$ORACLE_HOME/bin/emca -deconfig dbcontrol db -repos drop


同时要求sysman 和 sysman_mds、 sysman_opss用户不存在,已创建该用户的DB 可以drop 掉:


SQL> select * from v$version;

BANNER
--------------------------------------------------------------------------------
Oracle Database 11g Enterprise Edition Release 11.2.0.2.0 - 64bit Production
PL/SQL Release 11.2.0.2.0 - Production
CORE    11.2.0.2.0      Production
TNS for Linux: Version 11.2.0.2.0 - Production
NLSRTL Version 11.2.0.2.0 - Production

SQL> select * from global_name;

GLOBAL_NAME
--------------------------------------------------------------------------------
www.askmac.cn & www.askmac.cn

drop user sysman cascade;
drop user sysman_mds cascade;
drop user sysman_opss cascade;
drop user sysman_apm cascade;
drop user sysman_ro cascade;
drop user mgmt_view cascade;

@?/rdbms/admin/catsnmp


7. 确保能够从EM 主机顺利登录到 repository 数据库 :


[oem@vrh5 tmp]$ tnsping vrh4:1521/SBDB

TNS Ping Utility for Linux: Version 11.2.0.2.0 - Production on 16-OCT-2011 21:18:24

Copyright (c) 1997, 2010, Oracle.  All rights reserved.

Used parameter files:

Used HOSTNAME adapter to resolve the alias
Attempting to contact (DESCRIPTION=(CONNECT_DATA=(SERVICE_NAME=SBDB))(ADDRESS=(PROTOCOL=TCP)
(HOST=192.168.1.167)(PORT=1521)))
OK (0 msec)

[oem@vrh5 tmp]$ sqlplus  sys/maclean@vrh4:1521/SBDB  as sysdba

SQL*Plus: Release 11.2.0.2.0 Production on Sun Oct 16 21:18:54 2011

Copyright (c) 1982, 2010, Oracle.  All rights reserved.

Connected to:
Oracle Database 11g Enterprise Edition Release 11.2.0.2.0 - 64bit Production
With the Partitioning, OLAP, Data Mining and Real Application Testing options

SQL>


8. 确保网络正常

这里要求EM主机必须使用statics IP 静态IP ,否则安装会出错, 且已正确在/etc/hosts或DNS配置唯一的域名解析


正式安装


我们开始正式通过OUI安装Oracle Enterprise Manager Cloud Control 12c(12.1),这里要用到图形化的界面,确保DISPLAY环境变量正确或者使用Xmanager之类的软件:


(oem)$ unset ORACLE_HOME ORACLE_BASE ORACLE_SID
(oem)$ export DISPLAY=:0
(oem)$ cd /tmp/em_cloud/

注意这里若你的EM Host拥有多个host name ,那么要使用ORACLE_HOSTNAME参数指定规范的host name 

如/etc/hosts 中的信息为: 192.168.1.8 vrh5 vrh5.oracle.com 

那么要选用vrh5.oracle.com 这个hostname 

如果host name 中带"_"符号 可能导致安装失败

(oem)$ ./runInstaller ORACLE_HOSTNAME=vrh5.oracle.com

Starting Oracle Universal Installer…


如下图OUI界面顺利启动,勾销” I wish to receive security update…”,并点击Next:


Prerequisite Checks会检测EM安装的前提条件,这里因为物理内存不足(要求3g)而出现Warning,点击Next忽略该警告


点击Yes,忽略该问题


若检测顺利,则如下图:


下一步选择create a new Enterprise Manager -> Simple ,为Middleware Home location选定一可用的空目录,注意目录的拥有者应为oem(EM 所有者用户)


选择想要安装的插件,这里我们不安装额外的插件,保持默认配置点击Next:


选择暂时不安装Exalogic Elastic Cloud Infrastructure插件, Install Later:


配置Weblogic Server,填入Weblogic和Node Manager密码及OMS instance Base Location:


配置数据库连接信息,填入repository database的连接信息:


输入 sysman用户和Agent注册使用的密码, 安装程序会自动为你提供EM所需创建表空间数据文件的位置:


选择EM 12c将要使用的端口,一般默认即可,除非这些端口有其他用途:


点击 Next后 再点击Install Now进入安装过程:


安装流程包括Copy Files、Configure Plugins Prerequisites Check、Repository Configuration、MDS Schema Configuration、OMS Configuration、Plugins Deployment and Configuration 、 Start Oracle Management Service、 Oracle Configuration Manager Repeater、Agent Configuration Assistant 、Run root scripts,总耗时在1个小时左右。

在此过程中推荐监控安装进程的日志,这些日志的位置如下:

例如:

/m01/midd/oms/sysman/log/schemamanager/m_$date/m_$date.CREATE/em_repos_config.log
/m01/midd/oms/sysman/log/schemamanager/m_$date/m_$date.CREATE/emschema.log
/m01/midd/oms/cfgtoollogs/cfgfw/oracle.sysman.top.oms_*.log
/m01/midd/oms/cfgtoollogs/omsca/*.log

em_repos_config.log记录了em repository的配置日志,在此安装过程中可能遇到如下错误:

INFO: oracle.sysman.top.oms:__________________________DUMPING PARAMETERS
INFO: oracle.sysman.top.oms:OracleHome: /m01/midd/oms
INFO: oracle.sysman.top.oms:Connect String: (DESCRIPTION=(ADDRESS_LIST=(ADDRESS=(PROTOCOL=TCP)
(HOST=vrh4.oracle.com)(PORT=1588)))(CONNECT_DATA=(SID=SBDB)))
INFO: oracle.sysman.top.oms:SYS User: SYS
INFO: oracle.sysman.top.oms:________________________________________________________________________
INFO: oracle.sysman.top.oms:MDS Schema Creation status: RUNNING
SEVERE: oracle.sysman.top.oms:MDS Schema Creation is failed
INFO: oracle.sysman.top.oms:_______________________________________________________________________
INFO: oracle.sysman.top.oms:Starting opss Schema Creation.
INFO: oracle.sysman.top.oms:OPSS Component is already created
INFO: oracle.sysman.top.oms:_______________________________________________________________________
INFO: oracle.sysman.top.oms:Starting APM Schema Creation.
INFO: oracle.sysman.top.oms:APM Component is already created
INFO: oracle.sysman.top.oms:The plug-in MDS Schema Configuration has failed its perform method
INFO: oracle.sysman.top.oms:About to execute plug-in MDS Schema Configuration
INFO: oracle.sysman.top.oms:The plug-in MDS Schema Configuration is running

SEVERE: oracle.sysman.top.oms:MDS Schema Creation is failed 创建失败是由bug引起的


遇到该错误后,手动登录到数据库并执行以下create user命令:


 create user SYSMAN_MDS identified by sysman_mds;

创建该SYSMAN_MDS用户后,回到安装界面并点击retry按钮,安装会继续下去。

OMS和Agent配置过程中的日志如下:

INFO: oracle.sysman.top.oms:The plug-in OMS Configuration is running
INFO: oracle.sysman.top.oms:Internal PlugIn Class: oracle.sysman.oms.OMSConfiguration
INFO: oracle.sysman.top.oms:Classpath = /m01/midd/oms/sysman/jlib/omsConfig.jar:
INFO: oracle.sysman.top.oms:BaseConfiguration:invoke:Starting BaseConfiguration
invoke method on an aggregate=oracle.sysman.top.oms for Action=configuration in step=5:microstep=0
INFO: oracle.sysman.top.oms:Fetcing ports from teh static ports file: /m01/midd/.gcinstall_temp/staticports.ini
INFO: oracle.sysman.top.oms:COMMAND: /m01/midd/oms/bin/omsca NEW -RESPONSE_FILE
/m01/midd/oms/omscarespfile -lock_console -lock_upload -CONFIGURE_REPEATER true -nostart
INFO: oracle.sysman.top.oms:
 Check the OMS Configuration Assistant logs at: /m01/midd/oms/cfgtoollogs/omsca

INFO: oracle.sysman.top.oms:Oracle Enterprise Manager 11g Release 1 Grid Control
INFO: oracle.sysman.top.oms:Copyright (c) 2009, 2010, Oracle. All rights reserved.
INFO: oracle.sysman.top.oms:
INFO: oracle.sysman.top.oms:Enter Admin Server user password:
Enter Admin Server user password:Doing pre requisite checks ......
INFO: oracle.sysman.top.oms:Pre requisite checks completed successfully
INFO: oracle.sysman.top.oms:
INFO: oracle.sysman.top.oms:Doing infrastructure setup ......
INFO: oracle.sysman.top.oms:Infrastructure setup of EM completed successfully.
INFO: oracle.sysman.top.oms:
INFO: oracle.sysman.top.oms:Doing pre deployment operations ......
INFO: oracle.sysman.top.oms:Pre deployment of EM completed successfully.
INFO: oracle.sysman.top.oms:
INFO: oracle.sysman.top.oms:Deploying EM ......
INFO: oracle.sysman.top.oms:Deployment of EM completed successfully.
INFO: oracle.sysman.top.oms:
INFO: oracle.sysman.top.oms:Configuring webtier ......
INFO: oracle.sysman.top.oms:Configuring webTier completed successfully.
INFO: oracle.sysman.top.oms:
INFO: oracle.sysman.top.oms:Securing OMS ......
INFO: oracle.sysman.top.oms:EM Key is secured and is backed up at /m01/midd/oms/sysman/config/emkey.ora
INFO: oracle.sysman.top.oms:Adapter created successfully: emgc_USER
INFO: oracle.sysman.top.oms:Adapter created successfully: emgc_GROUP
INFO: oracle.sysman.top.oms:Post "Deploy and Repos Setup" operations completed successfully.
INFO: oracle.sysman.top.oms:
INFO: oracle.sysman.top.oms:Performing Post deploy operations ....
INFO: oracle.sysman.top.oms:Software Library OMS shared storage is not configured, skipping metadata registration
INFO: oracle.sysman.top.oms:Post deploy operations completed successfully.
INFO: oracle.sysman.top.oms:
INFO: oracle.sysman.top.oms:EM configuration completed successfully.
INFO: oracle.sysman.top.oms:EM URL is:https://vrh5.oracle.com:7799/em
INFO: oracle.sysman.top.oms:
INFO: oracle.sysman.top.oms:/m01/midd/oms/install/ocm/ocmInstance.txt (No such file or directory)
INFO: oracle.sysman.top.oms:Command for doing Self Update registration:
/m01/midd/oms/bin/emctl register oms metadata -service SelfUpdateEntityInstance
-file /m01/midd/oms/install/selfUpdate/agent_software_manifest.xml -core
INFO: oracle.sysman.top.oms:Oracle Enterprise Manager Cloud Control 12c Release 12.1.0.1.0
INFO: oracle.sysman.top.oms:Copyright (c) 1996, 2011 Oracle Corporation.  All rights reserved.
INFO: oracle.sysman.top.oms:SYSMAN password:
SYSMAN password:
Metadata registration successful
INFO: oracle.sysman.top.oms:Agent software entity instance registration to Self Update is successful.
INFO: oracle.sysman.top.oms:
 Check the OMS Configuration Assistant logs at: /m01/midd/oms/cfgtoollogs/omsca

INFO: oracle.sysman.top.oms:The plug-in OMS Configuration has successfully been performed
INFO: oracle.sysman.top.oms:About to execute plug-in Plugins Deployment and Configuration
INFO: oracle.sysman.top.oms:The plug-in Plugins Deployment and Configuration is running
INFO: oracle.sysman.top.oms:Internal PlugIn Class: oracle.sysman.oms.PluginCA
INFO: oracle.sysman.top.oms:Classpath = /m01/midd/oms/sysman/jlib/omsConfig.jar
INFO: oracle.sysman.top.oms:BaseConfiguration:invoke:Starting BaseConfiguration
invoke method on an aggregate=oracle.sysman.top.oms for Action=configuration in step=6:microstep=0
INFO: oracle.sysman.top.oms:Fetcing ports from teh static ports file: /m01/midd/.gcinstall_temp/staticports.ini
INFO: oracle.sysman.top.oms:COMMAND: /m01/midd/oms/bin/pluginca
-oracleHome /m01/midd/oms -middlewareHome /m01/midd -action  deploy
-plugins oracle.sysman.db=12.1.0.1.0,oracle.sysman.xa=12.1.0.1.0,
oracle.sysman.emas=12.1.0.1.0,oracle.sysman.mos=12.1.0.1.0,
INFO: oracle.sysman.top.oms:pluginca - Plugin Configuration Tool
INFO: oracle.sysman.top.oms:Oracle Enterprise Manager 12c Release 1 Grid Control
INFO: oracle.sysman.top.oms:Copyright (c) 1996, 2011 Oracle Corporation. All rights reserved.
INFO: oracle.sysman.top.oms:Log file:
/m01/midd/oms/cfgtoollogs/pluginca/plugin_deployment_2011-10-17_08-10-26/configplugin_deploy_2011-10-17_08-10-26.log
INFO: oracle.sysman.top.oms:Trace file:
/m01/midd/oms/cfgtoollogs/pluginca/plugin_deployment_2011-10-17_08-10-26/configplugin_deploy_2011-10-17_08-10-26.trc
INFO: oracle.sysman.top.oms:Initializing PluginCA.
INFO: oracle.sysman.top.oms:Starting Deployment
INFO: oracle.sysman.top.oms:Invoking pre deploy callbacks.
INFO: oracle.sysman.top.oms:OMS state could be found. It is down
INFO: oracle.sysman.top.oms:Performing Midtier deconfig
INFO: oracle.sysman.top.oms:Performing Midtier config
INFO: oracle.sysman.top.oms:Performing Midtier update oh prop
INFO: oracle.sysman.top.oms:Performing Opss config
INFO: oracle.sysman.top.oms:Performing Post metadata registration
INFO: oracle.sysman.top.oms:Performing Post config module
INFO: oracle.sysman.top.oms:Invoking post deploy callbacks.
INFO: oracle.sysman.top.oms:Completed Deployment
INFO: oracle.sysman.top.oms:Checking file
/m01/midd/oms/sysman/install/undeployed_pluginswith name 12.1.0.1.0_oracle.sysman.vt_2000_0.opar
INFO: oracle.sysman.top.oms:Checking file
/m01/midd/oms/sysman/install/undeployed_pluginswith name 12.1.0.1.0_oracle.em.ssad_2000_0.opar
INFO: oracle.sysman.top.oms:Checking file
/m01/midd/oms/sysman/install/undeployed_pluginswith name 12.1.0.1.0_oracle.sysman.empa_2000_0.opar
INFO: oracle.sysman.top.oms:Checking file
/m01/midd/oms/sysman/install/undeployed_pluginswith name 12.1.0.1.0_oracle.em.sidb_2000_0.opar
INFO: oracle.sysman.top.oms:Checking file
/m01/midd/oms/sysman/install/undeployed_pluginswith name 12.1.0.1.0_oracle.sysman.emct_2000_0.opar
INFO: oracle.sysman.top.oms:Checking file
/m01/midd/oms/sysman/install/undeployed_pluginswith name 12.1.0.1.0_oracle.em.soee_2000_0.opar
INFO: oracle.sysman.top.oms:Checking file
/m01/midd/oms/sysman/install/undeployed_pluginswith name 12.1.0.1.0_oracle.sysman.ssa_2000_0.opar
INFO: oracle.sysman.top.oms:Checking file
/m01/midd/oms/sysman/install/undeployed_pluginswith name 12.1.0.1.0_oracle.sysman.emfa_2000_0.opar
INFO: oracle.sysman.top.oms:The plug-in Plugins Deployment and Configuration has successfully been performed
INFO: oracle.sysman.top.oms:About to execute plug-in Start Oracle Management Service
INFO: oracle.sysman.top.oms:The plug-in Start Oracle Management Service is running
INFO: oracle.sysman.top.oms:Internal PlugIn Class: oracle.sysman.oms.StartOMS
INFO: oracle.sysman.top.oms:Classpath = /m01/midd/oms/sysman/jlib/omsConfig.jar:
INFO: oracle.sysman.top.oms:BaseConfiguration:invoke:Starting BaseConfiguration
invoke method on an aggregate=oracle.sysman.top.oms for Action=configuration in step=9:microstep=0
INFO: oracle.sysman.top.oms:Fetcing ports from teh static ports file:
/m01/midd/.gcinstall_temp/staticports.ini
INFO: oracle.sysman.top.oms:Starting OMS ...
INFO: oracle.sysman.top.oms:Executing command: /m01/midd/oms/bin/emctl start oms
INFO: oracle.sysman.top.oms:Oracle Enterprise Manager Cloud Control 12c Release 12.1.0.1.0
INFO: oracle.sysman.top.oms:Copyright (c) 1996, 2011 Oracle Corporation.  All rights reserved.
INFO: oracle.sysman.top.oms:Starting WebTier...
INFO: oracle.sysman.top.oms:WebTier Successfully Started
INFO: oracle.sysman.top.oms:Starting Oracle Management Server...
INFO: oracle.sysman.top.oms:Oracle Management Server Successfully Started
INFO: oracle.sysman.top.oms:Oracle Management Server is Up
INFO: oracle.sysman.top.oms:Starting of OMS is successful.
INFO: oracle.sysman.top.oms:The plug-in Start Oracle Management Service has successfully been performed


OMS和Agent成功配置和启动后,会要求用户执行allroot.sh脚本


# /home/oem/oraInventory/orainstRoot.sh
Changing permissions of /home/oem/oraInventory
Adding read,write permissions for group,Removing read,write,execute permissions for world.
Changing groupname of /home/oem/oraInventory to oinstall.
The execution of the script is complete

 /m01/midd/oms/allroot.sh 

Starting to execute allroot.sh ......... 

Starting to execute /m01/midd/oms/root.sh ......
Running Oracle 11g root.sh script...

The following environment variables are set as:
    ORACLE_OWNER= oem
    ORACLE_HOME=  /m01/midd/oms

Enter the full pathname of the local bin directory: [/usr/local/bin]: 

   Copying dbhome to /usr/local/bin ...
   Copying oraenv to /usr/local/bin ...

   Copying coraenv to /usr/local/bin ...

Creating /etc/oratab file...

Entries will be added to the /etc/oratab file as needed by
Database Configuration Assistant when a database is created
Finished running generic part of root.sh script.
Now product-specific root actions will be performed.
/etc exist

Creating /etc/oragchomelist file...
/m01/midd/oms
Finished execution of  /m01/midd/oms/root.sh ......

Starting to execute /m01/midd/agent/core/12.1.0.1.0/root.sh ......
Finished product-specific root actions.
/etc exist
Finished execution of  /m01/midd/agent/core/12.1.0.1.0/root.sh ......


打开浏览器,输入地址https://hostname:7799/em(7799默认端口)访问EM Cloud Control 12c,输入sysman的身份认证


Accept License Agreement


首次登陆EM 会显示一个OverView页面:


使用如下命令停止OMS和Agent 服务:


#!/bin/bash
export OMS_HOME=/m01/midd/oms
export AGENT_HOME=/m01/midd/agent/core/12.1.0.1.0

$OMS_HOME/bin/emctl stop oms -all
$AGENT_HOME/bin/emctl stop agent

如
[oem@vrh5 ~]$ $OMS_HOME/bin/emctl stop oms -all
Oracle Enterprise Manager Cloud Control 12c Release 12.1.0.1.0  
Copyright (c) 1996, 2011 Oracle Corporation.  All rights reserved.
Stopping WebTier...
WebTier Successfully Stopped
Stopping Oracle Management Server...
Oracle Management Server Successfully Stopped
AdminServer Successfully Stopped
Oracle Management Server is Down
[oem@vrh5 ~]$ $AGENT_HOME/bin/emctl stop agent
Oracle Enterprise Manager 12c Cloud Control 12.1.0.1.0  
Copyright (c) 1996, 2011 Oracle Corporation.  All rights reserved.
Stopping agent ..... stopped.


使用如下命令启动OMS和Agent 服务:


#!/bin/bash
export OMS_HOME=/m01/midd/oms
export AGENT_HOME=/m01/midd/agent/core/12.1.0.1.0

$OMS_HOME/bin/emctl start oms

$AGENT_HOME/bin/emctl start agent

如
[oem@vrh5 ~]$ $OMS_HOME/bin/emctl start oms
Oracle Enterprise Manager Cloud Control 12c Release 12.1.0.1.0  
Copyright (c) 1996, 2011 Oracle Corporation.  All rights reserved.
Starting WebTier...
WebTier Successfully Started
Starting Oracle Management Server...
Oracle Management Server Successfully Started
Oracle Management Server is Up

[oem@vrh5 ~]$ $AGENT_HOME/bin/emctl start agent
Oracle Enterprise Manager 12c Cloud Control 12.1.0.1.0  
Copyright (c) 1996, 2011 Oracle Corporation.  All rights reserved.
Starting agent ............................. started.

Oracle Database 12c(12.1) Beta已经开始内部测试

据悉Oracle Database 12.1 (12c)这个未来版本的Beta版已经开始在Oracle内部大规模测试,见下图:


12c的官方文档已经在Oracle内部网络可访问,包括Concepts、Reference和SQL Tuning Guide等,但似乎还没有12c 12.1 New Feature的文档。

以下为12.1 12c使用DBUA图形化工具升级数据库的界面,可以看到图形化界面的美学风格和11gR2没有太大的差别。


这些文档在外部尚不能访问,但是12c Release 1 (12.1) Beta的文档主页已经建立:

Enterprise Manager Cloud Control 12.1.0.1 (12c)安装指南

This document describes in detail the Steps for Installing Enterprise Manager Cloud Control in graphical mode. You can also refer to Enterprise Manager 12c Basic Installation Guide on OTN from the following link:
 Oracle Enterprise Manager Cloud Control Basic Installation Guide 12c Release 1 (12.1.0.1)

For installing Enterprise Manager 12c Agents, refer to Document 1360183.1

This document does NOT cover the procedure for Upgrading your existing Enterprise Manager system. To upgrade your system to Enterprise Manager 12c, refer to the following EM 12c Upgrade My Oracle Support notes and OTN documentation:

 Oracle Enterprise Manager Cloud Control Upgrade Guide 12c Release 1 (12.1.0.1)


Oracle 12c coming soon?

Oracle的扛鼎产品Database Software数据库软件12c版本何时会发布?

就这一问题,我们来回顾一下Oracle数据库产品发布的历史年表:

Release Release Date Elapsed Years
Oracle 6 1988
Oracle 7 1992 4
Oracle 8 1997 5
Oracle 8i 1998 1
Oracle 9i 2001 3
Oracle 10g 2004 3
Oracle 11g 2007 3
Oracle 12c Unknown till now 4


到11g为止(Oracle 11g的Beta版本最早在2006年招募内部测试者),Oracle平均每3.6年发布新的一代数据库产品。

根据以往的经验以及一些小道消息(部分来自于Oracle Staff),我们有理由相信在今年(2011)的第三或第四季度Oracle可能会展开对Database 12c的Beta测试,并且会在2012年的第一季度为其下一代的重量级数据库产品Oracle Database 12c揭开序幕!

在2012同期可能发布的重量级产品还有Microsoft微软公司的旗舰产品Windows 8。

如果不出意料的话我们有幸在2012-Dec-21之前体验到以上这2款软件,俗套地说:”神马都是浮云啊!“
Apocalypse2012

Dream features in Oracle Database 12g?

We are wondering some new features from Oracle database 12g in the immediate future:

  1. Oracle database 12g automatic upgrade,do not need human intervention anymore
  2. Oracle database 12g self-organizing Real application cluster, any instance created on any platform can be added into the cluster anytime
  3. Oracle database 12g automatic detected recovery, It can be recovered by itself like terminator!
  4. Oracle database 12g super compression, human don’t need care about compression any more, Oracle will compress data appropriately

to be continued……………

沪ICP备14014813号-2

沪公网安备 31010802001379号