我们在使用Grid Control集中化管理OS、Oracle数据库时要求在host上安装Agent代理程序,以便Agent定期收集OS、Oracle信息传输给Oracle Grid Control Management Server(OMS),并执行OMS下达的一系列指令。
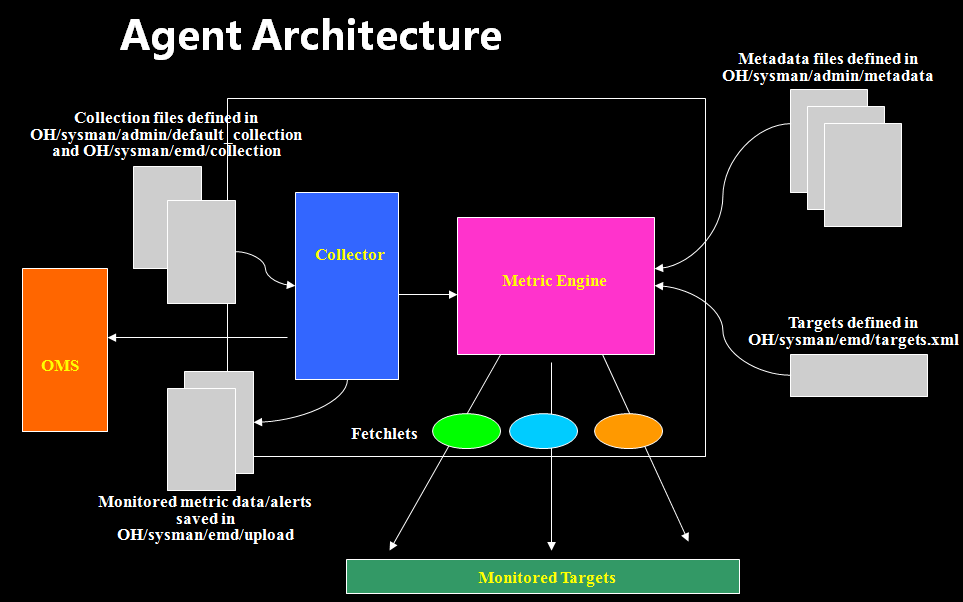
大多数人对于Agent的了解仅限于如何安装和启动agent,下图展示了OMS Agent的架构:
Agent主要由2个组件(component)部分组成,分别是Collector 收集器和 Metric Engine 度量引擎。
Collector收集器是agent的重要子系统。它负责收集并上传metric data度量数据到OMS(oms最终将这些数据存入数据库中)。Collector 利用collection file中的信息判定针对哪些target目标需要收集metric data以及多久收集一次。 为了获取数据,Collector将查询投递给Metric Engine,而Metric Engine负责实际的metric data的收集。 Metric Engine 通过Fetchlets 、Metadata原信息文件(Metadata files defined in OH/sysman/admin/metadata)和 已发现的target 信息文件(Targets defined in OH/sysman/emd/targets.xml)来获得每一个目标的metrics监控信息。 同时 metadata原信息文件也提供了实际如何去计算metrics度量的算法。
基于以上这些信息,Metric Engine 将使用恰当的fetchlets从监控目标获取数据, 这里的 Fetchlets指的是指定数据的访问方式, 例如访问数据库性能数据会采用SQL Fetchlets,而访问OS数据则使用OS Fetchlets。
一旦Collector 收集到metric data,它会将这些度量数据和已定义的阀值做对比,检查是否发送警告(alert waring), 同时将这些度量信息保存到本地文件系统上($OH/sysman/emd/upload目录)。 这些文件最后通过http 或 https 协议 传送到OMS服务器的指定URL上,该URL被$OH/sysman/config/emd.properties 配置文件中的REPOSITORY_URL指定,如以下例子:
[root@nas ~]# cat /w01/wls/agent/core/12.1.0.1.0/stage/sysman/config/emd.properties
#
#   emd Root directory(read-only location). Metrics should not create files
#   under this directory
#
#
emdRoot=/w01/wls/agent/core/12.1.0.1.0

#
#   agent Root directory(writeable).s
#   Use this property to base any temporary file creation.
#
#
agentStateDir=%EMSTATE%

#  perl executable directory
#
perlBin=/w01/wls/agent/core/12.1.0.1.0/perl/bin

#
# script directory
#
scriptsDir=/w01/wls/agent/core/12.1.0.1.0/sysman/admin/scripts

#
# stage directory for provisioning
#
emStageDir=/tmp

#
#  EMD main servlet URL
#
EMD_URL=http://nas:%EM_SERVLET_PORT%/emd/main/

#
#  OMS Upload URL
#
#  if there is no receiving OMS or if you wish to disable the UploadManager
#  please set this value to empty or comment out below line
#
REPOSITORY_URL=https://:4900/empbs/upload/

#
#The following properties are advanced read-only properties
#

#
# The location of the file that contains the root certificate.
#
emdRootCertLoc=/w01/wls/agent/core/12.1.0.1.0/sysman/config/b64LocalCertificate.txt
internetCertLoc=/w01/wls/agent/core/12.1.0.1.0/sysman/config/b64InternetCertificate.txt

#
# The download URL for the EMD Oracle Wallet and its local file location.
#
# Note: Ensure that this URL references a valid port number at which the
# console is available on http
#
emdWalletSrcUrl=https://:4900/em/wallets/emd
emdWalletDest=/w01/wls/agent/core/12.1.0.1.0/sysman/config/server

# JAVA HOME required for agent operations
#
JAVA_HOME=/w01/wls/agent/core/12.1.0.1.0/jdk

#
# This string is used by the agent to determine which algorithm to use for encrypted data
# The string value will be same as the release version
#
agentVersion=12.1.0.1.0

#
# To enable the metric browser, uncomment the following line
# This is a reloadable parameter
#
#_enableMetricBrowser=true

#
# These are the optional Java flags for the agent
#
agentJavaDefines=-Xmx128m

#
#   The agent base directory.
#
agentBaseDir=/w01/wls/agent

#
############################################################################
########################### Modifiable Properties ##########################
############################################################################
#

#
#### Tracing related properties
#

#
# emagent perl tracing levels
# supported levels: DEBUG, INFO, WARN, ERROR
# default level is WARN
#
#
EMAGENT_PERL_TRACE_LEVEL=INFO

# logging properties
Logger.log4j.appender.Rolling=org.apache.log4j.RollingFileAppender
Logger.log4j.appender.Rolling.File=%EMSTATE%/sysman/log/gcagent.log
Logger.log4j.appender.Rolling.Append=true
Logger.log4j.appender.Rolling.MaxFileSize=5000000
Logger.log4j.appender.Rolling.MaxBackupIndex=10
Logger.log4j.appender.Rolling.layout=oracle.sysman.gcagent.util.logging.GCPattern
# FOR NOW add a nother log for errors
Logger.log4j.appender.Errors=org.apache.log4j.RollingFileAppender
Logger.log4j.appender.Errors.File=%EMSTATE%/sysman/log/gcagent_errors.log
Logger.log4j.appender.Errors.Append=true
Logger.log4j.appender.Errors.Threshold=ERROR
Logger.log4j.appender.Errors.layout=oracle.sysman.gcagent.util.logging.GCPattern
Logger.log4j.appender.Errors.MaxFileSize=50000000
Logger.log4j.appender.Errors.MaxBackupIndex=3
# Add a test appender for individual tests
Logger.log4j.appender.Test=org.apache.log4j.FileAppender
Logger.log4j.appender.Test.File=/dev/null
Logger.log4j.appender.Test.Append=true
Logger.log4j.appender.Test.Threshold=DEBUG
Logger.log4j.appender.Test.layout=oracle.sysman.gcagent.util.logging.GCPattern

#
# If you increase the maximum file size for the Mdu and Errors logs, you
# should consider setting _maxFileSizeToCopy to a value that is higher then the
# new number (please note that this will potnetially increase the size of your
# incidents)
#

#
# Set root category priority to INFO and its only appender to Rolling.
Logger.log4j.rootCategory=INFO, Rolling, Errors, Test

#
# Enable HTTPListener (jetty) at INFO level.
# TODO: remove this when true trace is supported
Logger.log4j.category.oracle.sysman.gcagent.comm.agent.http.HTTPListener=INFO

Logger.log4j.appender.stdout=org.apache.log4j.ConsoleAppender
Logger.log4j.appender.stdout.layout=oracle.sysman.gcagent.util.logging.GCPattern

# Set the class loaders to level INFO
Logger.log4j.category.oracle.sysman.gcagent.metadata.impl.ChainedClassLoader=INFO
Logger.log4j.category.oracle.sysman.gcagent.metadata.impl.ReverseDelegationClassLoader=INFO
Logger.log4j.category.oracle.sysman.gcagent.metadata.impl.PluginLibraryClassLoader=INFO
Logger.log4j.category.oracle.sysman.gcagent.metadata.impl.PluginClassLoader=INFO

# Add an appender for MetaData Updates
Logger.log4j.appender.Mdu=org.apache.log4j.RollingFileAppender
Logger.log4j.appender.Mdu.File=%EMSTATE%/sysman/log/gcagent_mdu.log
Logger.log4j.appender.Mdu.Append=true
Logger.log4j.appender.Mdu.Threshold=INFO
Logger.log4j.appender.Mdu.layout=org.apache.log4j.PatternLayout
Logger.log4j.appender.Mdu.layout.ConversionPattern=%d [%t] - %m%n
Logger.log4j.appender.Mdu.MaxFileSize=50000000
Logger.log4j.appender.Mdu.MaxBackupIndex=3

Logger.log4j.category.oracle.sysman.gcagent.dispatch.MetadataUpdater=INFO, Mdu
Logger.log4j.additivity.oracle.sysman.gcagent.dispatch.MetadataUpdater=false

# Turn off QA log by default
Logger.log4j.category.QA=FATAL, QA

#Logger._enableTrace=true

#
#### Scalability related properties
#

#List of ora errors which can be ignored and need not be uploaded to repos
IgnoreDownOraErrors=12541,01033,01034,12505,03134,12170,12500,01219,1089,12560,12514,12528,12545

################################
#
# Put all additional properties here
#
################################

# uncomment for ease of debugging
#MaxThreads=1

# Set the server's graceful shutdown delay.
GracefulShutdownDelay=3

# Dump the dispatcher when overloaded
_dumpDispatcherWhenOverloaded=true

# Whether the EMD should listen on all NICs on the current host (the default)
# or just the NIC associated with the hostname in EMD_URL
AgentListenOnAllNICs=true

# Dump each request
#_dumpEveryDispatcherRequest=true

# Dynamic properties timeout for specific target types
dynamicPropsComputeTimeout_rac_database=180
dynamicPropsComputeTimeout_cluster=180
dynamicPropsComputeTimeout_has=180
dynamicPropsComputeTimeout_oracle_database=180
dynamicPropsComputeTimeout_oc4jjvm=180
dynamicPropsComputeTimeout_microsoft_sqlserver_database=180
dynamicPropsComputeTimeout_host=180
dynamicPropsComputeTimeout_osm_instance=180

_disableLoadDPFromCacheNormal=true

#Enable jobsystem streams tracing
_enableJobSystemStreamsTracing=true

# Allow beacon aplication to have 500 megabytes of space. Primarily for ATS collections.
# 500 * 1024 * 1024 = 524288000
applicationMetadataQuota_BEACON=524288000

#Enable auto tuning out of the box
enableAutoTuning=true
由Collector最终收集到的这些信息文件仅在满足以下任意条件时实际传送给OMS:
1) 有一条alert告警信息需要发送
2) Collector收集到的信息文件的大小超过一个预定值(默认为20MB 20480KB), 该预定限制值由$OH/sysman/config/emd.properties中UploadFileSize参数指定。
3) 从上一次数据加载算起时间超过30分钟(默认),该预订限制值由$OH/sysman/config/emd.properties中UploadInterval 参数指定。
注意与Agent的处理方式不同,由Agent发送给OMS的Alert severities告警信息,OMS会直接将其存入到EM Repository数据库中,而不是以临时文件的形式暂存。
Agent除了Metric Engine和Collector 2个主要模块外, 还有其他子系统负责完成不同的工作:
- Target Manager
- Target Manager holds monitored targets
- Target data in $EM/sysman/emd/targets.xml
- lists managed targets, each with name, type, and other properties
- Credential properties are encrypted
- Targets can be marked broken
- Required properties not provided
- Dynamic properties take too long to compute
- Discovery of new target instances possible by running perl scripts that list unmonitored instances.
- Metric Engine
- Driven by XML target metadata
- one file per target-type, found in $OH/sysman/admin/metadata/*.xml
- defines metrics; each may have multiple columns
- for each metric, defines how data is collected:
- QueryDescriptor : by fetchlet
- PushDescriptor: by recvlet
- ExecutionDescriptor: aggregation from other metrics
- Supports multiple target versions with ValidIf
- Defines properties for target type
- Instance properties: specified in targets.xml
- Dynamic properties: computed by metric engine
- Metric Engine holds target-type metadata
- given a target and a metric name, calls fetchlet manager and/or metric cache and returns a metric result
- Metric Cache caches last-collected data for use in computing expressions
- Aggregate metric support allows metrics to be computed via views, joins and group bys over other metrics
- GetView: select columns or rows from a MetricResult
- GroupBy: compute aggregation information (SUM, COUNT, MIN, MAX)
- Union: add rows returned by multiple MetricResults
- JoinTables: combine multiple metrics’ columns
- Fetchlet Manager
- A fetchlet is a data-access mechanism available to compute metric data
- OS fetchlets : launch an OS process and interpret output
- OS Fetchlet
- OSLine Fetchlet
- OSLineToken
- UDM : User Defined Metric
- SQL fetchlet : run a SQL or PL/SQL statement
- URL fetchlets
- HTTP data
- URLTiming Fetchlet
- and more…
- Collection Manager
- Holds all collections, both default and per-target
- CollectionItem is the basic unit of scheduled collection
- multiple metrics collected from the same target at the same interval can be collected in the same thread (MetricColl)
- Once data is collected for a CollectionItem, any Conditions are evaluated
- three states: Clear, Warning, Critical or Unknown
- last evaluated Condition states are stored in $EM/sysman/emd/state/*
- Collection XML files
- default collections defined for all targets of a type in $OH/sysman/admin/default_collection/*.xml
- additional collections for a particular target in $EM/sysman/emd/collection/*.xml
- specifies, by metric, schedule for collection and thresholds to be applied to columns
- Blackout Manager
- Manage blackout information stored in $EM/sysman/emd/blackouts.xml
- Scheduled collections consult Blackout Manager; if target is currently blacked-out, collection does not proceed
- Targets may be affected by multiple blackouts; if any blackout is effective on a target, the target is blacked-out
- Node blackouts affect all targets monitored by the agent
- Blackouts file :
- blackouts in $EM/sysman/emd/blackouts.xml
- each blackout can be applied to one or more targets; if target is node, blackout applies to all targets
- blackout can be immediate or scheduled; if scheduled, can be one-time or repeated
- Scheduler
- Schedules activities in order of next run time
- multiple schedule formats:
- Once: happens only once
- Interval: happens every n minutes/hours/days
- Week: happens on certain day of week
- Month: happens on certain day of month
- can specify begin time/end time
- Spawns threads to do work whose time has arrived
- Used by Collector and Blackout Manager
- Health Monitor checks that the scheduler is doing its work
- emctl status agent scheduler
- Dumps out all the scheduled elements
- Upload Manager
- As data is collected by other agent components, serializes writing of intermediary .dat files (stored in $AS/sysman/emd/upload)
- .dat files merged into .xml files on five priority channels
- XML files sent to OMS as HTTP requests
- maintains statistics on pending xml files; will disable collections based on number of files, aggregate size of files, and percentage free disk space on upload filesystem
- Upload interval dynamic, based on properties and previous upload status
- Ping Manager
- Periodically, sends HTTP heartbeat request to OMS and verifies response
- OMS response dictates interval before next ping
- Exchange timezone information
- A successful ping from the agent to the OMS is required before any uploads will occur
