Exadata Smart Flash Logging新特性
2011/12/07 by 3 Comments
从Exadata Storage Software 11.2.2.4开始引入了Exadata Smart Flash Logging的新特性,该特性允许LGWR进程将redo同时并行写入flash cache 和 disk controller 中, 只要在flash cache 和 disk controller中有任意一个率先写完成就会通知RDBMS数据库继续工作, 该特性着眼于改善了Exadata对Redo写入的响应时间和吞吐量。(The feature allows redo writes to be written to both flash cache and disk controller cache, with an acknowledgement sent to the RDBMS as soon as either of these writes complete; this improves response times and thoughput.);特别有利于改善log file sync等待事件是主要性能瓶颈的系统。
当频繁写redo重做日志的IO成为Exadata一体机的主要性能瓶颈的时候,Exadata开发部门自然想到了通过DBM上已有的flashcache来减少响应时间的办法。但是又要保证不会因为flashcache的引入而导致redo关键日志信息的丢失:
The main problem that number of writes in redo logs is very high, even there are no activity in database. Therefore Flash Cache disk will reach his write limit very fast – some days or months (I am not see exact test results). In this way you will lost flash cache disk and all data on them. But losing redo logs is very unpleasant case of database unavailability, which can lie in big downtime and possible data loss.
As you already know, 11.2.2.4.0 introduced the Smart Flash Log feature. For customers that are not in 11.2.2.4.0, don’t suggest putting the redo logs on a diskgroup that uses griddisks carved from flashdisks. There are different issues when using redo logs on the flashcache in previous versions and those should be avoided.
只要是安装过Exadata Storage Software 11.2.2.4补丁的系统都会隐式地启用该Exadata Smart Flash Logging特性,但是它同时也要求数据库版本要大于Database 11.2.0.2 Bundle Patch 11。
Metalink目前没有介绍如何在已经启用Exadata Smart Flash Logging的DBM上禁用(disable)该特性。
实际每个cell会分配512MB的flashcache用于Smart Flash Logging,因此现在每个cell的可用flash空间为 364.75Gb 。
不仅局限于Online Redo Log可以受益于Smart Flash Logging,Standby Redo Log 也可以从该特性中得到性能提升,前提是满足必要的软件版本组合cell patch 11.2.2.4 and Database 11.2.0.2 Bundle Patch 11 or greate。
可以通过CellCLI 命令行了解现有的Smart Flash Logging配置,若有输出则说明配置了Smart Flash Logging。
CellCLI> LIST FLASHLOG DETAIL
更多信息可以参考文档”Exadata Smart Flash Logging Explained”,引用如下:
Smart Flash Logging works as follows. When receiving a redo log write request, Exadata will do
parallel writes to the on-disk redo logs as well as a small amount of space reserved in the flash
hardware. When either of these writes has successfully completed the database will be
immediately notified of completion. If the disk drives hosting the logs experience slow response
times, then the Exadata Smart Flash Cache will provide a faster log write response time.
Conversely, if the Exadata Smart Flash Cache is temporarily experiencing slow response times
(e.g., due to wear leveling algorithms), then the disk drive will provide a faster response time.
Given the speed advantage the Exadata flash hardware has over disk drives, log writes should be
written to Exadata Smart Flash Cache, almost all of the time, resulting in very fast redo write
performance. This algorithm will significantly smooth out redo write response times and provide
overall better database performance.

The Exadata Smart Flash Cache is not used as a permanent store for redo data – it is just a
temporary store for the purpose of providing fast redo write response time. The Exadata Smart
Flash Cache is a cache for storing redo data until this data is safely written to disk. The Exadata
Storage Server comes with a substantial amount of flash storage. A small amount is allocated for
database logging and the remainder will be used for caching user data. The best practices and
configuration of redo log sizing, duplexing and mirroring do not change when using Exadata
Smart Flash Logging. Smart Flash Logging handles all crash and recovery scenarios without
requiring any additional or special administrator intervention beyond what would normally be
needed for recovery of the database from redo logs. From an end user perspective, the system
behaves in a completely transparent manner and the user need not be aware that flash is being
used as a temporary store for redo. The only behavioral difference will be consistently low
latencies for redo log writes.

By default, 512 MB of the Exadata flash is allocated to Smart Flash Logging. Relative to the 384
GB of flash in each Exadata cell this is an insignificant investment for a huge performance
benefit. This default allocation will be sufficient for most situations. Statistics are maintained to
indicate the number and frequency of redo writes serviced by flash and those that could not be
serviced, due to, for example, insufficient flash space being allocated for Smart Flash Logging.
For a database with a high redo generation rate, or when many databases are consolidated on to
one Exadata Database Machine, the size of the flash allocated to Smart Flash Logging may need
to be enlarged. In addition, for consolidated deployments, the Exadata I/O Resource Manager
(IORM) has been enhanced to enable or disable Smart Flash Logging for the different databases
running on the Database Machine, reserving flash for the most performance critical databases.
以及<Exadata Smart Flash Cache Features and the Oracle Exadata Database Machine>官方白皮书,公开的文档地址:
[gview file=”http://www.oracle.com/technetwork/database/exadata/exadata-smart-flash-cache-366203.pdf”]
Why ASMLIB and why not?
2011/05/29 by 21 Comments
ASMLIB是一种基于Linux module,专门为Oracle Automatic Storage Management特性设计的内核支持库(kernel support library)。
长久以来我们对ASMLIB的认识并不全面,这里我们来具体了解一下使用ASMLIB的优缺点。
理论上我们可以从ASMLIB API中得到的以下益处:
- 总是使用direct,async IO
- 解决了永久性设备名的问题,即便在重启后设备名已经改变的情况下
- 解决了文件权限、拥有者的问题
- 减少了I/O期间从用户模式到内核模式的上下文切换,从而可能降低cpu使用率
- 减少了文件句柄的使用量
- ASMLIB API提供了传递如I/O优先级等元信息到存储设备的可能
虽然从理论上我们可以从ASMLIB中得到性能收益,但实践过程中这种优势是几乎可以忽略的,没有任何性能报告显示ASMLIB对比Linux上原生态的udev设备管理服务有任何性能上的优势。在Oracle官方论坛上有一篇<ASMLib and Linux block devices>讨论ASMLIB性能收益的帖子,你可以从中看到”asmlib wouldn’t necessarily give you much of an io performance benefit, it’s mainly for ease of management as it will find/discover the right devices for you, the io effect of asmlib is large the same as doing async io to raw devices.”的评论,实际上使用ASMLIB和直接使用裸设备(raw device)在性能上没有什么差别。
ASMLIB可能带来的缺点:
- 对于多路径设备(multipathing)需要在/etc/sysconfig/oracleasm-_dev_oracleasm配置文件中设置ORACLEASM_SCANORDER及ORACLEASM_SCANEXCLUDE,以便ASMLIB能找到正确的设备文件,具体可以参考Metalink Note<How To Setup ASM & ASMLIB On Native Linux Multipath Mapper disks? [ID 602952.1]>
- 因为ASM INSTANCE使用ASMLIB提供的asm disk,所以增加了额外的层面
- 每次Linux Kernel更新,都需要替换新的ASMLIB包
- 增加了因人为错误造成宕机downtime的可能
- 使用ASMLIB意味着要花费更多时间去创建和维护
- 因为ASMLIB的存在,可能引入更多的bug,这是我们最不想看到的
- 使用ASMLIB创建的disk,其disk header并不会和普通的asm disk header有什么不同,仅仅是在头部多出了ASMLIB的属性空间。
结论:
我个人的观点是尽可能不要使用ASMLIB,当然这不是DBA个人所能决定的事情。另一方面这取决于个人习惯,在rhel 4的早期发行版本中没有提供udev这样的设备管理服务,这导致在rhel 4中大量的ASM+RAC组合的系统使用ASMLIB , 经网友指出udev 作为kernel 2.6的新特性被引入,在rhel4的初始版本中就已经加入了udev绑定服务,但是在rhel4时代实际udev的使用并不广泛(In Linux 2.6, a new feature was introduced to simplify device management and hot plug capabilities. This feature is called udev and is a standard package in RHEL4 or Oracle
Enterprise Linux 4 (OEL4) as well as Novell’s SLES9 and SLES10.)。如果是在RHEL/OEL 5中那么你已经有充分的理由利用udev而放弃ASMLIB。
Reference:
ASMLIB Performance vs Udev
RAC+ASM 3 years in production Stories to share
How To Setup ASM & ASMLIB On Native Linux Multipath Mapper disks? [ID 602952.1]
ASMLib and Linux block devices
Raid Level,该如何为Oracle存储选择才好?
2011/05/21 by 2 Comments
Oracle Database中的文件可以分成多种:包括数据文件、联机日志文件、归档日志文件、临时文件及控制文件等。而这些文件在数据库运行时的I/O表现上也存在着巨大的差异:譬如控制文件的IO特点是随机读写多、日志文件和归档日志文件是顺序写、SYSTEM系统表空间总是有大量的随机读写IO、临时表空间和回滚表空间也会有大量随机读写IO。
那么针对以上不同文件的IO特征,我该如何选择合适的Raid Level呢?
著名的Cary Millsap为我们提供了以下图表可作参考:
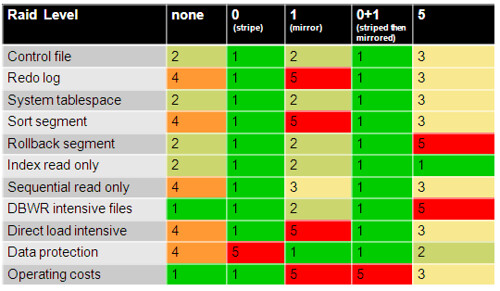
以上1代表最佳,5代表最差
在OLTP环境中Raid 10比Raid 5更为合适,因为Raid 5的每次写出都会引发2次读取操作加上一次实际写出操作,而这2次读取操作可能与其他读取发生冲突。同时大多数情况下Raid 5会配置较小的条带化大小(stripe size),如32k或者64k,因而多块读操作可能需要跨越多个磁盘,这就增长了并行读取争用现象出现的概率。
以下为Oracle中常见IO等待事件的属性列表:
| Wait Event | R/W | SIO/AIO | Single/Multi | Elapsed (with 1000+ waits per hour) |
|---|---|---|---|---|
| control file parallel write | W | AIO | Multi | < 15ms |
| control file sequential read | R | SIO | Single | < 20 ms |
| db file parallel read | R | AIO | Multi | < 20 ms |
| db file scattered read | R | SIO | Multi | < 20 ms |
| db file sequential read | R | SIO | Single | < 20 ms |
| direct path read | R | AIO | Multi | < 20 ms |
| direct path read temp | R | AIO | Multi | < 20 ms |
| direct path write | W | AIO | Multi | < 15 ms |
| direct path write temp | W | AIO | Multi | < 15 ms |
| log file parallel write | W | AIO | Multi | < 15 ms |
| Exadata Related | ||||
| cell smart table scan | R | AIO | Multi | < 1 ms |
| cell single block physical read | R | SIO | Single | < 1 ms |
| cell multiblock physical read | R | SIO | Multi | < 6 ms |
Discover Your Missed ASM Disks
2011/04/25 by 3 Comments
经常有网友在构建10g/11g中ASM存储环境的时候遇到ASM磁盘无法识别的问题,虽然已经为存储设备赋予了适当的权限,也为ASM实例修改了asm_diskstring初始化参数,可是在DBCA的ASM Diskgroup创建页面里就是无法显示候选的ASM Disk磁盘。
实际上因为ASM存储方式比起裸设备或GPFS来说更为黑盒,我们也无法利用ASM instance中的一些动态性能视图或内部视图来排查造成这一问题的原因,使得这类问题显得十分棘手。
下面我来介绍一种使用操作系统调用追踪工具来排查ASM无法找到磁盘问题的方法。
[oracle@vrh1 raw]$ cd /dev/rdsk

/* 演示中我们要用到的三个裸设备位于/dev/rdsk下 */

[oracle@vrh1 rdsk]$ ls
hdisk1  hdisk2  hdisk3

[oracle@vrh1 rdsk]$ sqlplus / as sysdba

SQL> select * from v$version;

BANNER
----------------------------------------------------------------
Oracle Database 10g Enterprise Edition Release 10.2.0.4.0 - Prod
PL/SQL Release 10.2.0.4.0 - Production
CORE    10.2.0.4.0      Production
TNS for Linux: Version 10.2.0.4.0 - Production
NLSRTL Version 10.2.0.4.0 - Production

SQL>  select path from v$asm_disk;
no rows selected

SQL> alter system set asm_diskstring='/dev/rdsk/hdisk*';
System altered.

SQL> select * from v$asm_disk;
no rows selected

/* 以上虽然设置了asm_diskstring参数,ASM instance依然无法在指定路径下找到合适的设备
    这是为什么呢?!
*/

[oracle@vrh1 rdsk]$ ps -ef|grep rbal|grep -v grep
oracle   31375     1  0 15:40 ?        00:00:00 asm_rbal_+ASM1

/* 找出当前ASM实例中的rbal后台进程  */

/* 针对该后台进程做系统调用的trace,一般Linux上使用strace,而Unix上使用truss */

strace -f -o /tmp/asm_rbal.trc -p $OS_PID_OF_RBAL_BGPROCESS
truss  -ef -o /tmp/asm_rbal.trc -p $OS_PID_OF_RBAL_BGPROCESS

[oracle@vrh1 rdsk]$ strace -f -o /tmp/asm_rbal.trc  -p 31375
Process 31375 attached - interrupt to quit

/* 在另外一个终端窗口中打开sqlplus登录ASM实例,执行对v$ASM_DISK或者X$KFDSK的查询 */

SQL> select * from x$kfdsk;

no rows selected

/* 完成以上查询后使用Ctrl+C中断strace命令,并分析生成的system call trace */

/* 因为在不同Unix平台上rbal后台进程可能使用不同的system call function函数以达到相同的目的,
    所以在你的平台上可能并不像在Linux上使用open和access2个关键词搜索就可以得到答案了!     */

[oracle@vrh1 rdsk]$ cat /tmp/asm_rbal.trc |egrep "open|access"
31375 open("/dev/rdsk", O_RDONLY|O_NONBLOCK|O_LARGEFILE|O_DIRECTORY) = 15
31375 access("/dev/rdsk/hdisk3", R_OK|W_OK) = -1 EACCES (Permission denied)
31375 access("/dev/rdsk/hdisk2", R_OK|W_OK) = -1 EACCES (Permission denied)
31375 access("/dev/rdsk/hdisk1", R_OK|W_OK) = -1 EACCES (Permission denied)
可以看到以上系统调用中使用access函数访问候选的hdisk*ASM磁盘设备时出现了”Permission denied”的问题,很显然是因为权限不足导致了ASM实例无法利用这部分的磁盘设备,我们来纠正这一问题后再次尝试:
[root@vrh1 ~]# chown oracle:dba /dev/rdsk/hdisk*

SQL> select path_kfdsk from x$kfdsk;

PATH_KFDSK
--------------------------------------------------------------------------------
/dev/rdsk/hdisk3
/dev/rdsk/hdisk2
/dev/rdsk/hdisk1

SQL> select path from v$asm_disk;

PATH
--------------------------------------------------------------------------------
/dev/rdsk/hdisk3
/dev/rdsk/hdisk1
/dev/rdsk/hdisk2
以上丢失ASM Disk诊断方法的原理是在查询v$asm_disk或者x$kfdsk视图时Oracle会让RBAL这个ASM特别的后台进程去访问asm_diskstring参数指定路径下的所有可用设备,只要我们了解了在访问过程中RBAL遭遇的问题,那么一般来说都可以很简单地予以解决,如果strace/truss也无法给予你任何启示的话,也许你不得不去提交一个SR让Oracle Support来进一步协助你了,当然在正式提交SR之前你有必要再次确认一下你的ASM Disk是否都满足了以下的这些硬指标:
1.合理地设置ASM_DISKSTRING参数,若没有设置ASM_DISKSTRING参数那么ASM实例会尝试到默认的一些路径去搜索磁盘设备,这些默认路径在不同操作系统上略有不同:
| 操作系统 | 默认搜索路径 |
| Solaris | /dev/rdsk/* |
| Windows | \\.\orcldisk* |
| Linux | /dev/raw/* |
| Linux with ASMLIB | ORCL:* |
| Linux with ASMLIB | /dev/oracleasm/disks/* |
| HPUX | /dev/rdsk/* |
| HP-UX(Tru 64) | /dev/rdsk/* |
| AIX | /dev/* |
2.候选磁盘设备应当属于安装ASM的Oracle软件的用户,否则使用chown或卷管理软件修改磁盘拥有者,并保证磁盘被正确加载
3.候选磁盘设备应当设置合理的权限,一般为660,如果存在问题那么可以临时设为770以便测试
4.RAC环境中需要注意所有的磁盘设备应当在所有节点都可见,建议使用cluvfy工具验证
有趣的数字记录方式
2010/09/07 by Leave a Comment
著名的Tanel Poder最近在他的博客上发表了《Which number takes more space in an Oracle row?》;Oracle是如何存储数字类型字段的?如果我们惯性思维的话,存储数字123肯定要比存储数字10000000000000000所占用的空间少吧,事实是这样吗?
SQL> select vsize(123) from dual;
VSIZE(123)
----------
3

SQL> select dump(123,16) from dual;
DUMP(123,16)
--------------------
Typ=2 Len=3: c2,2,18

/* 可以看到Oracle存储数字123需要用到3个字节的空间,其16进程形式为c2,02,18 */

/* 如果是gooooogle(1后面跟n个零)呢?  * /

SQL> select vsize(power(10,38))  from dual;
VSIZE(POWER(10,38))
-------------------
                  2
oracleasm failed to createdisk on raw device
2007/04/25 by Leave a Comment
在测试ASMlib的时候出现了oracleasm无法创建磁盘的错误,具体如下:
[root@vrh1 yum.repos.d]# /etc/init.d/oracleasm configure
Configuring the Oracle ASM library driver.

This will configure the on-boot properties of the Oracle ASM library
driver.  The following questions will determine whether the driver is
loaded on boot and what permissions it will have.  The current values
will be shown in brackets ('[]').  Hitting [ENTER] without typing an
answer will keep that current value.  Ctrl-C will abort.

Default user to own the driver interface []: oracle
Default group to own the driver interface []: oinstall
Start Oracle ASM library driver on boot (y/n) [n]: y
Scan for Oracle ASM disks on boot (y/n) [y]: y
Writing Oracle ASM library driver configuration: done
Initializing the Oracle ASMLib driver:                     [  OK  ]
Scanning the system for Oracle ASMLib disks:
                                                           [  OK  ]

/* configure没有出现错误 */

[root@vrh1 ~]# /etc/init.d/oracleasm createdisk VOL1 /dev/raw/raw3
Marking disk "VOL1" as an ASM disk:                        [FAILED]

/* 之后发现在块设备上创建磁盘就没有问题,想想也是如果用了ASMLIB就没必要再建成裸设备了 */

[root@vrh1 ~]# /etc/init.d/oracleasm createdisk VOL1 /dev/sdb6
Marking disk "VOL1" as an ASM disk:                        [  OK  ]
记以录之!
