
Overview
ParnassusData Recovery Manager (PRM) is an enterprise-level Oracle database recovery tool, which can extract and restore database datafile from Oracle 9i, 10g, 11g, 12c directly without any SQL execution on Oracle database instances. ParnassusData Recovery Manager is a Java-based green software without any installation. Download it, and click to run.
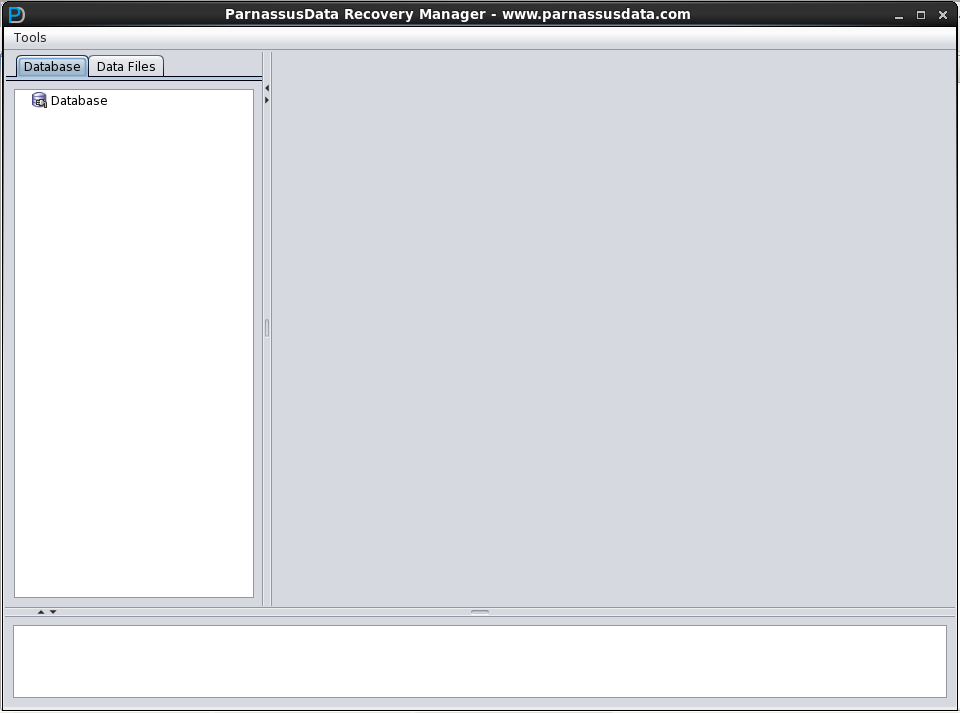
PRM adopts the convenient GUI for any command (as shown in Picture1). There is no need to learn additional scripts or master any skill in Oracle data structure. It is all integrated in Recovery Wizard of the tool.
Download PRM-DUL:
http://parnassusdata.com/sites/default/files/ParnassusData_PRMForOracle_3206.zip
Why PRM is necessary?
Isn’t RMAN enough for ORACLE database recovery? Why do the users need PRM for Oracle recovery? You may ask.
In the growing IT systems within enterprises, database size is expanding geometrically. Oracle DBAs are facing the problems that disks are insufficient for full backup, and tape storages take much more time than usual expectation.
“For Database, backup 1st” is the first lesson for DBAs, however, the fact is that: disk space for backup is not sufficient, new storage device is still on the way, and even the backup does not actually work in the process of data recovery.
In order to solve the above problems, PD Recovery Manager, based on its understanding of the data structure within Oracle DB and core startup process, can not only solve cases such as system tablespace lost without any backup, data dictionary table misoperation, and database unable to be opened caused by inconsistent data dictionary due to power outages, but also restore data from Truncated/Deleted business data tables.
No matter you are a professional DBA or new fish in Oracle world, you can master this user-friendly tool immediately. PRM is easy to install and use. You don’t need to have any deep Oracle knowledge or skills in scripts. All you need to do is to click-by-click and you will finish all recovery processes.
Comparing the traditional recovery tool Oracle DUL, which is an Oracle internal tool and only for Oracle employee usage, PRM can be used by any kind of IT professionals or geeks. It greatly shortens the failure time from database failure to complete data recovery, and cuts down the total cost of enterprise.
There are 2 ways for data recovery by PRM:
By traditional way, data has to be extracted to text file and then inserted to a new DB by SQLLDR tools, which takes double time and occupies double storage size.
Another way that we strongly recommend for you is to use the unique data bridge feature of ParnassusData Recovery Manager. It can extract data from original source database and then insert into new destination database without any inter-media. This is a truly time and storage saver.
Oracle ASM is becoming popular in enterprise database implementation, due to its advantage in high performance, cluster support, and convenient management. However, for many IT professionals, ASM is a black box. Once the data structure of certain Disk Group in ASM is corrupted so that the Disk Group cannot be mounted, which means that all data is locked in ASM. In this circumstance without PRM, only senior Oracle experts can manually patch ASM internal structure, but it is too expensive and time-consuming for normal Oracle users.
PRM now can support two kinds of ASM data recovery:
- Once Disk Group cannot be mounted, PRM can read metadata, and clone ASM file from Disk Group.
- Once Disk Group cannot be mounted, PRM can read ASM file and extract data, which supports both traditional data export and data bridge.
PRM-DUL Software Introduction
ParnassusData Recovery Manager (PRM) was based on Java development, which ensured that PRM can run across platforms. No matter AIX, Solaris, HPUNIX, Red-Hat, Oracle Linux, SUSE, or Window, It can be run smoothly. Whether AIX, Solaris, HPUX and other Unix platforms, Redhat, Oracle Linux, SUSE and other Linux platforms, or Windows can run PRM directly.
OS & Platform that PRM Supports:
| Platform Name | Supported |
| AIX POWER | ü |
| Solaris Sparc | ü |
| Solaris X86 | ü |
| Linux X86 | ü |
| Linux X86-64 | ü |
| HPUX | ü |
| MacOS | ü |
Database Version that PRM Supports:
| ORACLE DATABASE VERSION | Supported |
| Oracle 7 | û |
| Oracle 8 | û |
| Oracle 8i | û |
| Oracle 9i | ü |
| Oracle 10g | ü |
| Oracle 11g | ü |
| Oracle 12c | ü |
Considering some old servers run early OS like AIX 4.3, on which the latest JD cannot be installed. Any platforms that can run JDS 1.4 can run PRM.
In addition, Oracle 10g database is integrated with JDK 1.4, and 11g with JDK 1.5. Therefore, users can run PRM directly without any JDK updates or installation.
For users who needs JDK 1.4, please download from below link:
http://www.oracle.com/technetwork/java/javasebusiness/downloads/java-a rchive-downloads-javase14-419411.html
For less bug and performance purpose, ParnassusData strongly recommend users to use Open JDK on Linux.
Open JDK for Linux download Link:
| Open jdk x86_64 for Linux 5 | http://pan.baidu.com/s/1qWO740O |
| Tzdata-java x86_64 for Linux 5 | http://pan.baidu.com/s/1gdeiF6r |
| Open jdk x86_64 for Linux 6 | http://pan.baidu.com/s/1mg0thXm |
| Open jdk x86_64 for Linux 6 | http://pan.baidu.com/s/1sjQ7vjf |
| Open jdk x86 for Linux 5 | http://pan.baidu.com/s/1kT1Hey7 |
| Tzdata-java x86 for Linux 5 | http://pan.baidu.com/s/1kT9iBAn |
| Open jdk x86 for Linux 6 | http://pan.baidu.com/s/1sjQ7vjf |
| Tzdata-java x86 for Linux 6 | http://pan.baidu.com/s/1kTE8u8n |
JDK on Other platforms download link:
| AIX JAVA SDK 7 | http://pan.baidu.com/s/1i3JvAlv |
| JDK Windows x86 | http://pan.baidu.com/s/1qW38LhM |
| JDK Windows x86-64 | http://pan.baidu.com/s/1qWDcoOk |
| Solaris JDK 7 x86-64bit | http://pan.baidu.com/s/1gdzgSvh |
| Solaris JDK 7 x86-32bit | http://pan.baidu.com/s/1mgjxFlQ |
| Solaris JDK 7 Sparc | http://pan.baidu.com/s/1pJjX3Ft |
The minimum JAVA software environment for PRM is JDK 1.4. Parnassus Data strongly recommends you to run it on JDK 1.6, since JDK 1.4, it has greatly improved performance on JAVA procedure.
Therefore, the recovery speed of PRM under JDK 1.6 is faster than JDK 1.4.
PRM hardware requirement:
| CPU | At least 800 MHZ |
| Memory | At least 512 MB |
| Disk | At least 50 MB |
PRM recommended hardware configuration:
| CPU | 2.0 GHZ |
| Memory | 2 GB |
| Disk | 2 GB |
Languages that PRM Supports:
| Language | Character Set | Encoding |
| Simplified/Traditional Chinese |
ZHS16GBK |
GBK |
| Simplified/Traditional Chinese |
ZHS16DBCS |
CP935 |
| Simplified/Traditional Chinese |
ZHT16BIG5 |
BIG5 |
| Simplified/Traditional Chinese |
ZHT16DBCS |
CP937 |
| Simplified/Traditional Chinese |
ZHT16HKSCS |
CP950 |
| Simplified/Traditional Chinese |
ZHS16CGB231280 |
GB2312 |
| Simplified/Traditional Chinese |
ZHS32GB18030 |
GB18030 |
| Japanese | JA16SJIS | SJIS |
| Japanese | JA16EUC | EUC_JP |
| Japanese | JA16DBCS | CP939 |
| Korean | KO16MSWIN949 | MS649 |
| Korean | KO16KSC5601 | EUC_KR |
| Korean | KO16DBCS | CP933 |
| French | WE8MSWIN1252 | CP1252 |
| French | WE8ISO8859P15 | ISO8859_15 |
| French | WE8PC850 | CP850 |
| French | WE8EBCDIC1148 | CP1148 |
| French | WE8ISO8859P1 | ISO8859_1 |
| French | WE8PC863 | CP863 |
| French | WE8EBCDIC1047 | CP1047 |
| French | WE8EBCDIC1147 | CP1147 |
| Deutsch | WE8MSWIN1252 | CP1252 |
| Deutsch | WE8ISO8859P15 | ISO8859_15 |
| Deutsch | WE8PC850 | CP850 |
| Deutsch | WE8EBCDIC1141 | CP1141 |
| Deutsch | WE8ISO8859P1 | ISO8859_1 |
| Deutsch | WE8EBCDIC1148 | CP1148 |
| Italian | WE8MSWIN1252 | CP1252 |
| Italian | WE8ISO8859P15 | ISO8859_15 |
| Italian | WE8PC850 | CP850 |
| Italian | WE8EBCDIC1144 | CP1144 |
| Thai | TH8TISASCII | CP874 |
| Thai | TH8TISEBCDIC | TIS620 |
| Arabic | AR8MSWIN1256 | CP1256 |
| Arabic | AR8ISO8859P6 | ISO8859_6 |
| Arabic | AR8ADOS720 | CP864 |
| Spanish | WE8MSWIN1252 | CP1252 |
| Spanish | WE8ISO8859P1 | ISO8859_1 |
| Spanish | WE8PC850 | CP850 |
| Spanish | WE8EBCDIC1047 | CP1047 |
| Portuguese | WE8MSWIN1252 | CP1252 |
| Portuguese | WE8ISO8859P1 | ISO8859_1 |
| Portuguese | WE8PC850 | CP850 |
| Portuguese | WE8EBCDIC1047 | CP1047 |
| Portuguese | WE8ISO8859P15 | ISO8859_15 |
| Portuguese | WE8PC860 | CP860 |
Features that PRM supports:
| Features | Supported |
| Cluster Table | YES |
| Inline or out-of-line LOBS, different chunk version and size, LOB partition | YES |
| Heap table, partitioned or non-partitioned | YES |
| Partition and Non-partition | YES |
| Table With chained rows ,migrated rows, intra-block chaining | YES |
| Bigfile Tablespace | YES |
| ASM Automatic Storage Management 10g,11g,12c,diskgroups are dismounted | YES |
| ASM 11g Variable Extent Size | YES |
| IOT, partitioned or non-partitioned | YES(Future) |
| Basic Compressed Heap table | YES(Future) |
| Advanced Compressed Heap Table | NO |
| Exudates HCC Heap Table | NO |
| Encrypted Heap Table | NO |
| Table with Virtual Column | NO |
Attention: for virtual column、11g optimized default column, data export has no problem, but it may lose the corresponding column. These two are new features after 11g with less users.
Data type that PRM supports:
| Data Type | Supported |
| BFILE | No |
| Binary XML | No |
| BINARY_DOUBLE | Yes |
| BINARY_FLOAT | Yes |
| BLOB | Yes |
| CHAR | Yes |
| CLOB and NCLOB | Yes |
| Collections (including VARRAYS and nested tables) | No |
| Date | Yes |
| INTERVAL DAY TO SECOND | Yes |
| INTERVAL YEAR TO MONTH | Yes |
| LOBs stored as SecureFiles | Future |
| LONG | Yes |
| LONG RAW | Yes |
| Multimedia data types (including Spatial, Image, and Oracle Text) | No |
| NCHAR | Yes |
| Number | Yes |
| NVARCHAR2 | Yes |
| RAW | Yes |
| ROWID, UROWID | Yes |
| TIMESTAMP | Yes |
| TIMESTAMP WITH LOCAL TIMEZONE | Yes |
| TIMESTAMP WITH TIMEZONE | Yes |
| User-defined types | No |
| VARCHAR2 and VARCHAR | Yes |
| XMLType stored as CLOB | No |
| XMLType stored as Object Relational | No |
Support for ASM by PRM:
| Function | Supported |
| Directly extract Table data from ASM | YES |
| Directly copy datafile from ASM | YES |
| Repair ASM metadata | YES |
| Draw ASM Structure by GUI | Future |
PRM installation and start-up
It is not necessary to install PRM since it is a Java-based green software. Users simply need to extract the ZIP package and click to RUN.
unzip prm_latest.zip
ParnassusData recommends you to run PRM with command line, from which you can get more diagnostic information.
Starting method under Windows:
- Make sure you have installed JDK correctly and add JAVA to environment variable.
- Double click ‘prm.bat’ under the folder.

prm.bat will start PRM in the background.

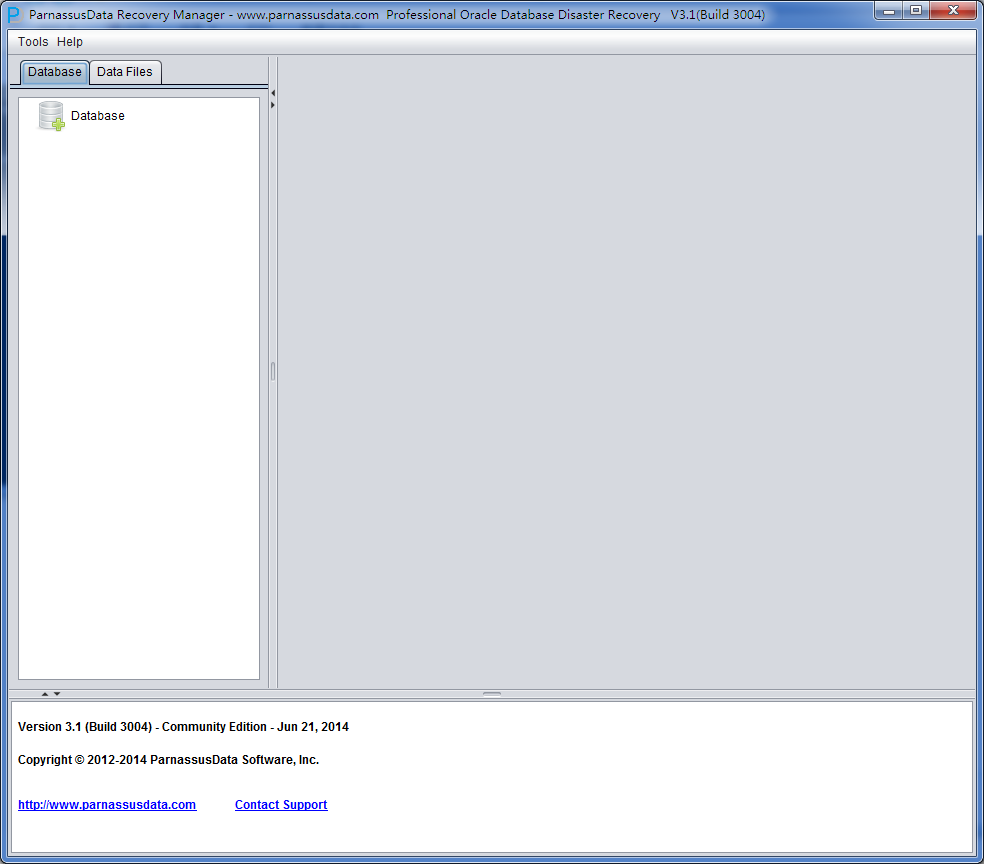
Then, it pops up PRM-DUL main interface:
Linux/Unix:
In Linux/Unix, use X Server for GUI
- Make sure you had installed JDK and add Java to profile
- cd to PRM-DUL folder, and run./PRM-DUL.sh to start the tool
Starting method under Linux/Unix:
Under Linux/Unix, use X Server for GUI
- Make sure you have installed JDK correctly and add Java to environment variable
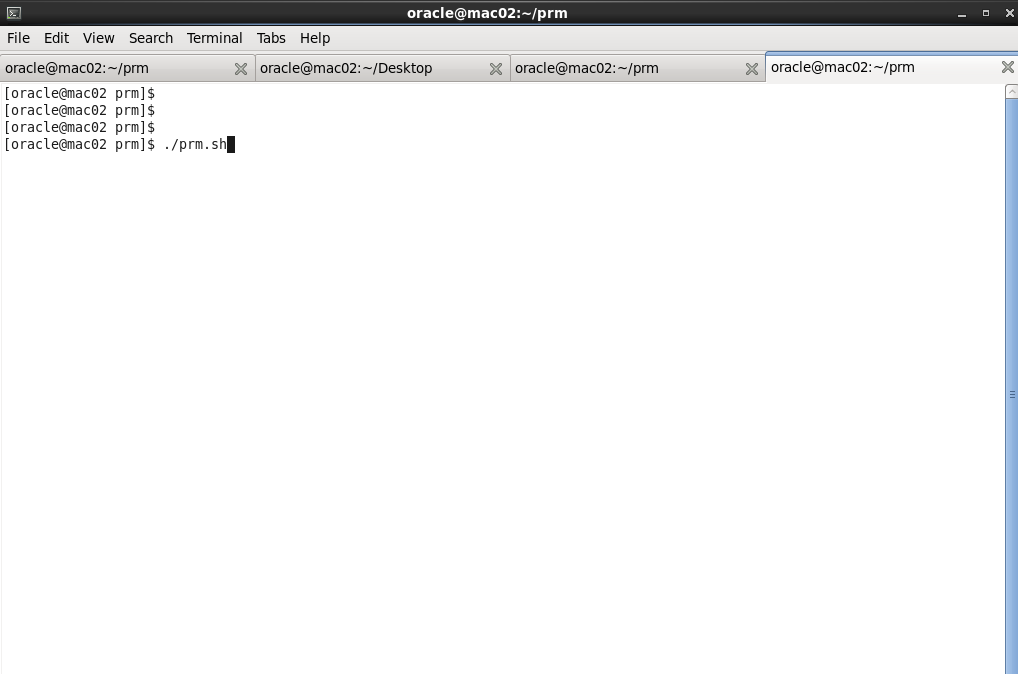
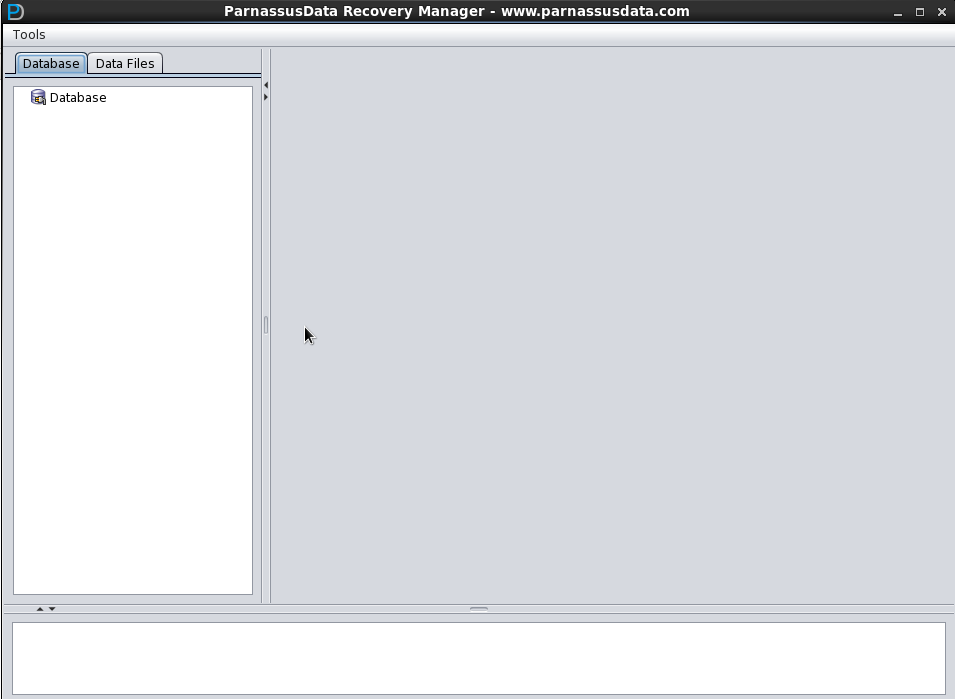
- Cd to the directory of PRM, and run./prm.sh to start the main interface of the program
PRM License Registration
ParnassusData Recovery Manager (PRM) needs license for full use. ParnassusData provide the community version of PRM for user testing and demo. (Community version has no limits on ASM clone, and we will add more free features in it.)
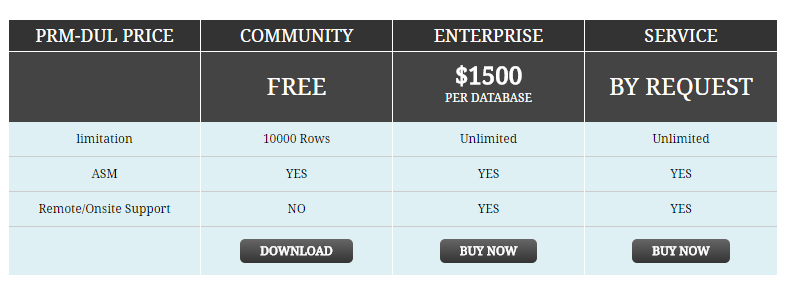
It needs license for full use of PRM. Now, we provide two kinds of license for clients: Standard Edition and Enterprise Edition, and specifications are as follows.
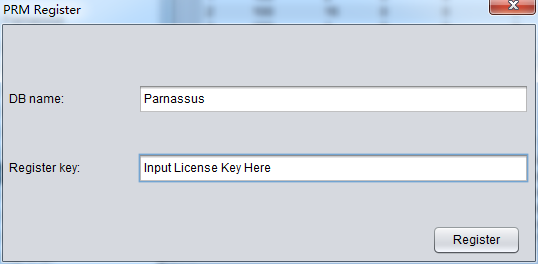
Clients can purchase PRM license from official website: www.parnassusdata.com, and it needs Database name. After your purchasing, you will receive an email which includes a DBNAME and License Key.
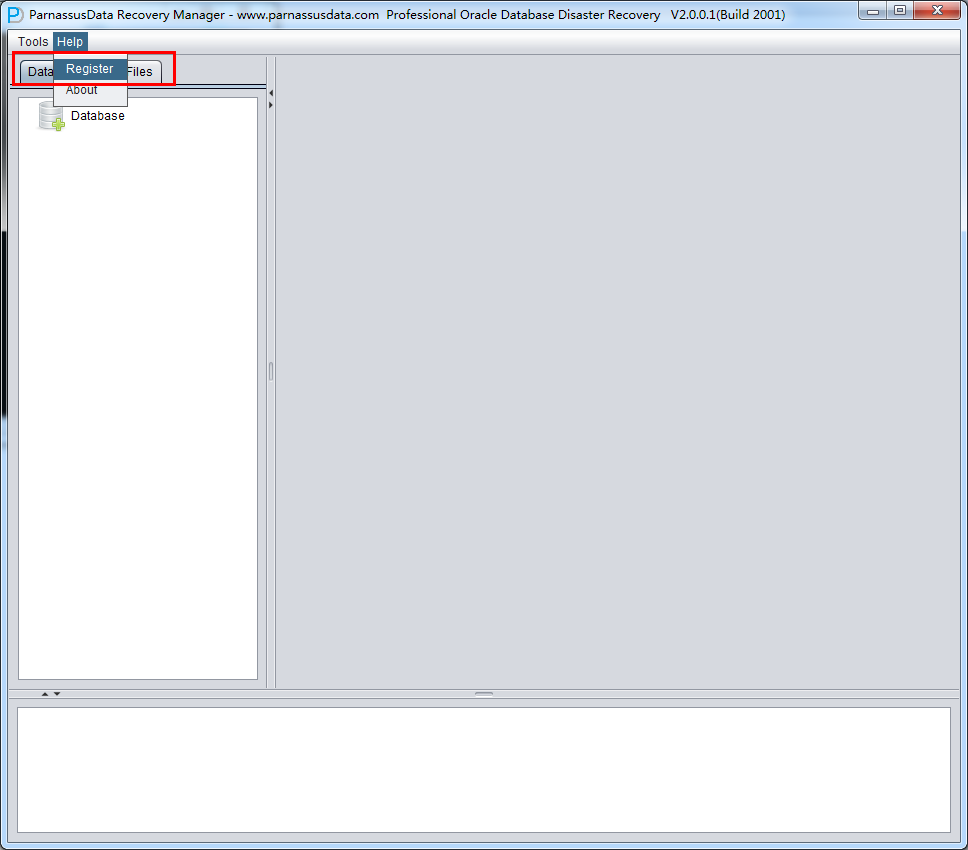
Once you obtain the License Key, please register in the software as below,
- In the Menu, Help => Register
- Input DB NAME and you License Key, then click Register button
After registration, you don’t need to input license key again on your next boot.
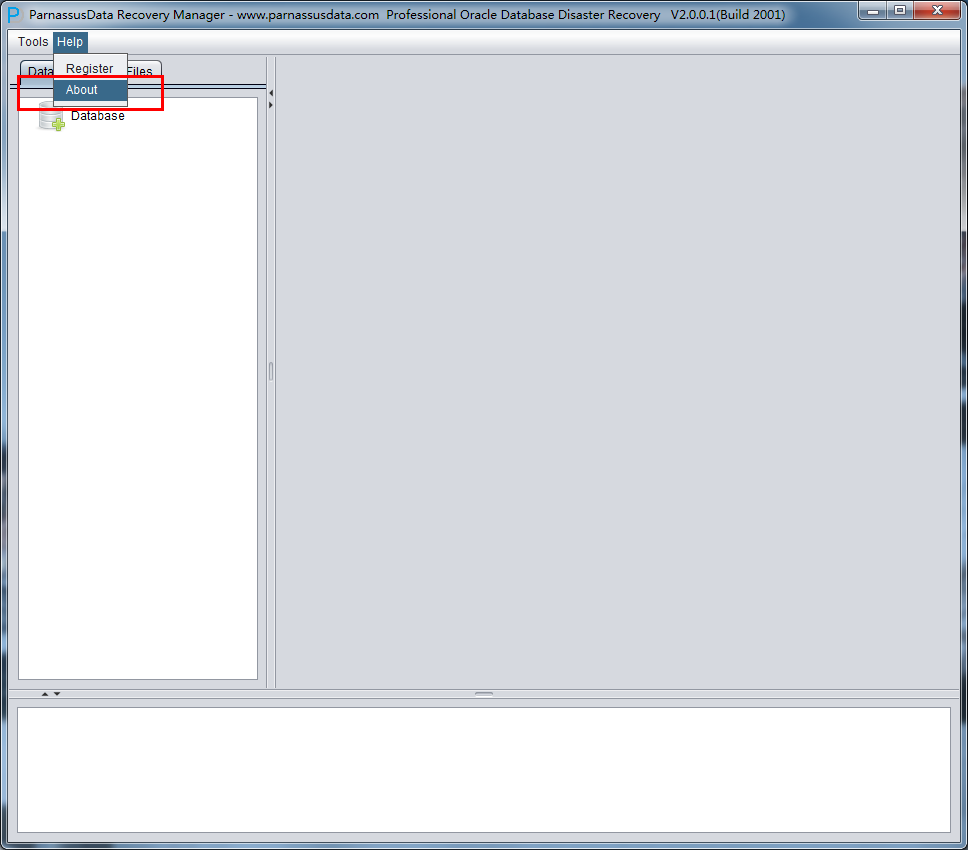
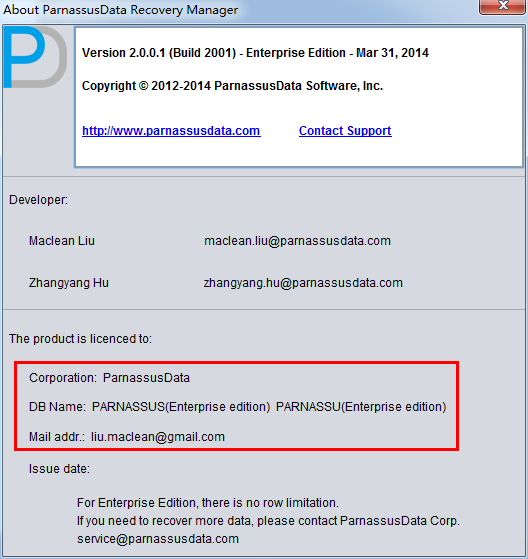
Your registration information can be found in Help=>about
Case Study on Oracle database recovery via PRM
CASE 1: General recovery of truncated table by mistake
User D had truncated all data in a table by mistake due to mistaking test environment library for product database. The DBA tried to recover table from RMAN backup, and accidently the backup is unavailable. Therefore DBA decided to use PRM for rescuing all truncated data.
Since all database system files under the environment are available and healthy, DBA just needs to load SYSTEM tablespace datafile in dictionary mode and datafile in TRUNCATED table. For example:
create table ParnassusData.torderdetail_his1	tablespace	users as select * from parnassusdata.torderdetail_his;


SQL> desc	ParnassusData.TORDERDETAIL_HIS
Name	Null?	Type
----------------------- -------- --------------
SEQ_ID	NOT NULL	NUMBER(10)
SI_STATUS	NUMBER(38)
D_CREATEDATE	CHAR(20)
D_UPDATEDATE	CHAR(20)
B_ISDELETE	CHAR(1)
N_SHOPID	NUMBER(10)
N_ORDERID	NUMBER(10)
C_ORDERCODE	CHAR(20)
N_MEMBERID	NUMBER(10)
N_SKUID	NUMBER(10)
C_PROMOTION	NVARCHAR2(5)
N_AMOUNT	NUMBER(7,2)
N_UNITPRICE	NUMBER(7,2)
N_UNITSELLINGPRICE	NUMBER(7,2)
N_QTY	NUMBER(7,2)
N_QTYFREE	NUMBER(7,2)


N_POINTSGET	NUMBER(7,2)
N_OPERATOR	NUMBER(10)
C_TIMESTAMP	VARCHAR2(20)
H_SEQID	NUMBER(10)
N_RETQTY	NUMBER(7,2)
N_QTYPOS	NUMBER(7,2)


select count(*) from ParnassusData.TORDERDETAIL_HIS;


COUNT(*)
----------
984359


select bytes/1024/1024 from dba_segments where segment_name='TORDERDETAIL_HIS' and owner='PARNASSUSDATA';

BYTES/1024/1024
---------------
189.71875


SQL>  truncate  table ParnassusData.TORDERDETAIL_HIS;


Table truncated.


SQL> select count(*) from ParnassusData.TORDERDETAIL_HIS;

COUNT(*)
----------
0
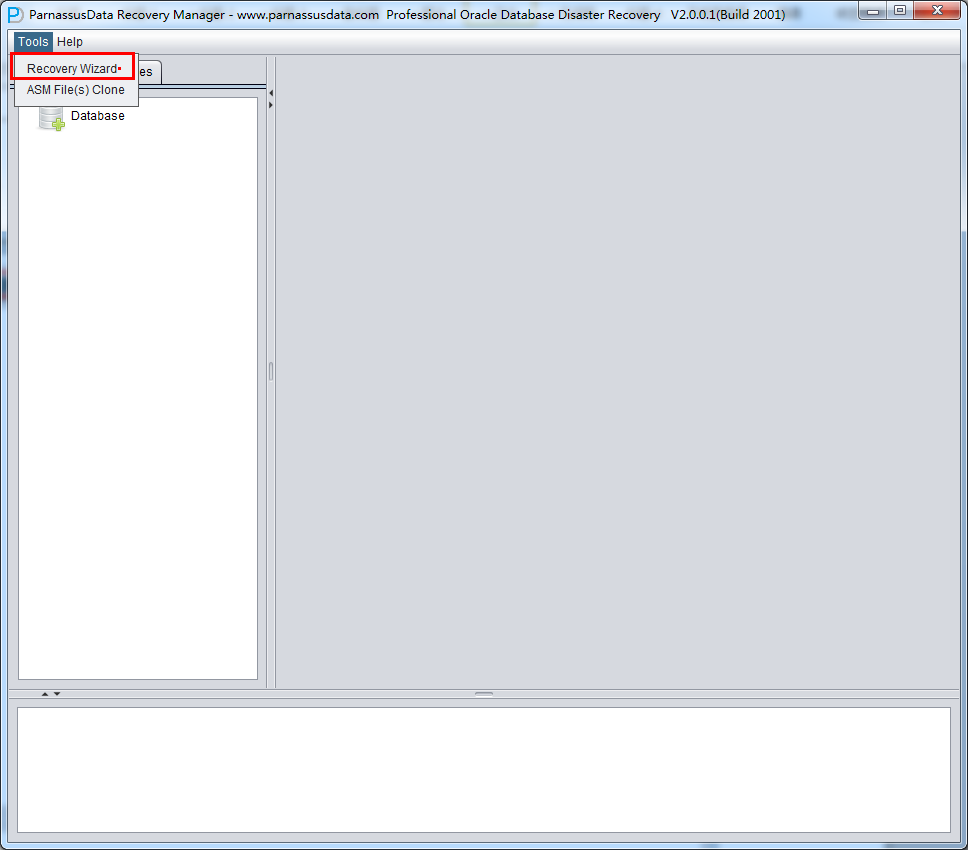
Run PRM, and select Tools =>Recovery Wizard
Click Next
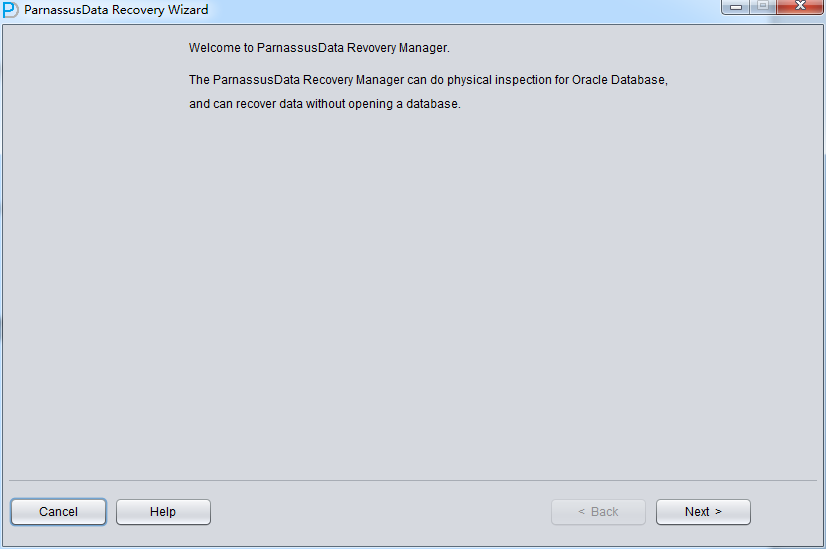
Since client did not use ASM storage in the scenario, just select ‘Dictionary Mode’:

Next, we need to select a few parameters: Endian byte- order and DBNAME.
Oracle datafiles adopt different Endian byte orders on different OS, please choose accordingly:
| Solaris[tm] OE (32-bit) | Big |
| Solaris[tm] OE (64-bit) | Big |
| Microsoft Windows IA (32-bit) | Little |
| Linux IA (32-bit) | Little |
| AIX-Based Systems (64-bit) | Big |
| HP-UX (64-bit) | Big |
| HP Tru64 UNIX | Little |
| HP-UX IA (64-bit) | Big |
| Linux IA (64-bit) | Little |
| HP Open VMS | Little |
| Microsoft Windows IA (64-bit) | Little |
| IBM zSeries Based Linux | Big |
| Linux x86 64-bit | Little |
| Apple Mac OS | Big |
| Microsoft Windows x86 64-bit | Little |
| Solaris Operating System (x86) | Little |
| IBM Power Based Linux | Big |
| HP IA Open VMS | Little |
| Solaris Operating System (x86-64) | Little |
| Apple Mac OS (x86-64) | Little |
In traditional UNIX, AIX (64-bit), UP-UNIX (64-bit), it uses Big Endian byte order.
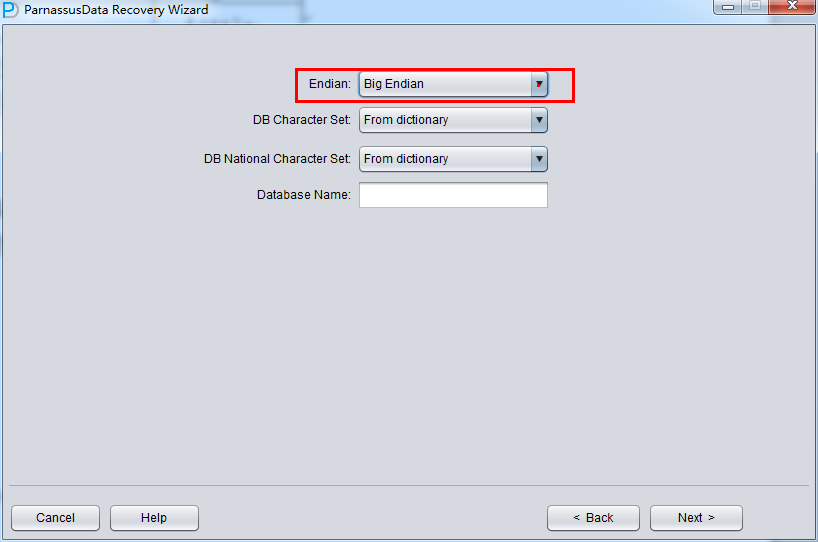
Usually, Linux X86/64, Windows remain the default Little Endian:
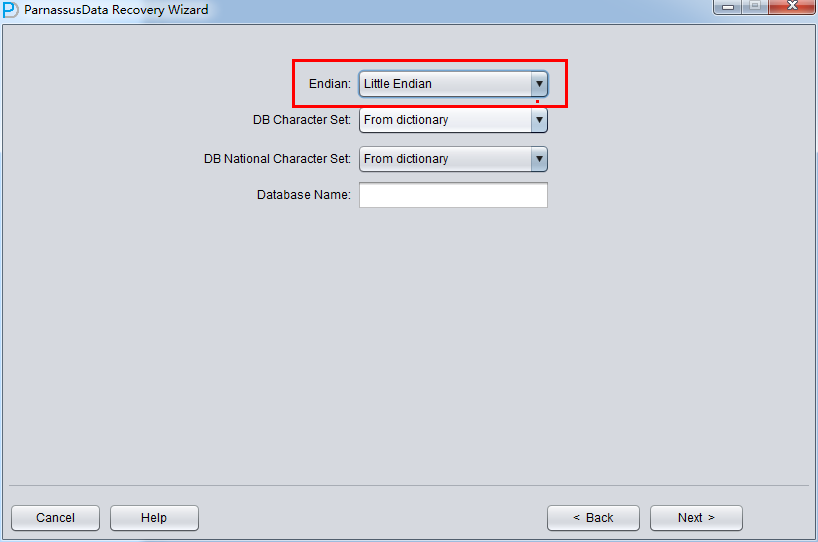
Attention: if your data file was generated on AIX, and you want to copy the datafile to Windows and recover data by PRM, you should select the original Big Endian mode.
Since the data file is on Linux X86, we select Little for Endian, and input the database name.
license key is generated based on DB_NAME found in datafile header)
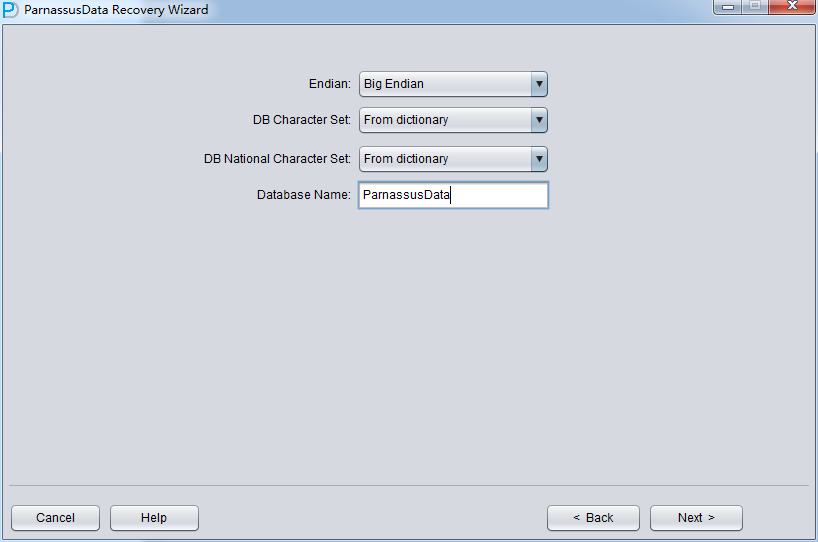
Click “Next” =>Click “Choose Files”
If the database is not too big, you can select all data files together; if the database is very big and DBA knows the data location, you can just select SYSTEM tablespace datafile(necessary) and specified datafile.
Attention: make sure the GUI Supports Ctrl + A & Shift short keys:
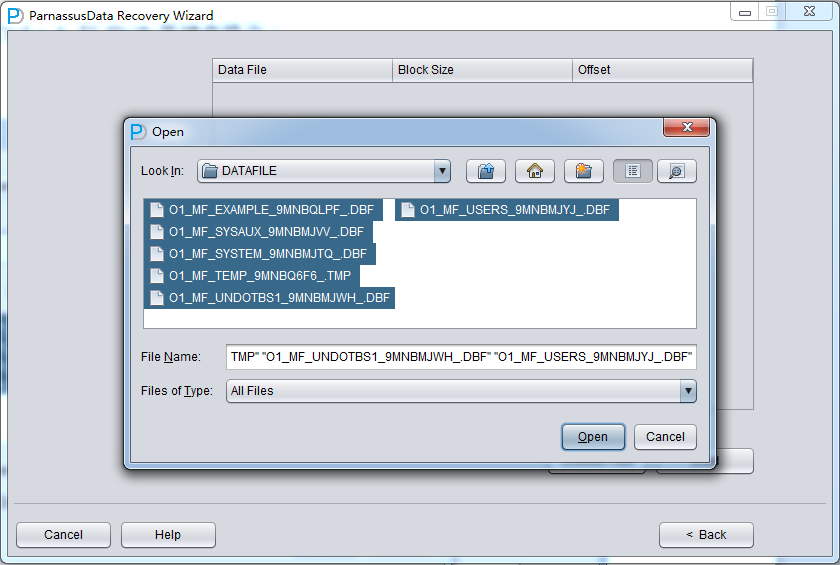
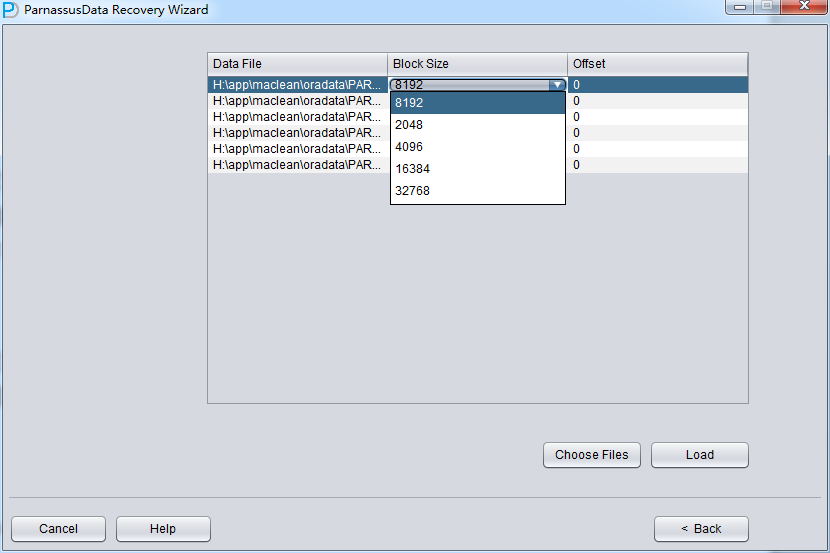
Then specify the Block Size (i.e. Oracle data block size) based on the actual situation. For example, if the default DB_BLOCK_SIZE is 8K, but some tablespace specify 16k as its block size, then users just need to modify the block size for datafile whose block size are not 8k.
OFFSET setting are mainly for raw device storage mode, for example: on AIX, LV based on normal VG as datafile, the offset will be 4k OFFSET.
If you are using raw device but don’t know what the OFFSET is, you can use dbfsize tool under $ORACLE_HOME/bin to check, as shown in the picture below.
$dbfsize /dev/lv_control_01
Database file: /dev/lv_control_01
Database file type: raw device without 4K starting offset Database file size: 334 16384 byte blocks
Since the block size of all data file here is 8K and there is no OFFSET, please click Load:
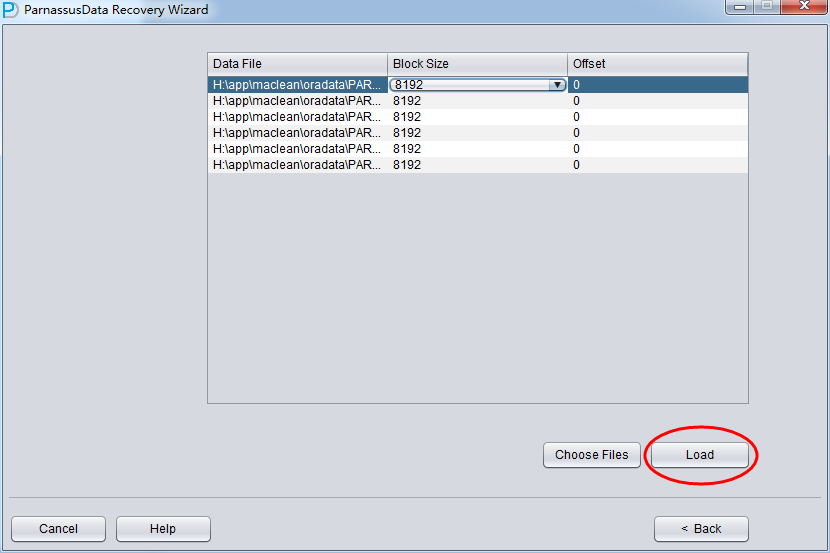
During Load phase, PRM read Oracle data dictionary directly from system tablespace, and recreate a new data dictionary in embedded database, which enables PRM to process all kinds of data in Oracle DB.
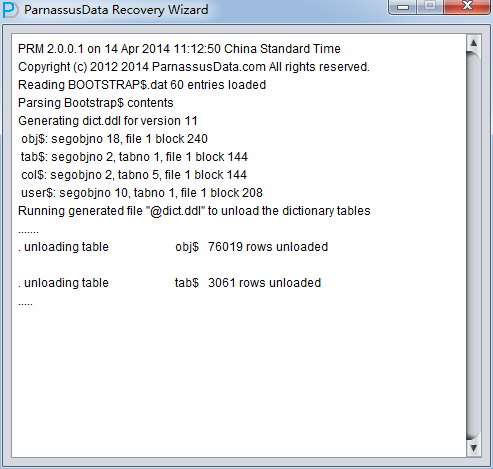
After loading, information such as the database character set and the national character set will be output in the background:
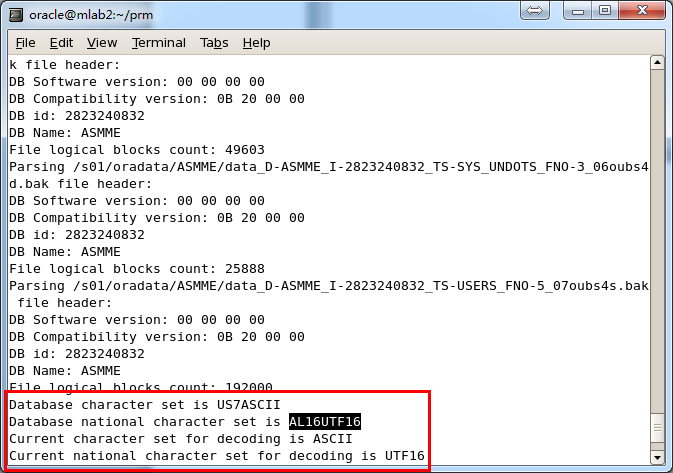
Attention: PRM supports multiple languages and multiple character set of Oracle DB. However,
the prerequisite is the OS have installed specified language packages. For example, if you didn’t install Chinese language package on Windows, and Oracle database character set are independent and support ZHS16GBK, PRM would display Chinese as messy code. Once the Chinese language package is installed on OS, PRM can display multi-byte character set properly.
Similarly, it needs to install font-Chinese language package on Linux.
[oracle@mlab2 log]$ rpm -qa|grep chinese
fonts-chinese-3.02-12.el5
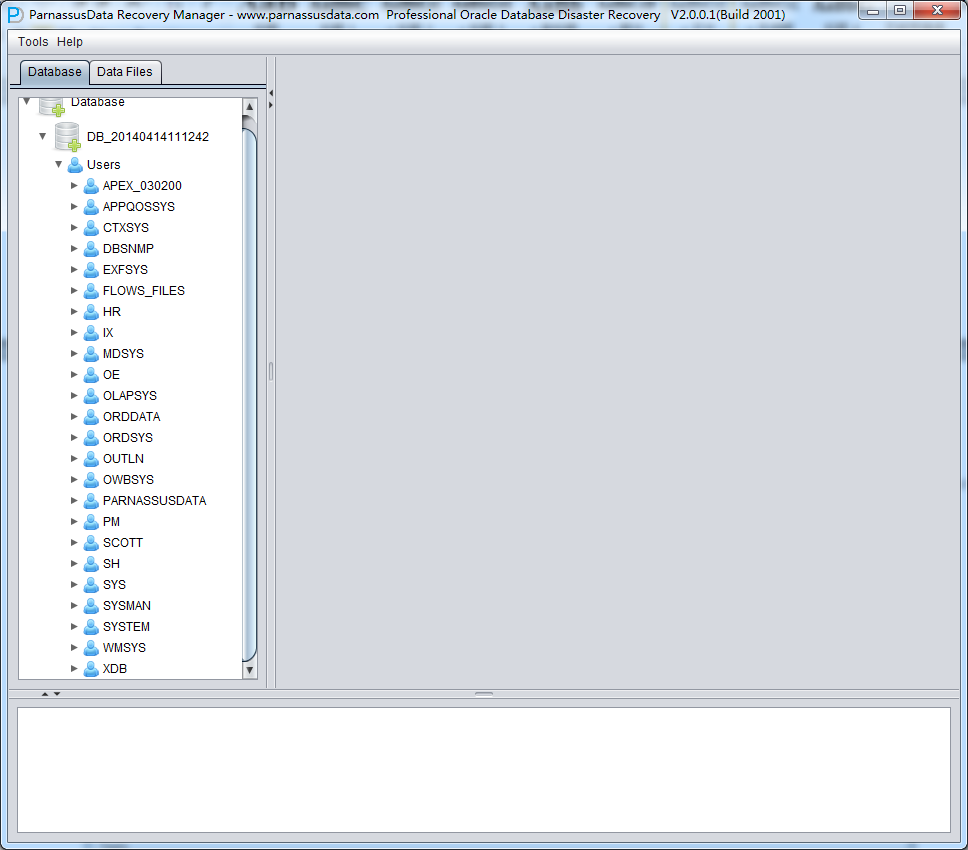
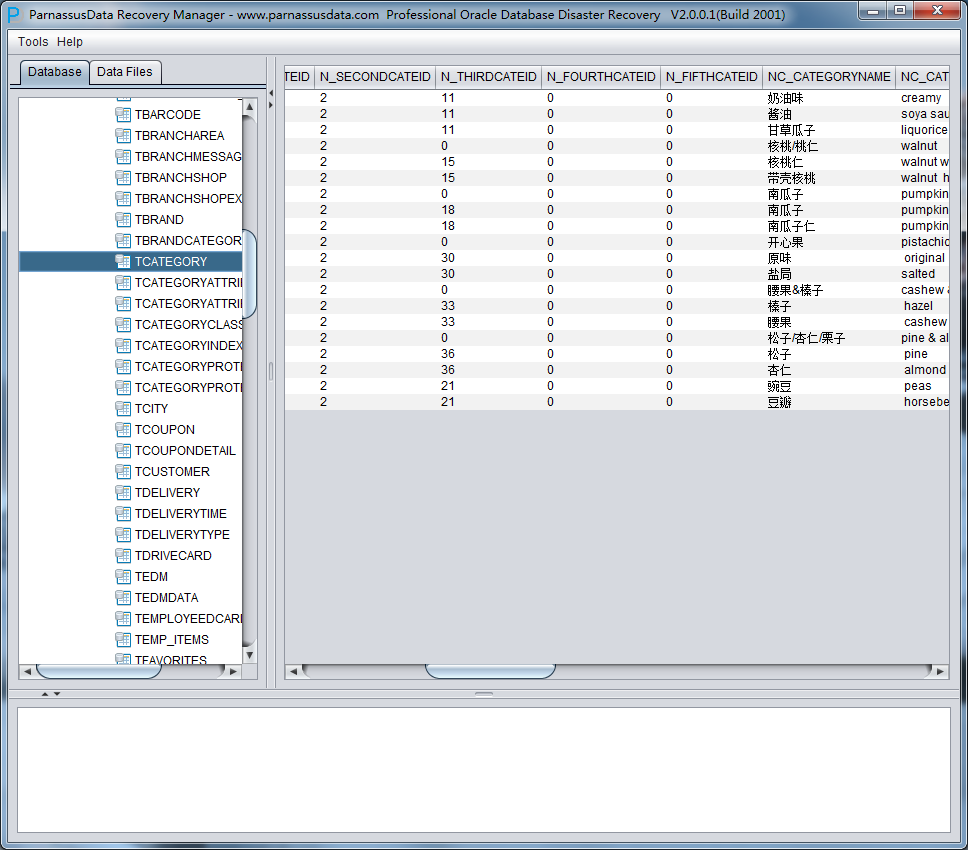
After loading, on the left side of PRM GUI, it will display a tree diagram grouped by database users.
Click Users, you can find more users. For example, if users want to recover a table under PARNASSUSDATA SCHEMA, click PARNASSUSDATA and double click the table name:
The TORDERDETAIL_HIS table has been truncated before, so it won’t show any data.
Now right-click and select Unload truncated data on the table:
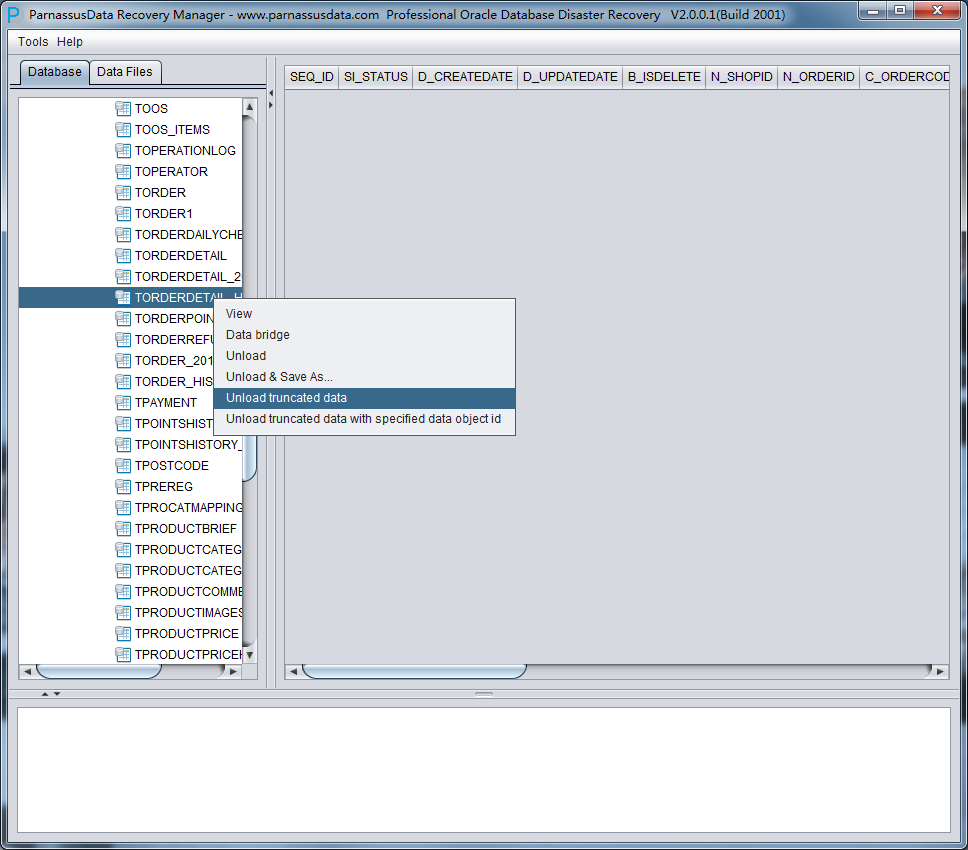
PRM will scan the tablespace and extract data from truncated table.

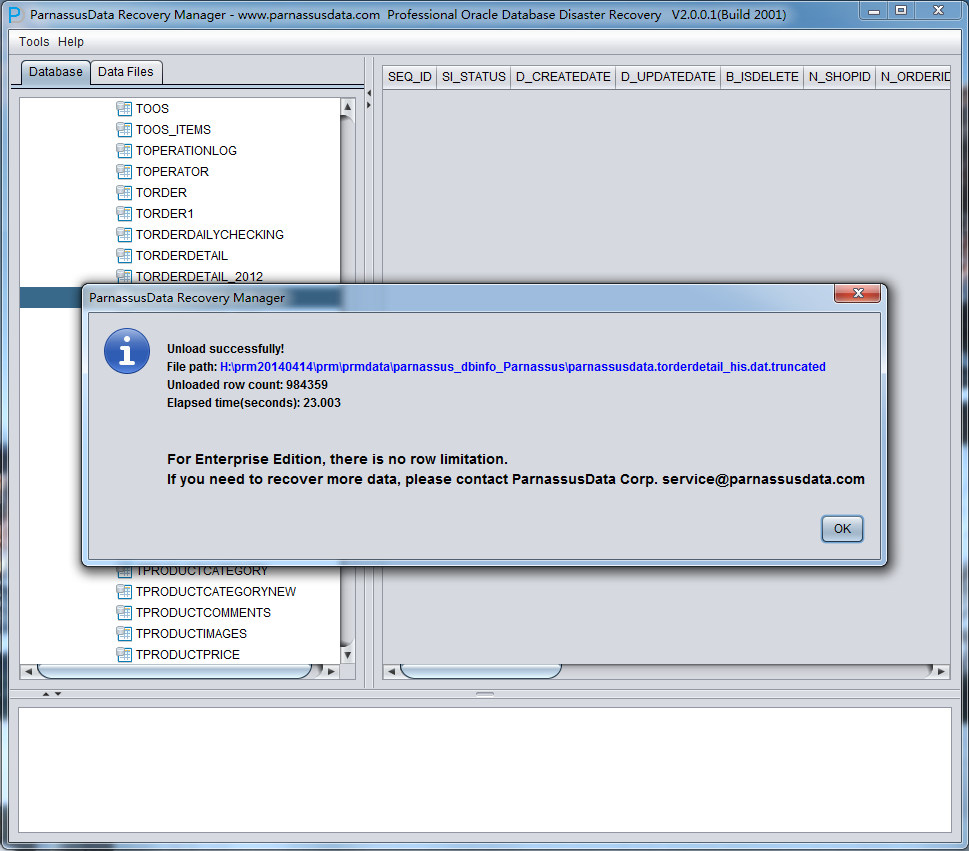
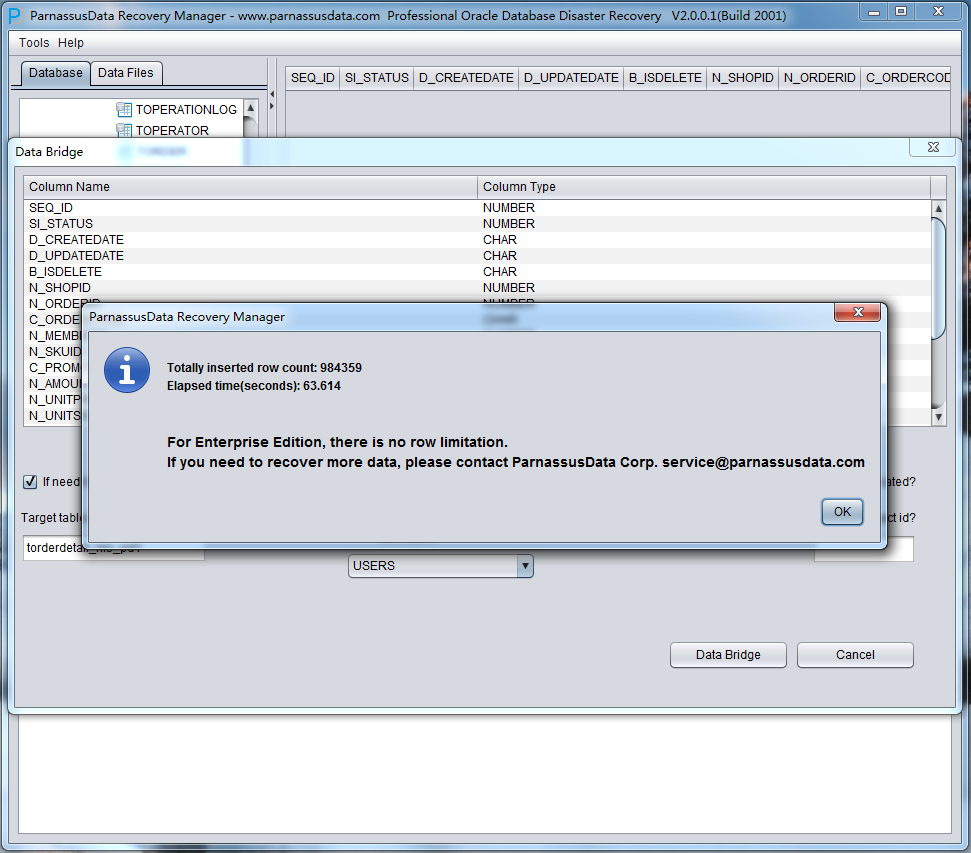
As shown in the above picture, 984359 record have been exported from the truncated TORDERDETAIL_HIS, and stored under the specified path.
In addition, it generated SQLLDR control file for text data importing.
| $ cd /home/oracle/PRM-DUL/PRM-DULdata/parnassus_dbinfo_PARNASSUSDATA/$ ls -l ParnassusData*-rw-r–r– 1 oracle oinstall 495 Jan 18 08:31 ParnassusData.torderdetail_his.ctl-rw-r–r– 1 oracle oinstall 191164826 Jan 18 08:32 ParnassusData.torderdetail_his.dat.truncated
$ cat ParnassusData.torderdetail_his.ctl LOAD DATA INFILE ‘ParnassusData.torderdetail_his.dat.truncated’ APPEND INTO TABLE ParnassusData.torderdetail_his FIELDS TERMINATED BY ‘ ‘ OPTIONALLY ENCLOSED BY ‘”‘ TRAILING NULLCOLS ( “SEQ_ID” , “SI_STATUS” , “D_CREATEDATE” , “D_UPDATEDATE” , “B_ISDELETE” , “N_SHOPID” , “N_ORDERID” , “C_ORDERCODE” , “N_MEMBERID” , “N_SKUID” , “C_PROMOTION” , “N_AMOUNT” , “N_UNITPRICE” , “N_UNITSELLINGPRICE” , “N_QTY” , “N_QTYFREE” , “N_POINTSGET” , “N_OPERATOR” , “C_TIMESTAMP” , “H_SEQID” , “N_RETQTY” , “N_QTYPOS” ) |
When you import data to original table, ParnassusData strongly recommends you to modify the SQLLDR table name as a temporary table, thus it would not overwrite the original environment.
| $ sqlldr control=ParnassusData.torderdetail_his.ctl direct=yUsername:/ as sysdba//user SQLLDR to import data//Minus can be used for data comparing
select * from ParnassusData.torderdetail_his minus select * from parnassus.torderdetail_his;
no rows selected |
After comparing the tested truncate case table with original data table, it is found that the records are exactly the same.
It demonstrates that PRM has successfully and completely recovered the record on truncated table.
CASE 2: Recovery of MIS-truncated table by DataBridge
In Case 1, we used traditional unload+sqlldr method for data recovery, but in fact ParnassusData strongly recommend you to use DataBridge Feature for recovery.
Why use DataBridge?
- Traditional unload+sqlldr method means that a copy of data needs to be saved as flat file on file system first, the data has to be loaded into Unicode text file and then inserted into destination database by sqlldr, which will take double storage space and double
- DataBridge can extract data from source DB and export to destination DB without any
- The data sent to destination DB by databridge is structured, users can immediately use SQL statement to verify its integrity and consistency.
- If the source and destination database locate on different servers, the read/write IO will be balanced on two servers, and MTTR will be
- If DataBridge is used in truncated table recovery, it is very convenient for the truncated data to be exported back to problem database
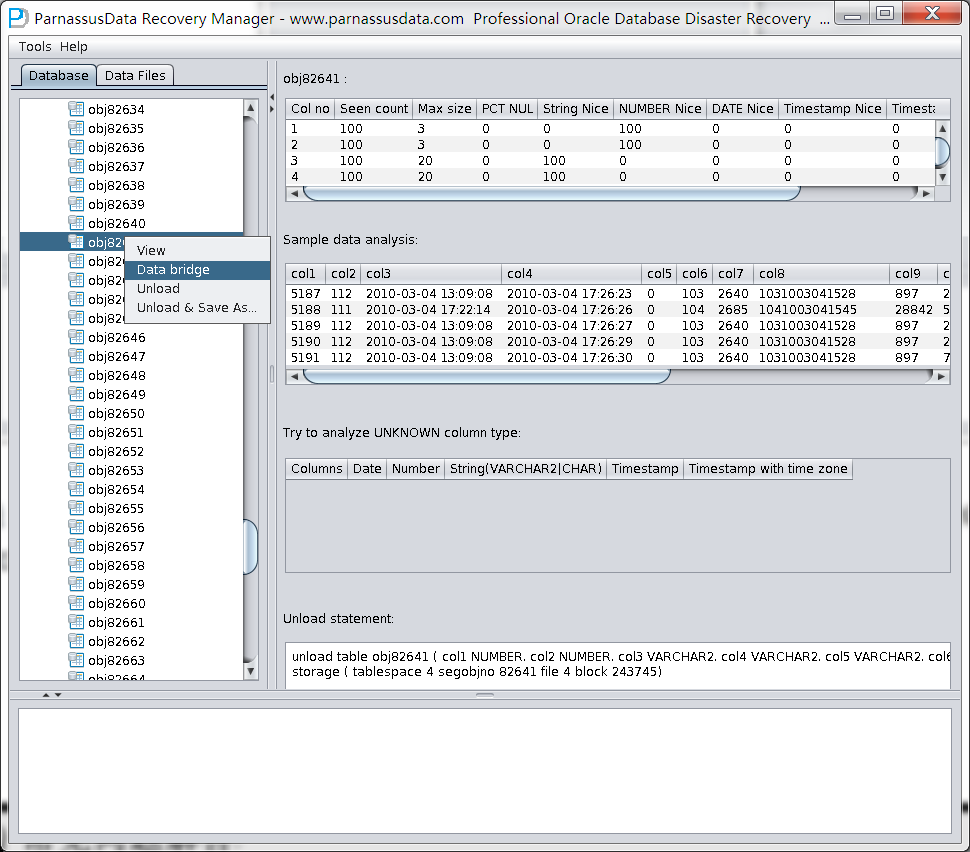
DataBridge is very easy and convenient to use. Right click the table on the left side, and select DataBridge:
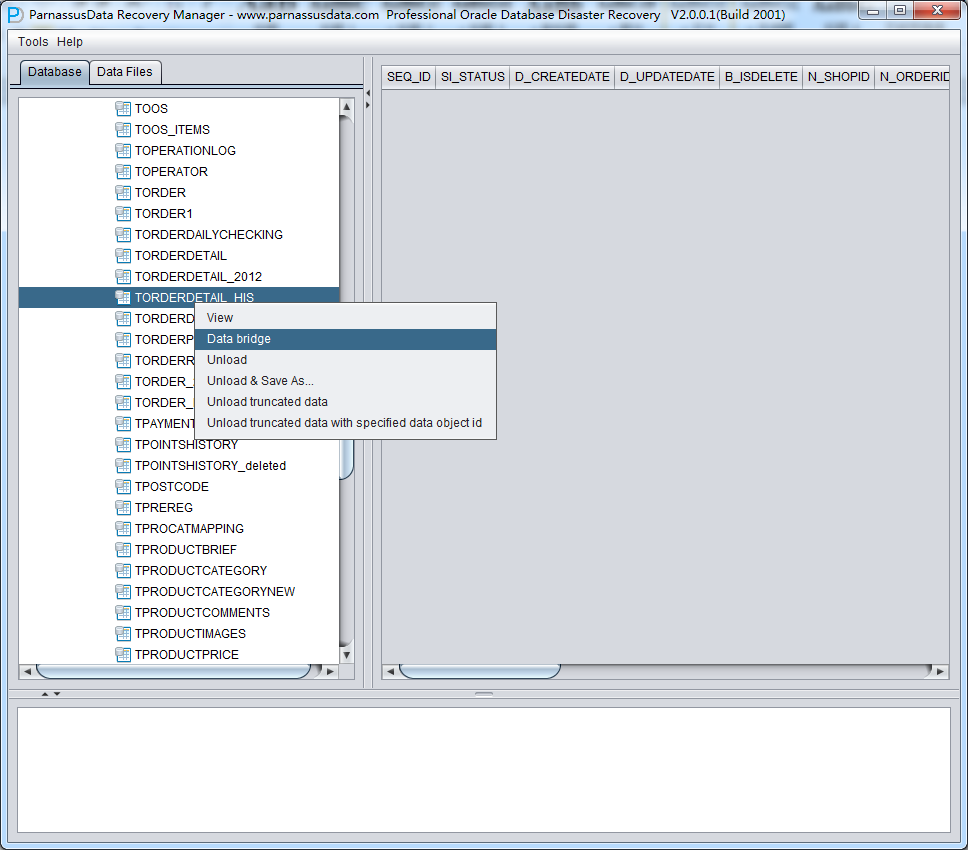
For the first time to use DataBridge, DB connection information is necessary, which is similar with SQL Developer connection, including DB host, Port, Service_Name and user login information.
Attention: DataBridge will save data to the specified schema given in the DB connection.
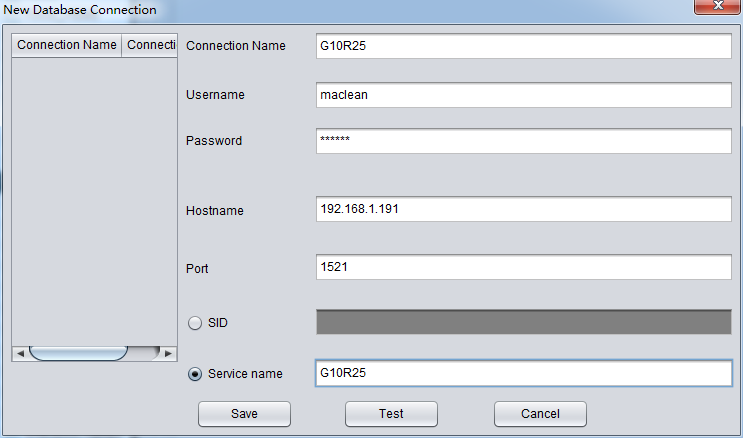
For example, the above G10R25 connection, the user is maclean, and the corresponding Oracle Easy Connection is
192.168.1.191:1521/G10R25.
After inputting the account/connection information, you can use the Test button for connection testing. If the message “Connect to DB server successfully “is returned, the connection is done and click to save.
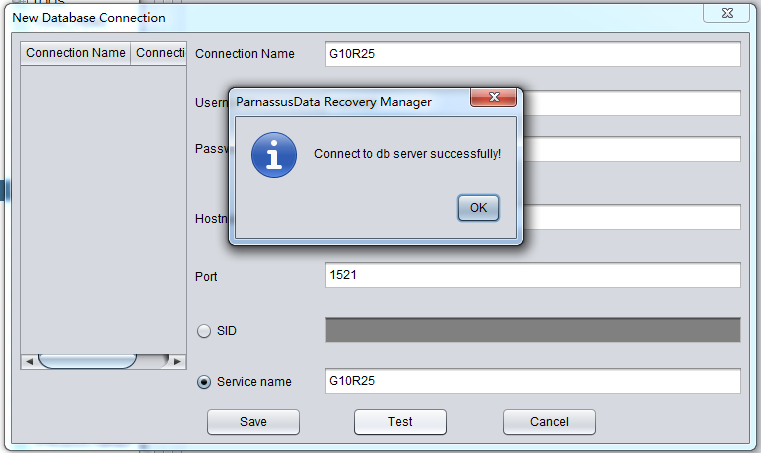
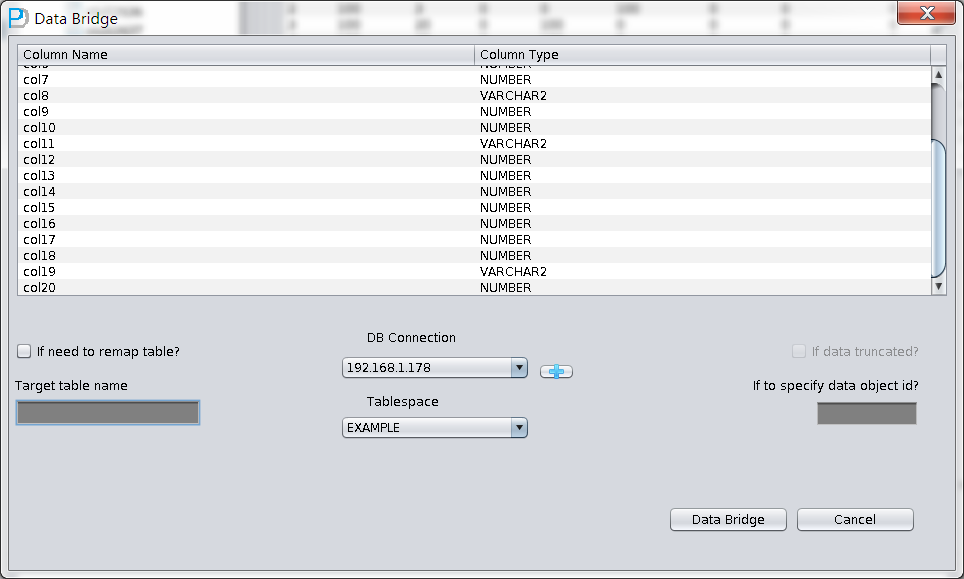
After saving connection, and then enter the DataBridge main interface, first select the just added Connection G10R25 under the drop-down list of DB Connection:
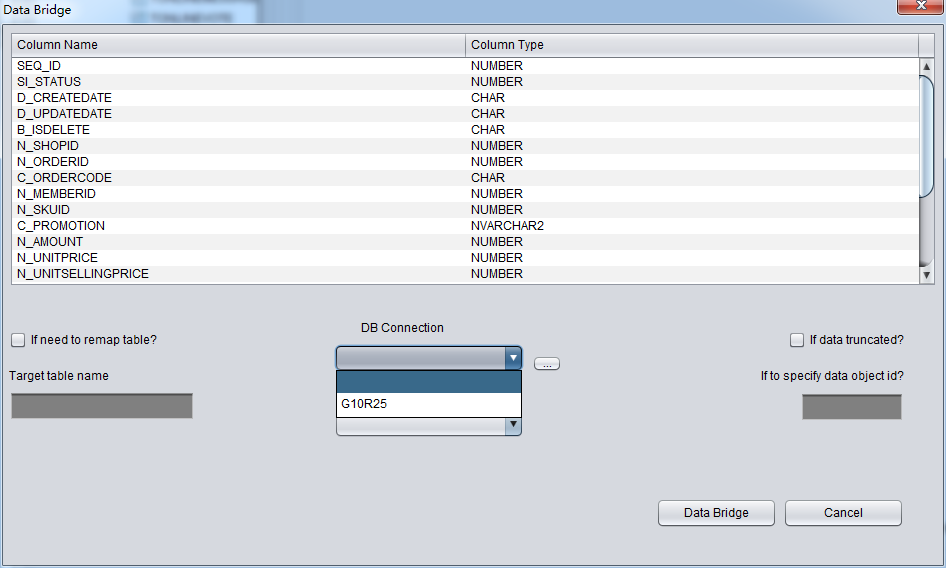
If your DB connection is not in the drop down list, please click DB connection Button, which is highlighted in red.
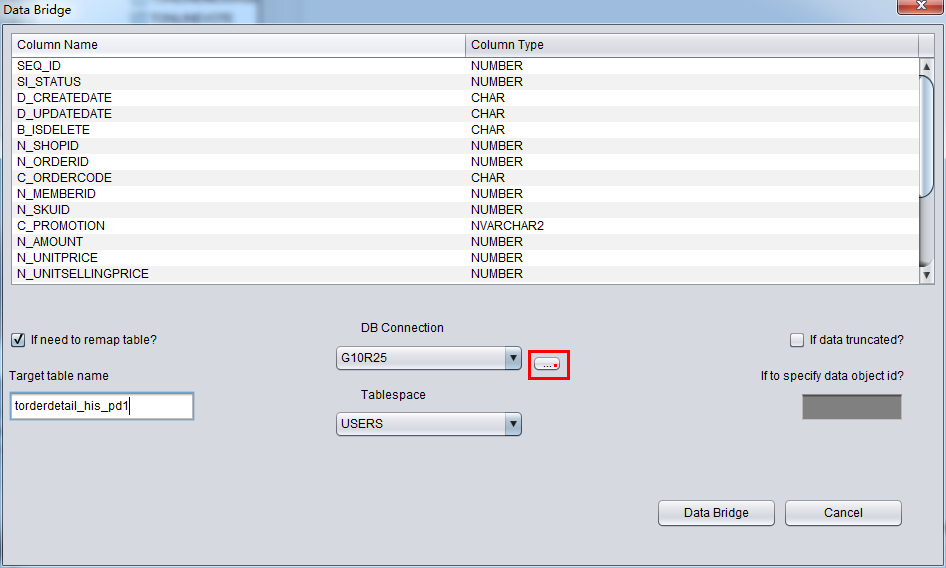
After selecting DB Connection, the Tablespace dropdown list will be selectable:
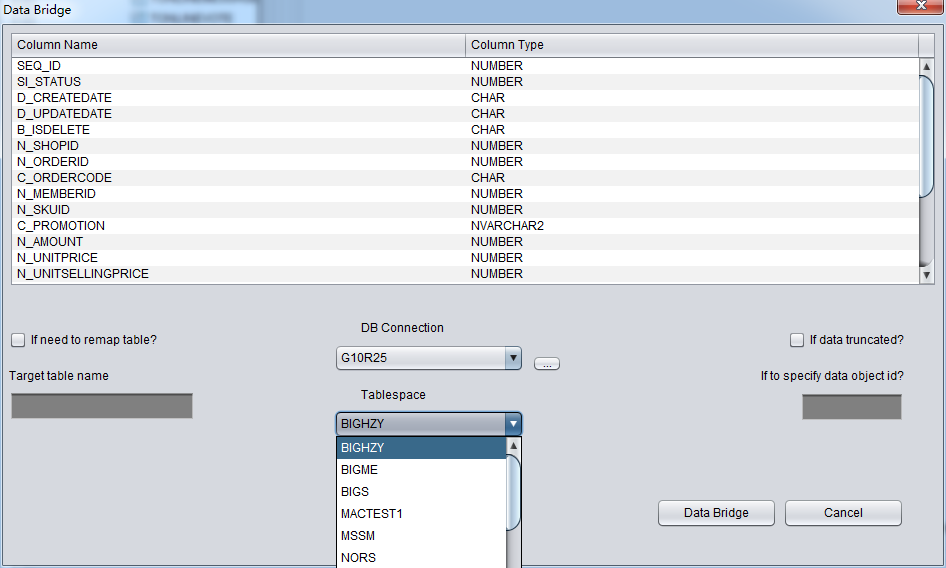
Notes on recovering truncated/dropped table by DataBridge: when recovering truncated/dropped data and inserting back to source DB, users should choose another tablespace which differs from the original tablespace. If exporting data into the same tablespace, oracle will reuse the space which stores truncated/dropped table, and make data overwritten, thus we may lose the last resort to recover the data.
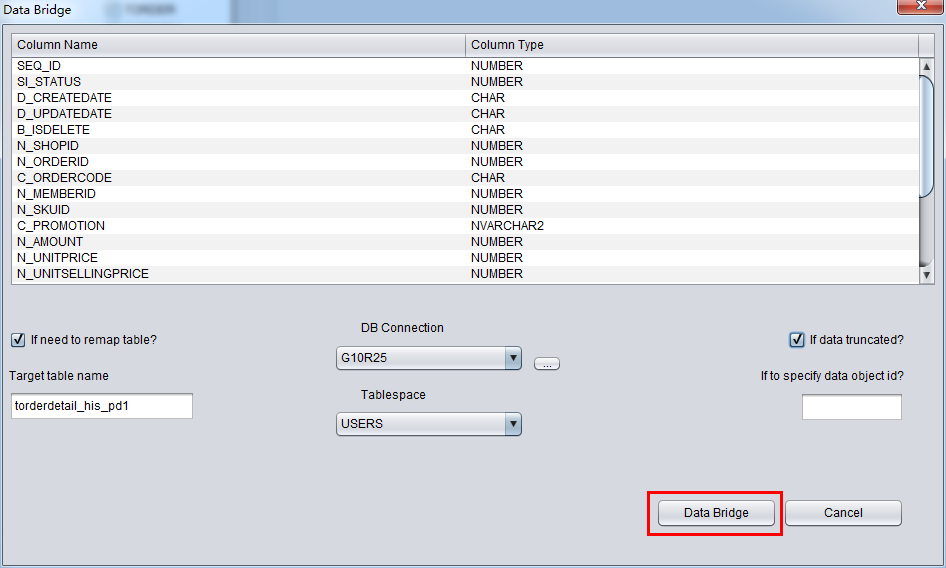
For example, we truncated a table and now use DataBridge to recover the data back to source database, but we do not want to use the original table name, for example, the original table name is torderdetail_his. Then the user can select “if need to remap table” and fill in the appropriate target table name as below:
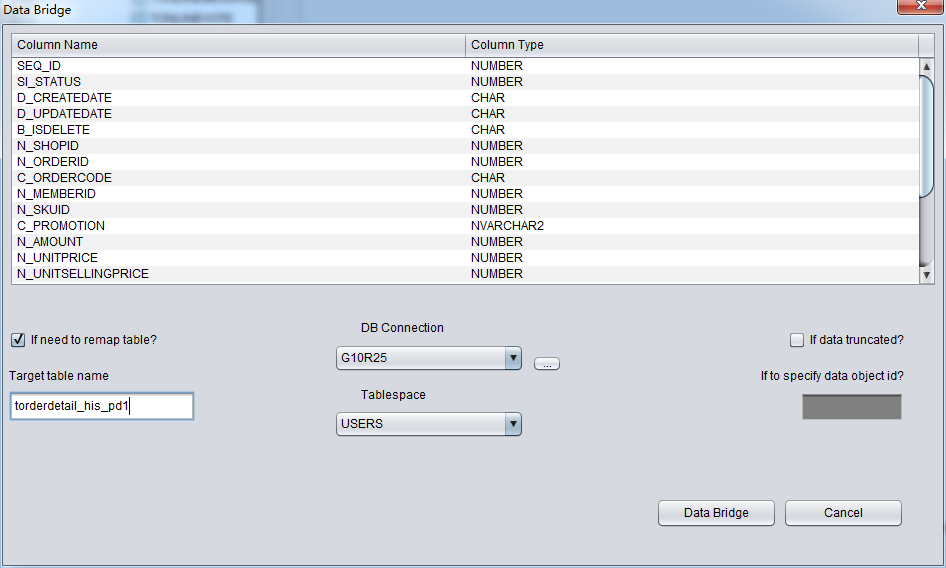
Attention: 1) For destination DB which had the corresponding table name, PRM would not recreate a table but append all recovered data. 2) For destination DB which did not have corresponding table name, PRM would try to create table on specified tablespace and insert recovered data.
In this case, we need to recover truncated data, so please select “if data truncated”, Or, PRM will execute regular data extraction, which cannot extract the truncated data.
The mechanism of truncating data is: Oracle will only update table DATA_OBJECT_ID in data dictionary and segment header. And the real data will not be overwritten. Due to the difference between dictionary and DATA_OBJECT_ID, Oracle server process will not read data that was truncated but not yet overwritten while scanning table.
PRM will try to scan 10M-bytes blocks behind the table’s segment header, if some blocks with smaller DATA_OBJECT_ID than the object’s current DATA_OBJECT_ID were found, then PRM thinks it finds something useful.
There is a blank input field called “if to specify data object id”, which enables the user to input Data Object ID to be recovered. Generally, you don’t need to input any value, unless the recovery does not work. We suggest users contact ParnassusData for help.
Click the DataBridge button, then it will start extracting if the configuration is done.
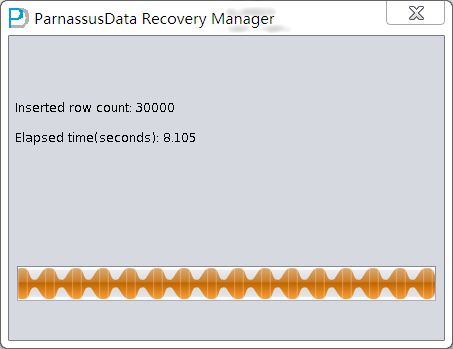
DataBridge will display the successfully rescued rows and elapsed time.
Case 3: DB cannot be opened caused by corrupted Oracle Data Dictionary
DBA of Company D deleted SYS.TS$ (A bootstrap Table) by mistake, which causes Oracle DB cannot be opened.
| Oracle Database 11g Enterprise Edition Release 11.2.0.3.0 – 64bit ProductionWith the Partitioning, Automatic Storage Management, OLAP, Data Miningand Real Application Testing optionsINSTANCE_NAME
—————- ASMME
SQL> SQL> SQL> select count(*) from sys.ts$;
COUNT(*) ———- 5
SQL> delete ts$;
5 rows deleted.
SQL> commit;
Commit complete.
SQL> shutdown immediate; Database closed. Database dismounted. ORACLE instance shut down.
Database mounted. ORA-01092: ORACLE instance terminated. Disconnection forced ORA-01405: fetched column value is NULL Process ID: 5270 Session ID: 10 Serial number: 3
Undo initialization errored: err:1405 serial:0 start:3126020954 end:3126020954 diff:0 (0 seconds) Errors in file /s01/diag/rdbms/asmme/ASMME/trace/ASMME_ora_5270.trc: ORA-01405: fetched column value is NULL Errors in file /s01/diag/rdbms/asmme/ASMME/trace/ASMME_ora_5270.trc: ORA-01405: fetched column value is NULL Error 1405 happened during db open, shutting down database USER (ospid: 5270): terminating the instance due to error 1405 Instance terminated by USER, pid = 5270 ORA-1092 signalled during: ALTER DATABASE OPEN… opiodr aborting process unknown ospid (5270) as a result of ORA-1092
|
In this case, data dictionary had been damaged, so it would be very hard to open the database normally.
Then, we can use PRM to rescue data in DB. Follow the steps as below:
- Recovery Wizard
- Select Data Dictionary Mode
- Choose Big or Little Endian , and input DB NAME
- Click Load for database loading
- Restore the data in the table according to actual demand
Case 4: Mistakenly deleted or lost SYSTEM tablespace
A System Administrator of company D deleted SYSTEM tablespace by mistake, which caused DB unable to be opened. Unfortunately, there is no RMAN backup available. Therefore, company D try to use PRM to recover all data.
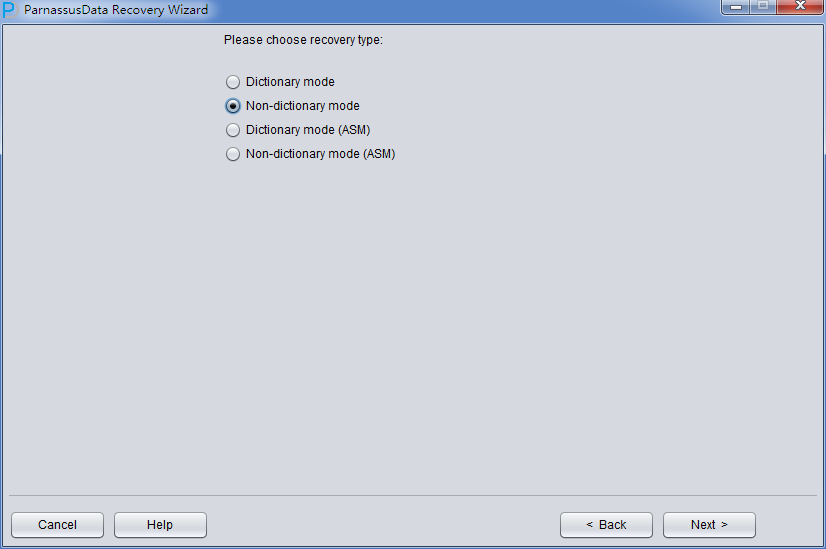
In this case, run PRM, enter Recovery Wizard, and select “Non-Dictionary mode”:
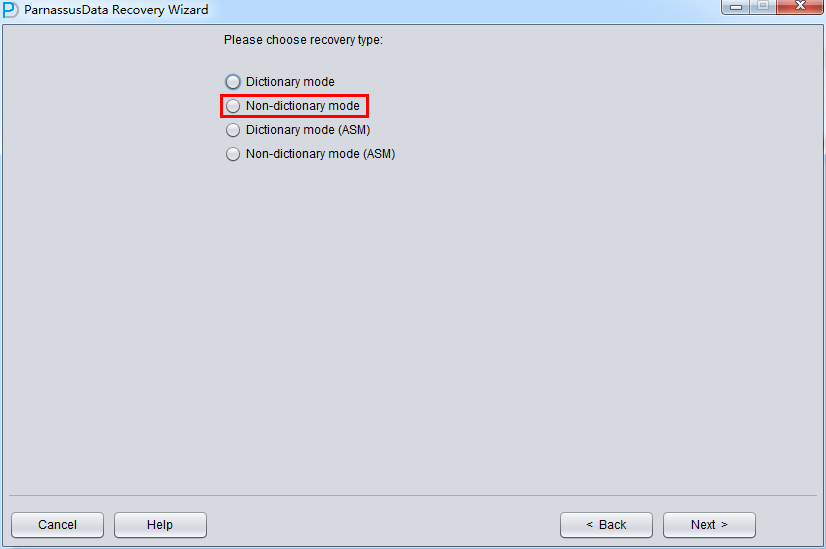

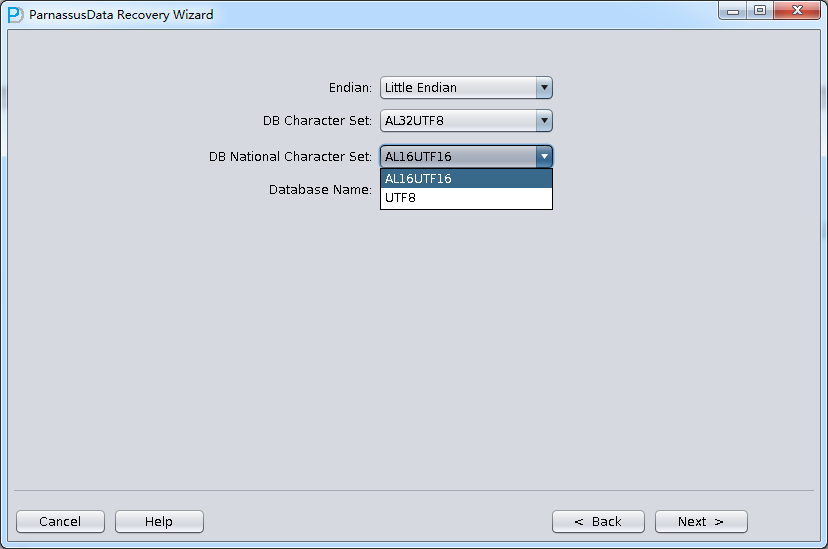
In Non-dictionary mode, we have to select User Specified Character Set and National Character
Set. This is because the character set information of database cannot be obtained due to the lost system tablespace.
Similar to case 1, select all data (excluding temp file) and set correct Block Size and OFFSET.
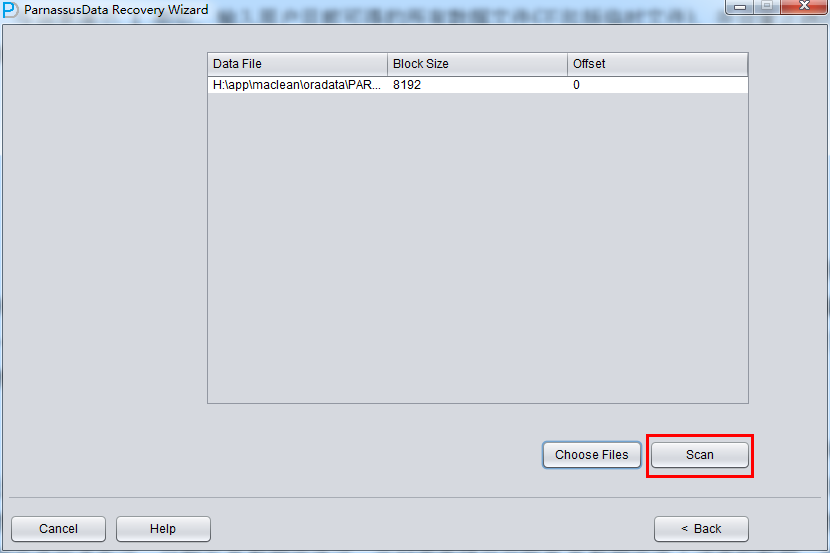
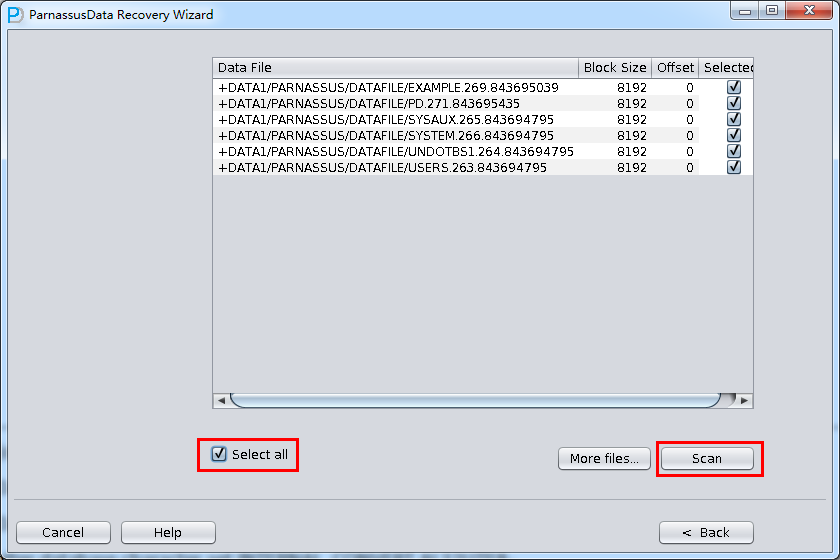
Then click the scan button. PRM will scan all segment header and extents in datafile, and record it into SEG$.DAT and EXT$.DAT. In Oracle, each partition table or non-partition table has a segment header. Once we find segment header, we could find the whole table extent map information. Through extent map, we can get all record on the table.
There is one exception, for example, there is one non-partition table that is stored in two database files. The segment header and half of data are stored in datafile A, and the others are stored in datafile B. But for some reasons, both system tablespace and datafile A are lost, PRM can’t find segment header associated with problem table. Instead, it can scan datafile B to get the rest extent map.
In order to recover data via segment header and extent map in no-dictionary mode.
PRM will create two files: SEG$.DAT (stores segment header info) and EXT$.DAT (stores extent info), and record them in PRM embedded database.
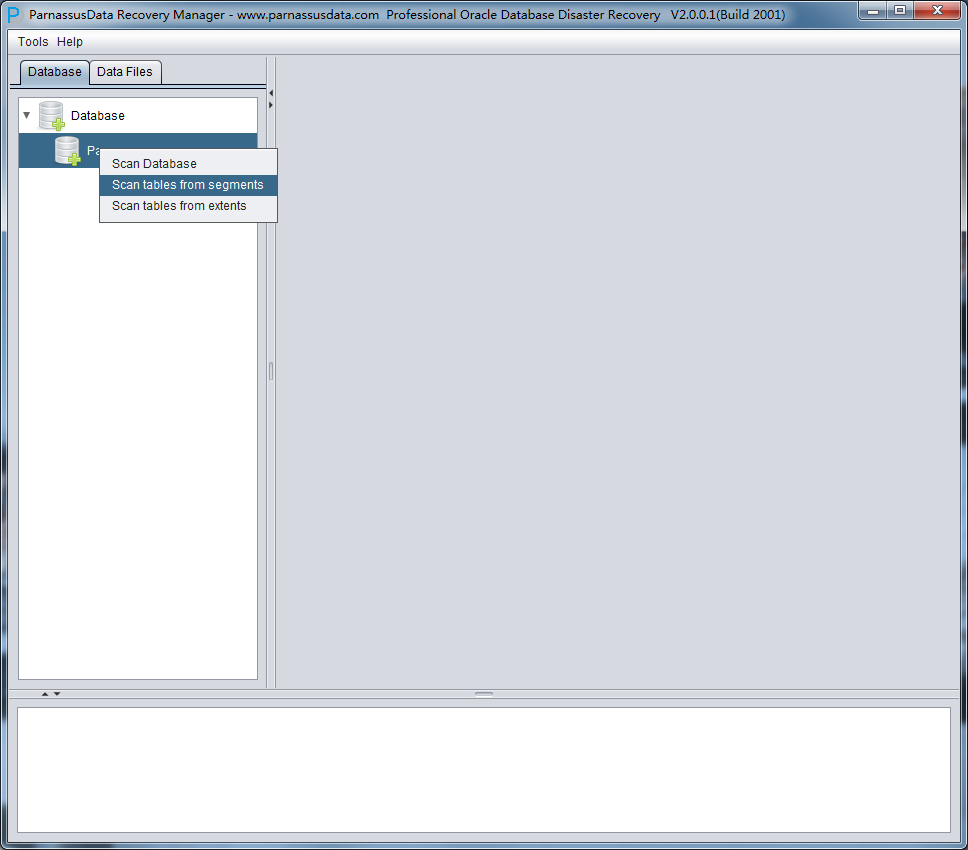
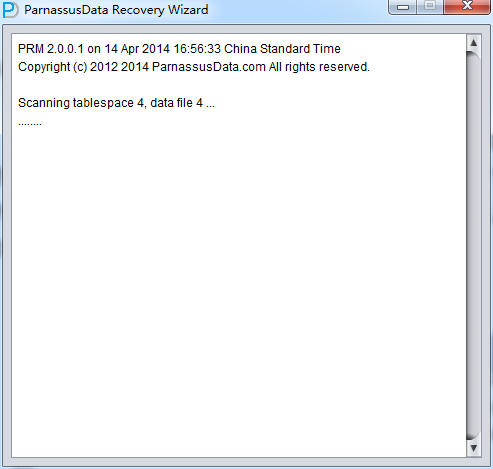
After scaning, there appears the database icon on the left. Now, there are 2 options:
1、 Scan Tables From Segments:
- System tablespace is lost, but all application data tablespace exists
2、 Scan Tables From Extents
- Doesn’t apply to data recovery of truncated data in Dictionary Mode.
- Both system tablespace and datafile of segment header are lost.
It is not necessary to first use “Scan Tables From Extents” mode, unless you can’t find the needed data by “Scan Tables From Segment “mode.
Scan tables from segments should be your first choice.
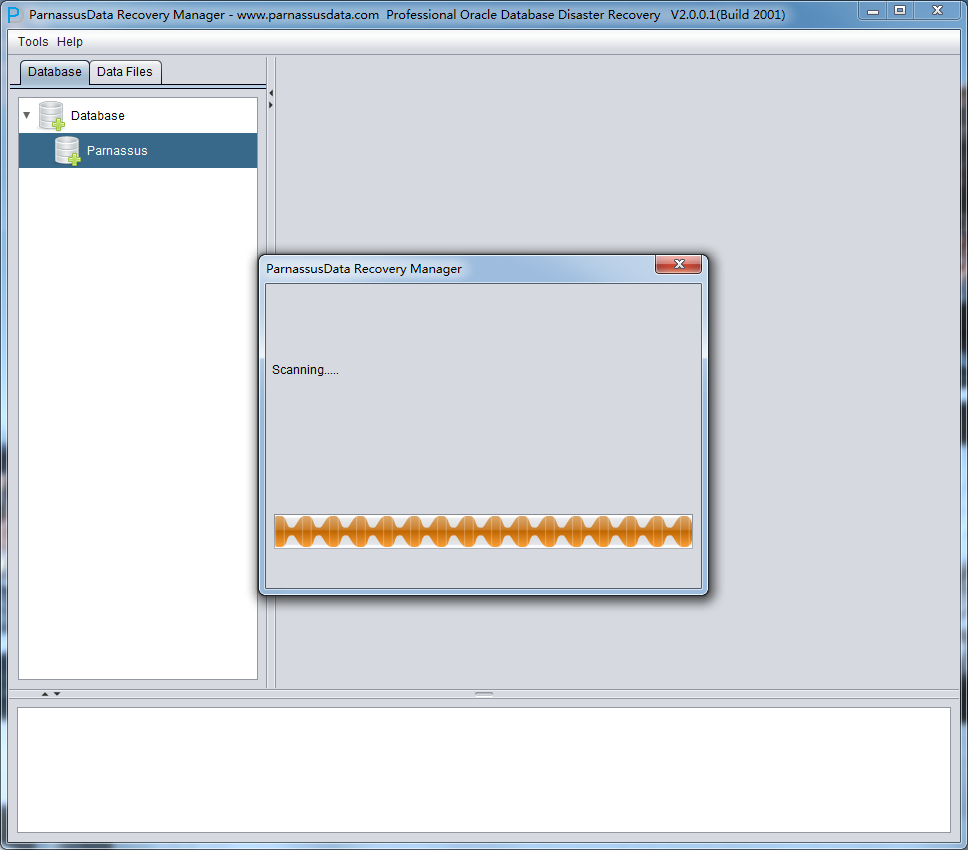
After scanning tables from segments, click the tree diagram on the left.
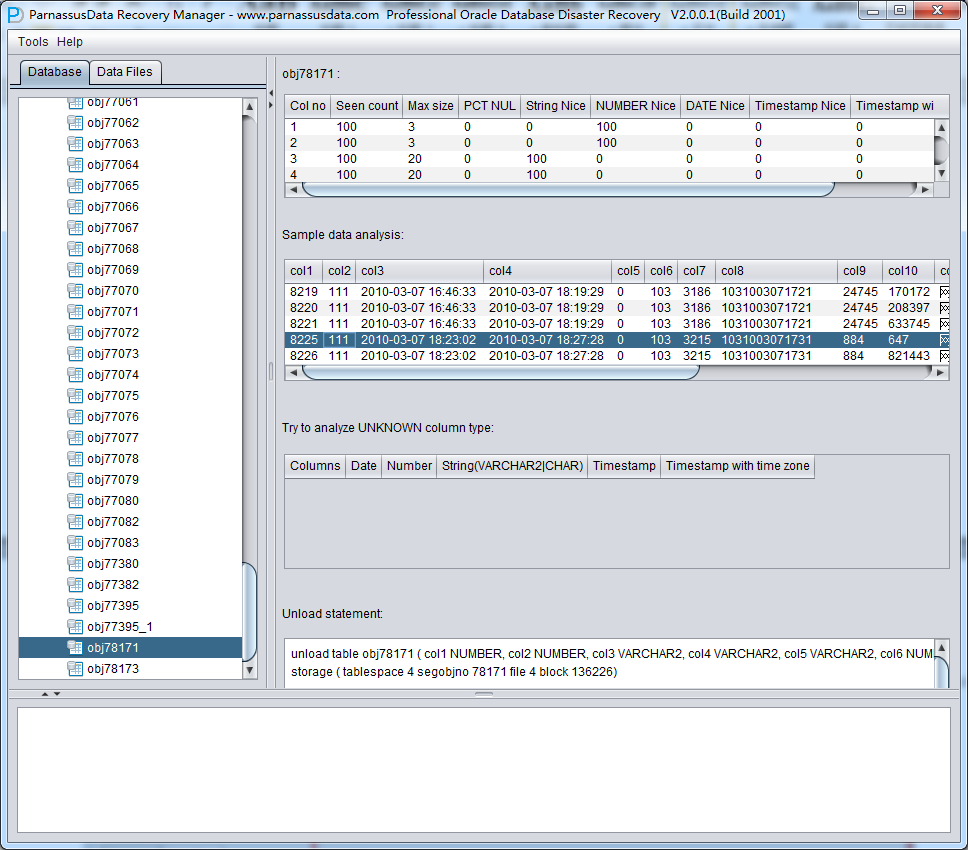
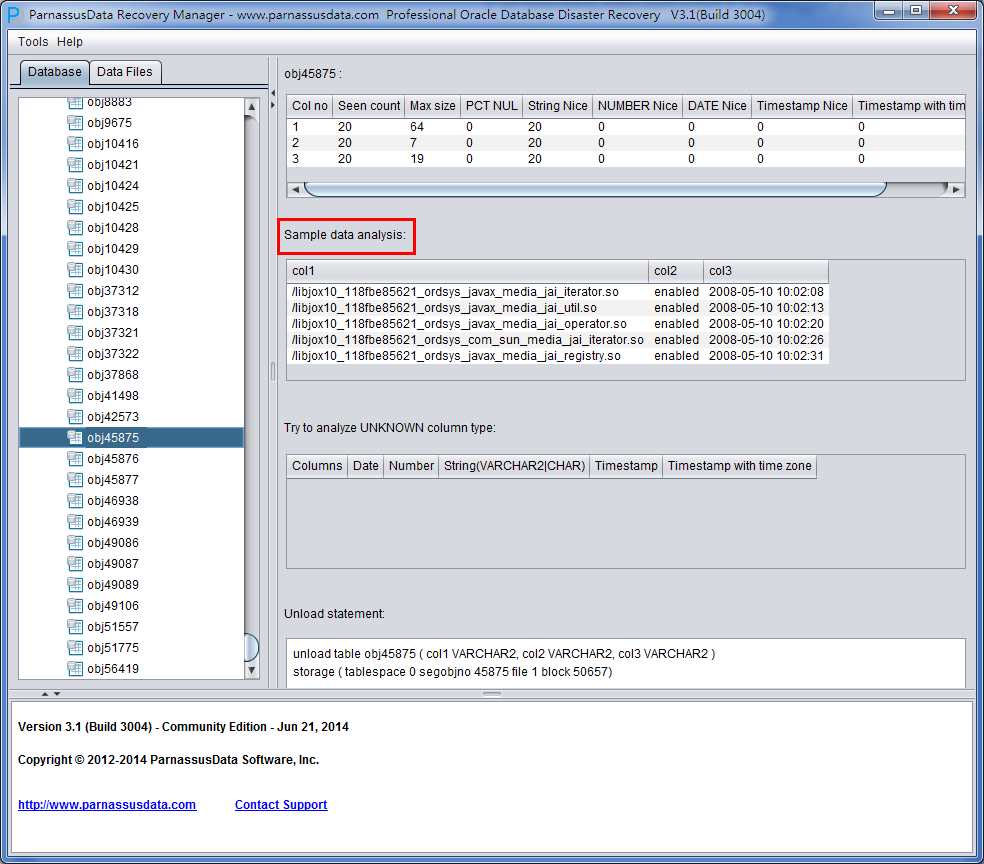
Scan Tables is for constructing the data based on segment header in SEG$. Each node in the diagram represent a data segment, which is named by DATA OBJECT ID recorded in obj+ segment.
Click on a node and observe the right side of main interface:

Intelligent field type analysis
Because of SYSTEM tablespace lost, there is not data structure information available in NO-Dictionary mode. The structure information includes field name and field type of the table. All these are stored in dictionary instead of table. Therefore, PRM needs to guess every field type.
PRM uses the advanced JAVA pre-analysis algorithm, and can parse up to 10 kinds of main data types.、
Intelligent analysis can successfully guess more than 90% of columns in most of cases.
The meaning of each field on the right side:
- Col1 no
- Seen Count
- MAX SIZE
- PCT NULL
- String Nice
- Number Nice
- Date Nice
- Timestamp Nice
- Timestamp with timezone Nice
Sample Data Analysis:

Intelligence Analysis will analyze 10 records and display the results. These results will help client to know the column information.
If the records on data segments are less than 10, it will displays all the records.
TRY TO ANALYZE UNKNOWN column type:
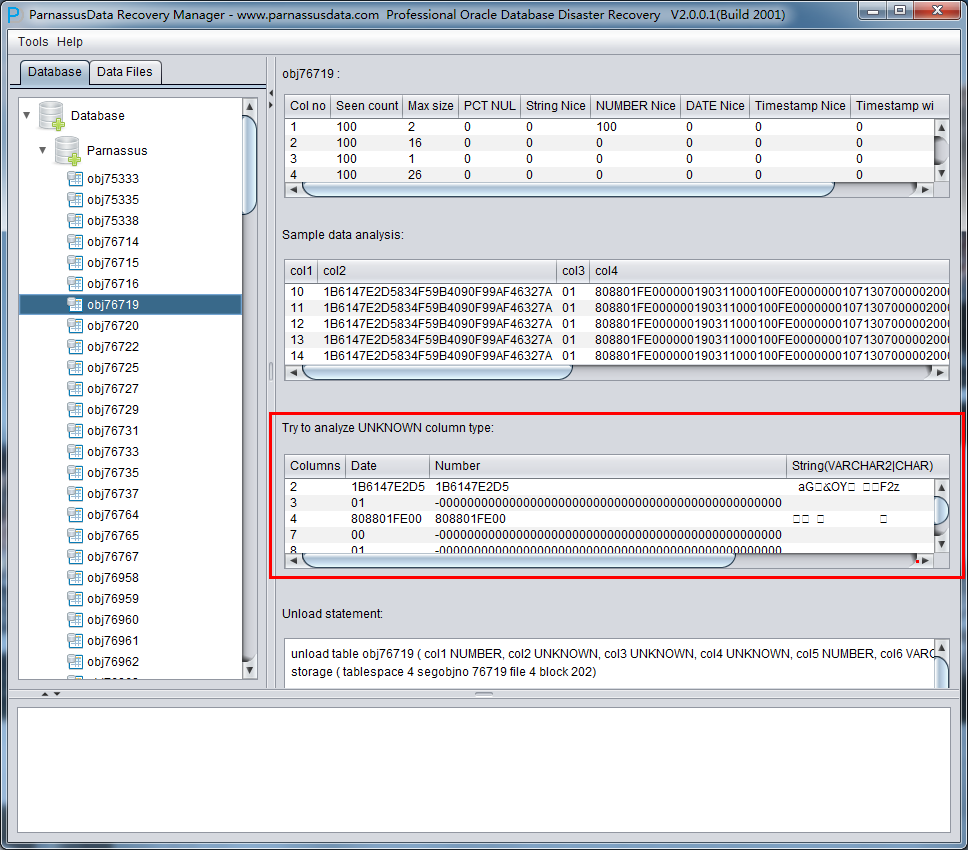
If PRM cannot recognize the column’s data type, you can specify the data type by yourself.
So far, PRM does not support below types: XDB.XDB$RAW_LIST_T、XMLTYPE、User-defined type
Unload Statement:
Here are the UNLOAD statements PRM generated, and these statements can be only used by PRM development team and supporting engineers of ParnassusData.

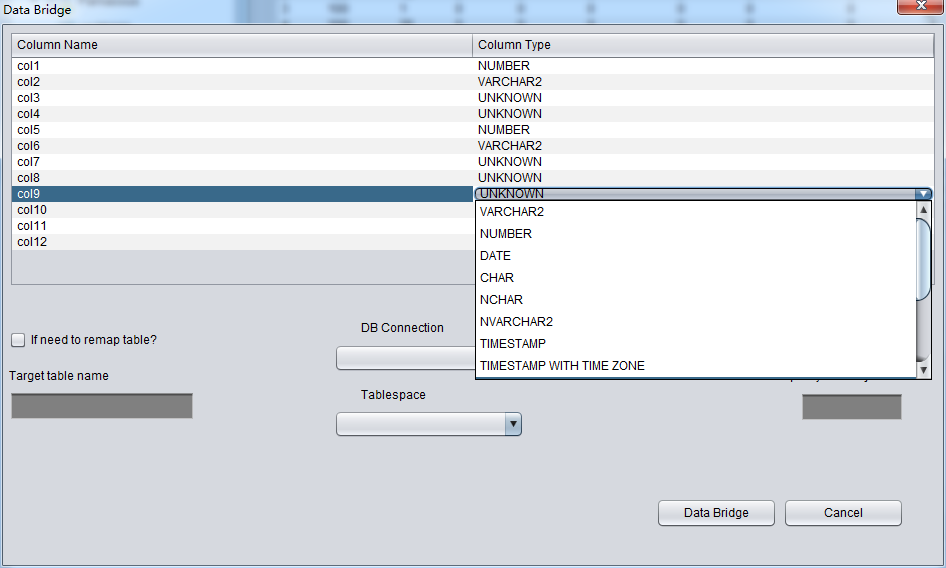
In “Non-Dictionary Mode”, the normal mode and Data Bridge are also applicable. Compared with” Dictionary Mode”, the user can perform the field type by themselves when using data bridge in Non-Dictionary Mode. As below picture, the field type is UNKNOW. The field types might be types that PRM doesn’t supported yet, for instance: XML.
If the user knows the data type in this table (from schema design documents), it is necessary to specify the correct column types manually.
CASE 5: Deleted System Tablespace and Part of User tablespace datafile by mistake
The SA of Company D deleted the system tablespace and part of user tablespace datafile by mistake.
In this case, part of tablespace datafile were deleted, and they might include datafile which stored segment header. Therefore it is better to use “Scan Tables From Extents” than” Scan Tables From Segment Header”.
The brief steps are as follows:
- Enter Recovery Wizard, select No-Dictionary mode, and added all usable data file. Then perform scan
- Select database, and right click on Scan Tables From Extents
- Analyze the data and implement data extraction and Data Bright
- Following steps are the same with Case 4
CASE 6: Copy DB datafile from damaged ASM diskgroup
The Company D begins to uses ASM instead of other file system. Since there are many bugs in the version 11.2.0.1that it uses, causing that ASM DISKGROUP cannot be mounted and still does not work after repairing ASM Disk Header.
In this case, user can use the ASM Files Clone feature of PRM to rescue datafile from damaged ASM DiskGroup directly.
- Open main interface, and select ASM File(s) Clone under Tools:
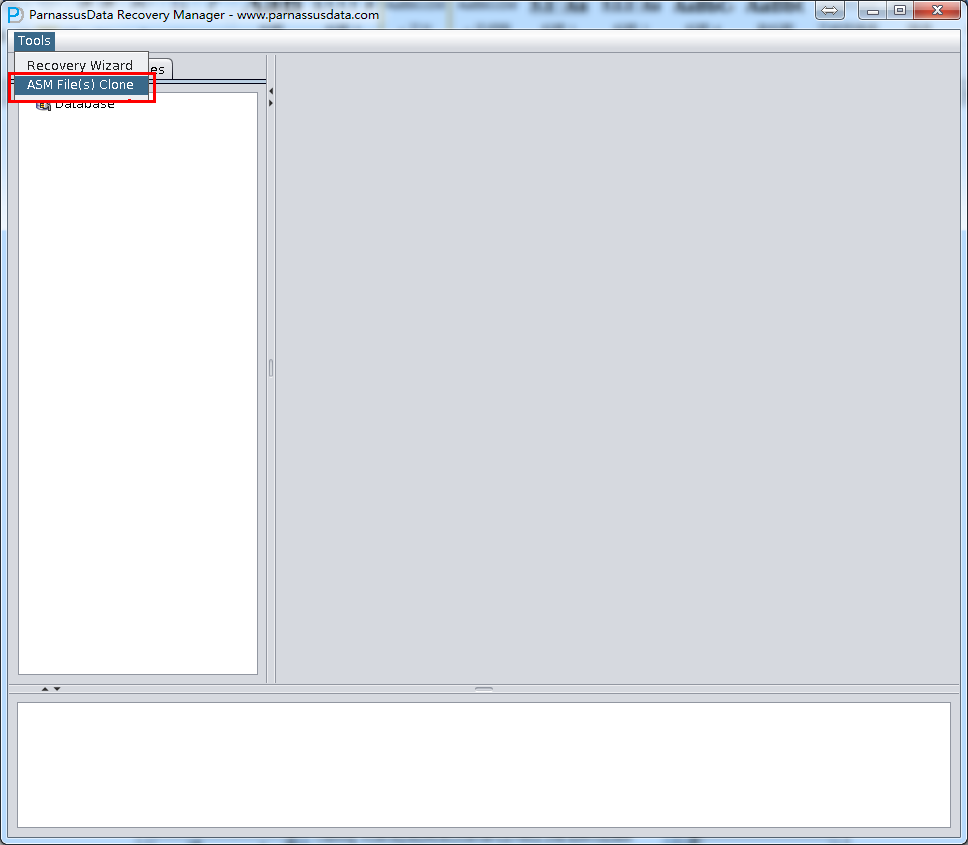
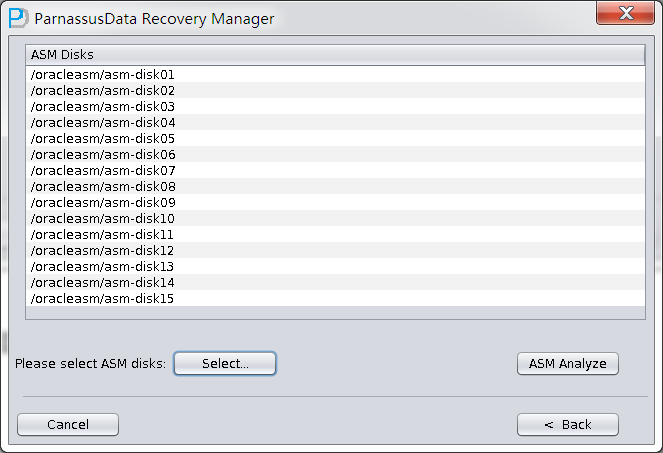
Enter ASM Disks Window, click SELECT…to add ASM Disks, for example:
/dev/asm-disk5(linux). Then click ASM analyze.
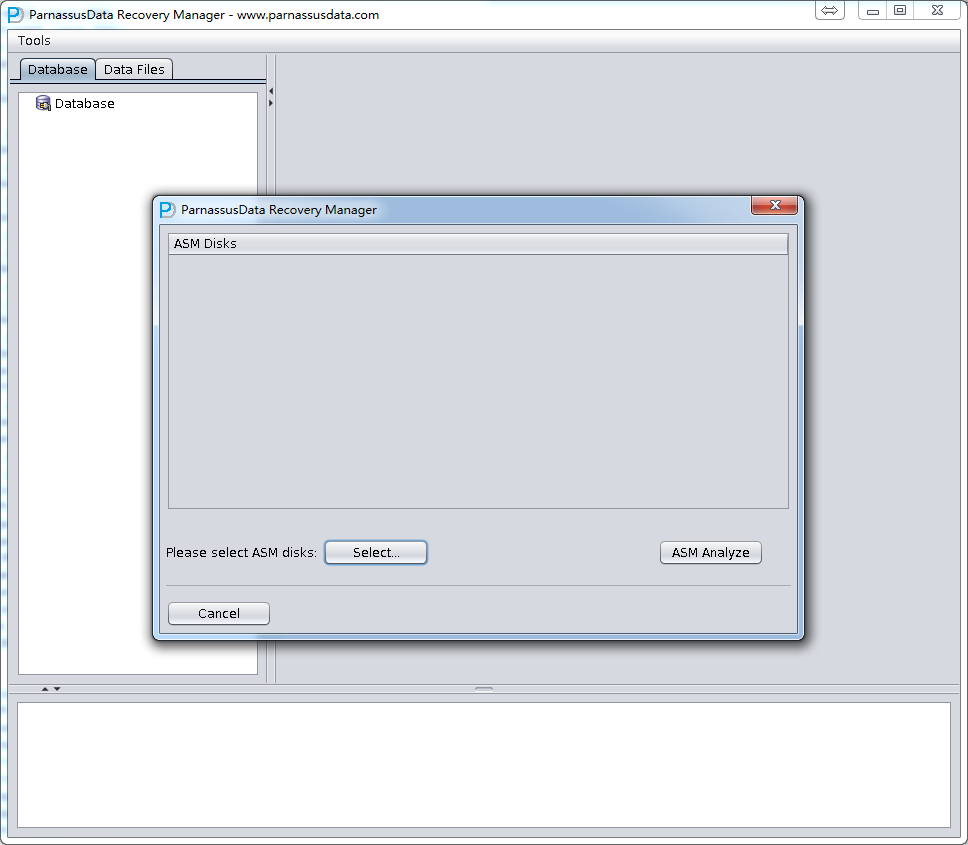
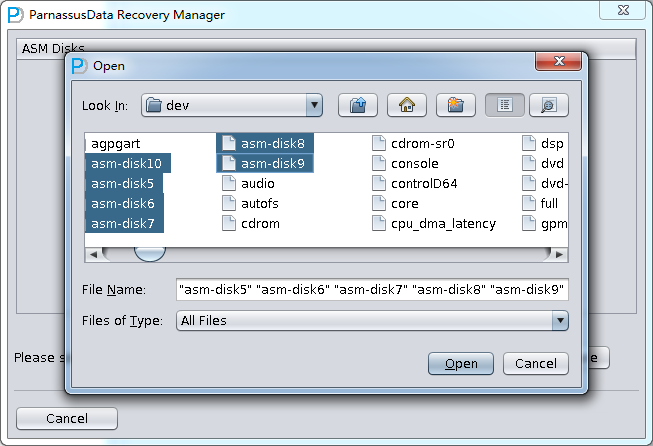
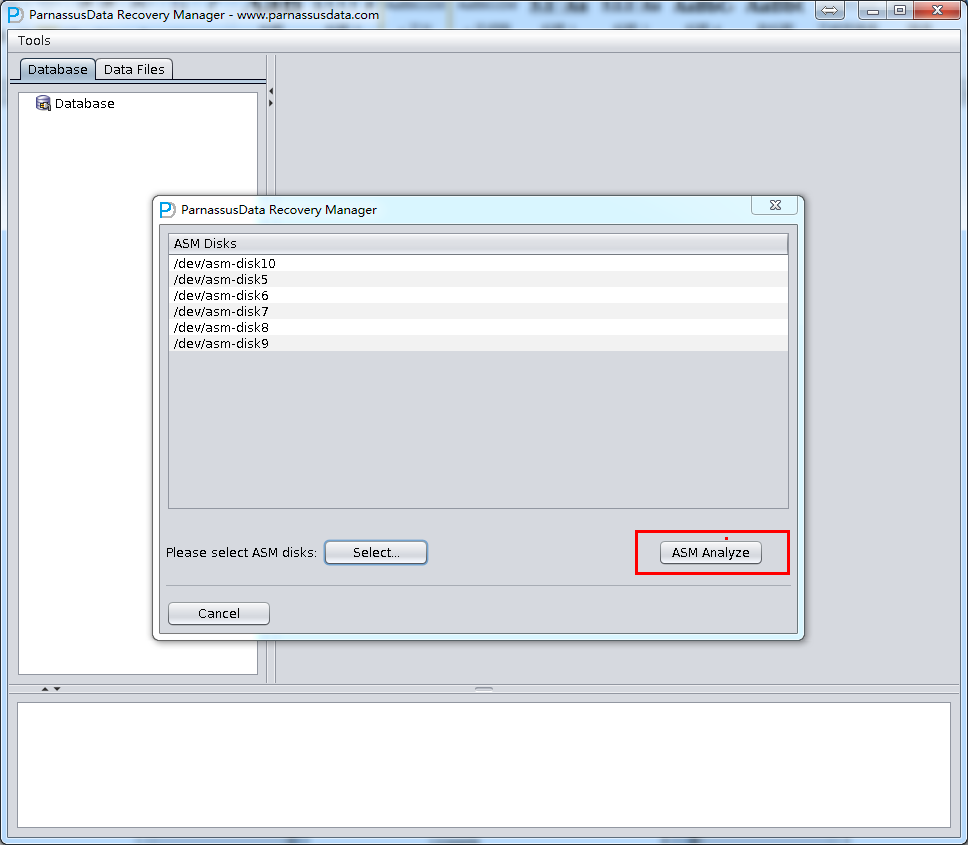
ASM Files Clone will analyze the specified ASM Disk header, in order to find corresponding files in Disk group and the File Extent Map. All of the information will be recorded into PRM embedded database for future use. PRM can collect, analyze and store all Metadata, and improve the basic functions of PRM in various forms, showing to users by diagram.
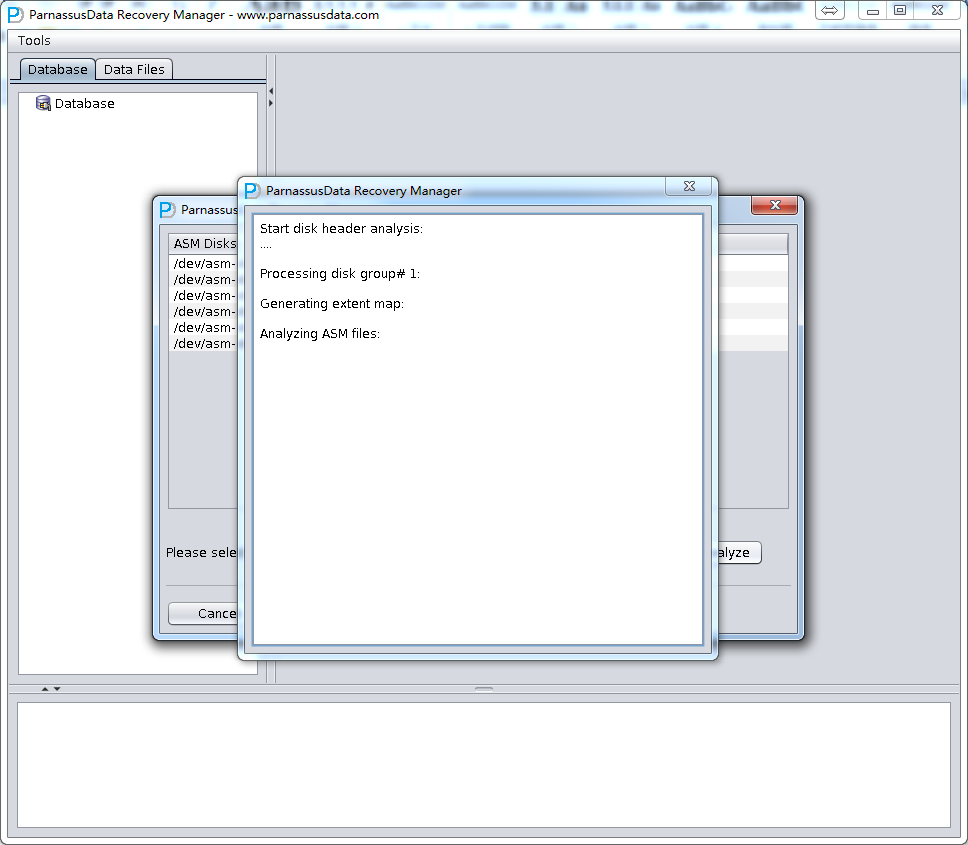
After ASM Analyze, PRM will find the file list in Disk groups. So users can select the datafile/archivelog which need to be cloned to destination folder
Click ASM Clone to start file cloning…
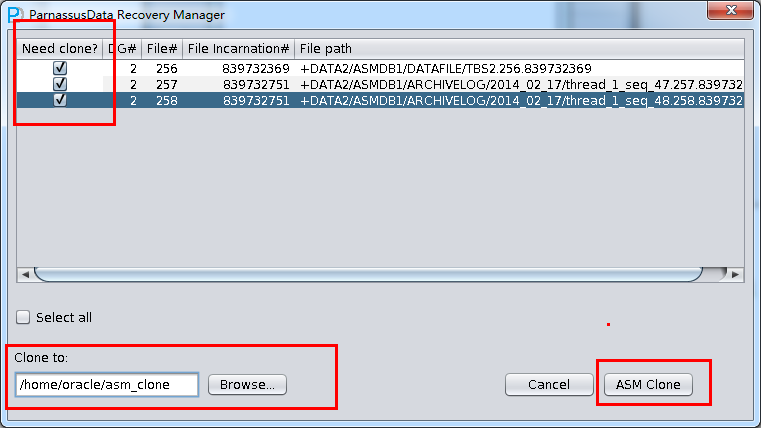
There is a progress bar of file cloning.
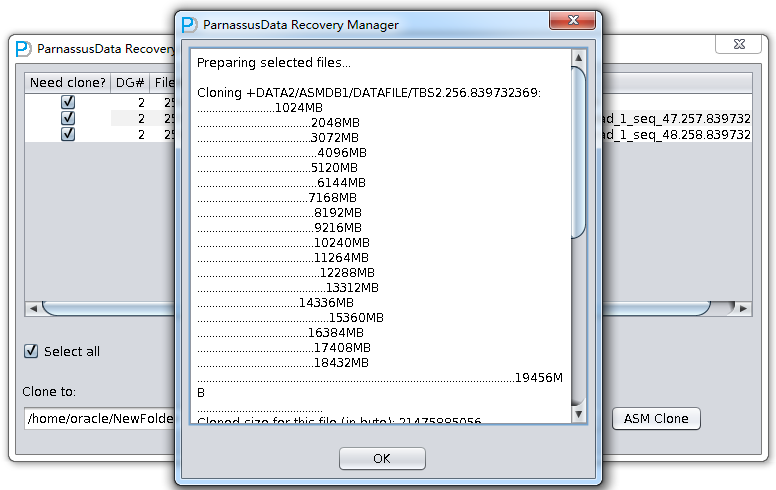
ASM File Clone log as below:
| Preparing selected files…Cloning +DATA2/ASMDB1/DATAFILE/TBS2.256.839732369:……………………..1024MB………………………………..2048MB………………………………..3072MB
………………………………….4096MB ………………………………..5120MB ………………………………….6144MB ……………………………….7168MB …………………………………8192MB …………………………………9216MB …………………………………10240MB …………………………………11264MB …………………………………..12288MB …………………………………….13312MB …………………………….14336MB ……………………………………..15360MB ……………………………….16384MB …………………………………17408MB …………………………………18432MB …………………………………………………………………………………………….19456MB …………………………………… Cloned size for this file (in byte): 21475885056
Cloned successfully!
Cloning +DATA2/ASMDB1/ARCHIVELOG/2014_02_17/thread_1_seq_47.257.839732751: …… Cloned size for this file (in byte): 29360128
Cloned successfully!
Cloning +DATA2/ASMDB1/ARCHIVELOG/2014_02_17/thread_1_seq_48.258.839732751: …… Cloned size for this file (in byte): 1048576
Cloned successfully!
All selected files were cloned done. |
It is necessary to validate cloned data via the “dbv” or “rman validate” command, for example:
| rman target /RMAN> catalog datafilecopy ‘/home/oracle/asm_clone/TBS2.256.839732369.dbf’;cataloged datafile copy
datafile copy file name=/home/oracle/asm_clone/TBS2.256.839732369.dbf RECID=2 STAMP=839750901
RMAN> validate datafilecopy ‘/home/oracle/asm_clone/TBS2.256.839732369.dbf’;
Starting validate at 17-FEB-14 using channel ORA_DISK_1 channel ORA_DISK_1: starting validation of datafile channel ORA_DISK_1: including datafile copy of datafile 00016 in backup set input file name=/home/oracle/asm_clone/TBS2.256.839732369.dbf channel ORA_DISK_1: validation complete, elapsed time: 00:03:35 List of Datafile Copies ======================= File Status Marked Corrupt Empty Blocks Blocks Examined High SCN —- —— ————– ———— ————— ———- 16 OK 0 2621313 2621440 1945051 File Name: /home/oracle/asm_clone/TBS2.256.839732369.dbf Block Type Blocks Failing Blocks Processed ———- ————– —————- Data 0 0 Index 0 0 Other 0 127
Finished validate at 17-FEB-14
|
How to use PRM in ASM environment with ASMLIB?
asmlib related ASM DISK will be stored in OS as ll /dev/oracleasm/disks.
For example: Add files under /dev/oracleasm/disks into PRM ASM DISK
| $ll /dev/oracleasm/diskstotal 0brw-rw—- 1 oracle dba 8, 97 Apr 28 15:20 VOL001brw-rw—- 1 oracle dba 8, 81 Apr 28 15:20 VOL002brw-rw—- 1 oracle dba 8, 65 Apr 28 15:20 VOL003brw-rw—- 1 oracle dba 8, 49 Apr 28 15:20 VOL004
brw-rw—- 1 oracle dba 8, 33 Apr 28 15:20 VOL005 brw-rw—- 1 oracle dba 8, 17 Apr 28 15:20 VOL006 brw-rw—- 1 oracle dba 8, 129 Apr 28 15:20 VOL007 brw-rw—- 1 oracle dba 8, 113 Apr 28 15:20 VOL008 |
CASE 7: DB stored in ASM cannot be opened
One of CRM database in company D can’t be opened due to I/O error in a few disks that are added into ASM diskgroup, which generated some corrupted block in system tablespace datafile, and caused DB cannot be opened.
In this case, we can use PRM ASM Diskgroup to clone all datafile out of ASM.
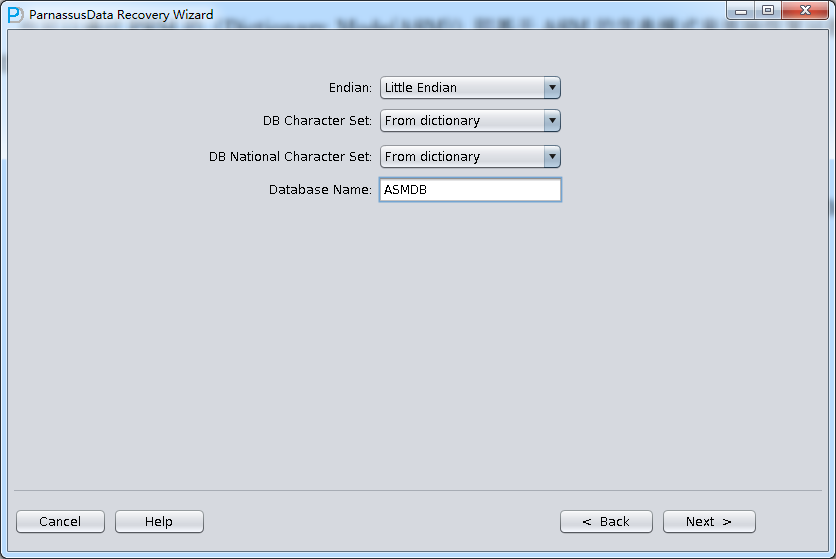
Or, users can also use “Dictionary Mode(ASM)” to recover data from this ASM environment . Steps are as below:
- Recovery Wizard
- Dictionary Mode(ASM)
- Add ASM DISK (all ASM DISK in the ASM Disk Group that you want to recover)
- Click ASM analyze
- Select suitable Endian
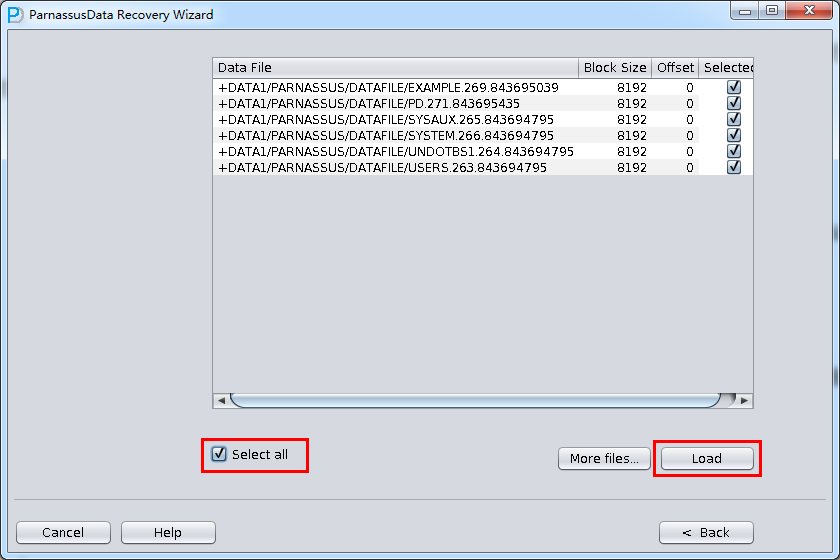
- Select the needed datafile from the datafile lists by ASM analyze, or click “select all”
- Click “load”, following steps are the same with case3
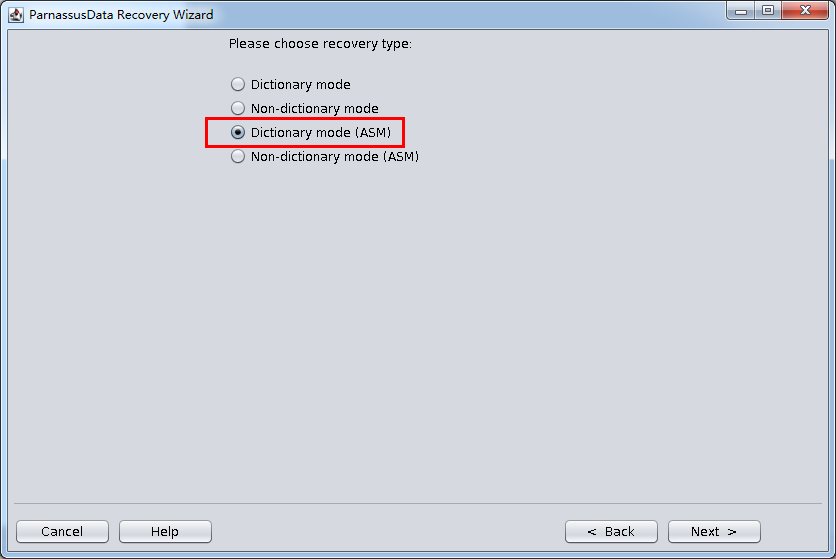
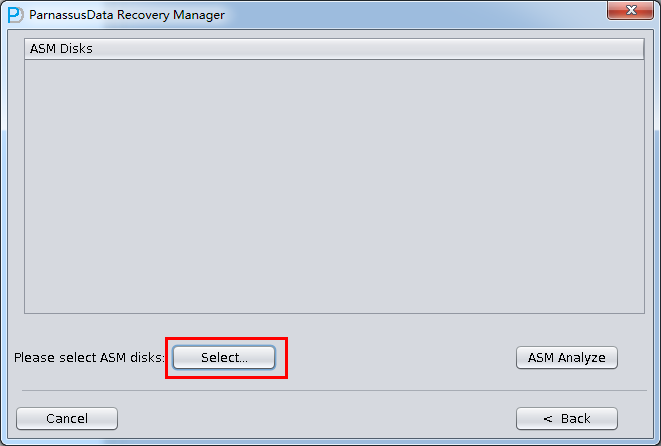

CASE 8: Recovery of Mistakenly deleted or Lost system tablespace in ASM
The operation staff of Company D deleted system tablespace FILE#=1 datafile and user tablespace by mistake, causing the database cannot be opened.
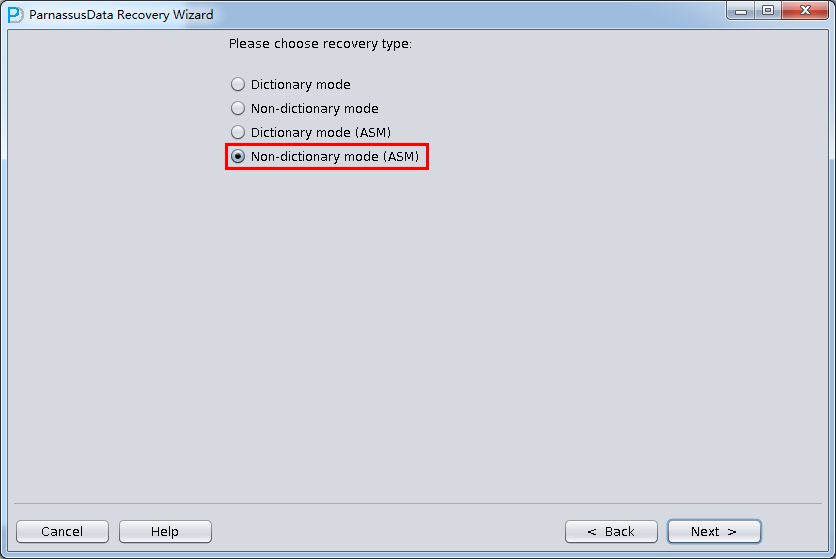
In this case, users can use” Non-Dictionary Mode (ASM)” to recover data.
Steps are as below:
- Recovery Wizard
- Non-Dictionary Mode (ASM)
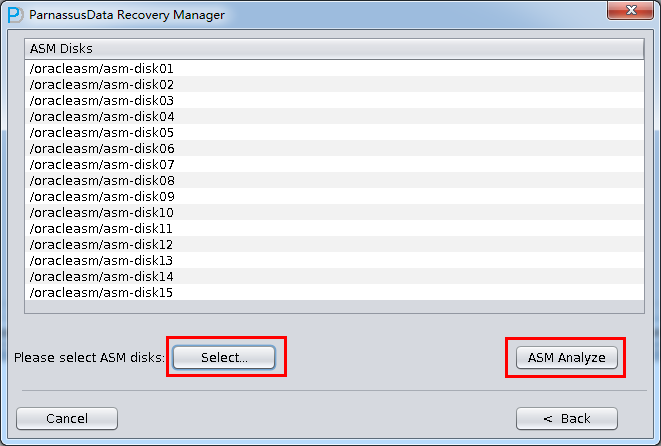
- Add necessary ASM Disk
- Click ASM analyze
- Select the suitable Endian and Character set. (Manually select character set due to Non-Dictionary Mode)
- Select all data file, or click “Select all”
- Click “scan”, following steps are the same with Case 3
CASE 9: Data Recovery of Dropped Tablespace
Staffs of Company D dropped a tablespace(DROP TABLESAPCE INCLUDING CONTENTS) by mistake. They want to recover data resided in that tablespace, but there is no RMAN backup.
Now we can use PRM in No-Dictionary mode to recover data. In this way, we can recover most of the data. However, the data is not mapping to the dictionary. Users need to manually recognize the table. Since it changed data dictionary by DROPPING TABLE and deleted objects in OBJ$, we cannot know the corresponding relations between DATA_OBJECT_ID and OBJECT_NAME. Below is the instruction of getting mapping.
| select tablespace_name,segment_type,count(*) from dba_segments where owner=’PARNASSUSDATA’ group by tablespace_name,segment_type;TABLESPACE SEGMENT_TYPE COUNT(*)———- ————— ———-USERS TABLE 126
USERS INDEX 136
SQL> select count(*) from obj$;
COUNT(*) ———- 75698
SQL> select current_scn, systimestamp from v$database;
CURRENT_SCN ———– SYSTIMESTAMP ————————————————————————— 1895940 25-4月 -14 09.18.00.628000 下午 +08:00
SQL> select file_name from dba_data_files where tablespace_name=’USERS’;
FILE_NAME ——————————————————————————– H:\PP\MACLEAN\ORADATA\PARNASSUS\DATAFILE\O1_MF_USERS_9MNBMJYJ_.DBF
SQL> drop tablespace users including contents;
C:\Users\maclean>dir H:\APP\MACLEAN\ORADATA\PARNASSUS\DATAFILE\O1_MF_USERS_9MNBMJYJ_.DBF
The volume is entertainment in drive H and SN is A87E-B792
H:\APP\MACLEAN\ORADATA\PARNASSUS\DATAFILE
The drive can not find the file
|
Here, we can use file recovery tools, for example: Undeleter on Windows, to restore the accidentally deleted datafile.

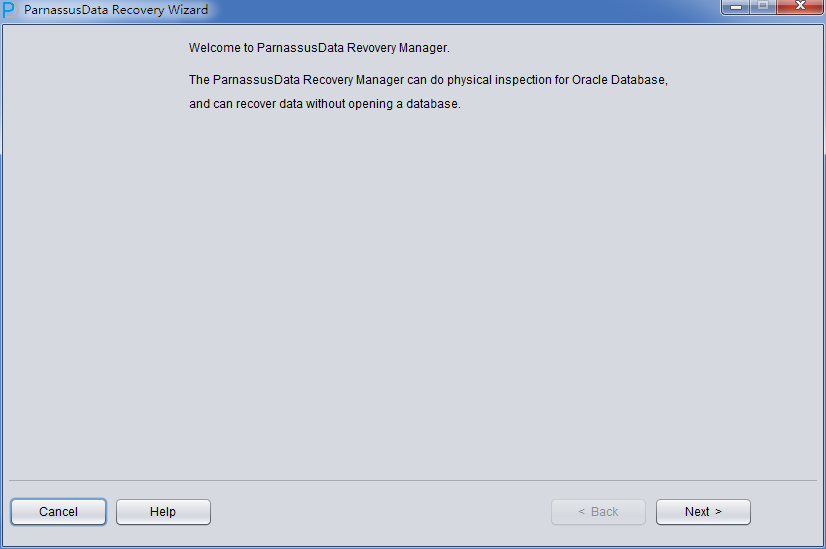
Start up PRM => recovery Wizard => No-Dictionary mode
For it is in No-Dictionary mode, please select the correct character set manually.
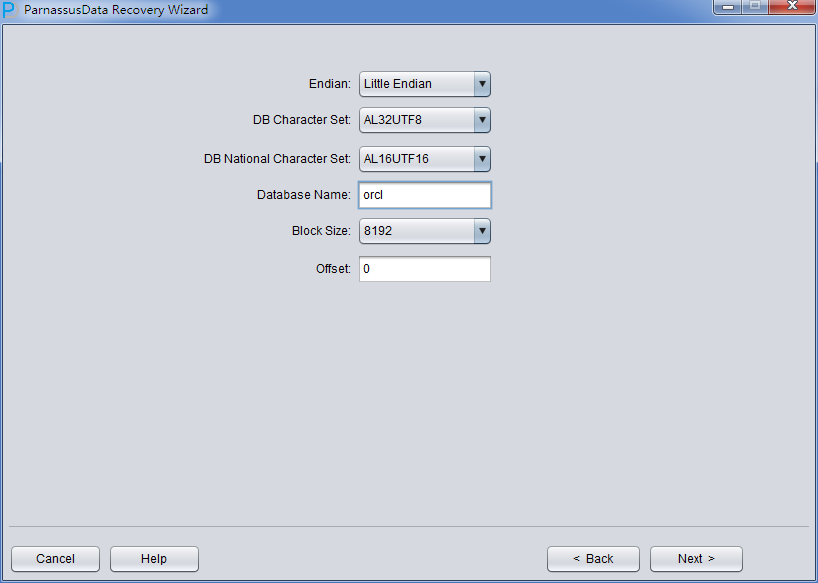
Add the recovered files and Click scan.
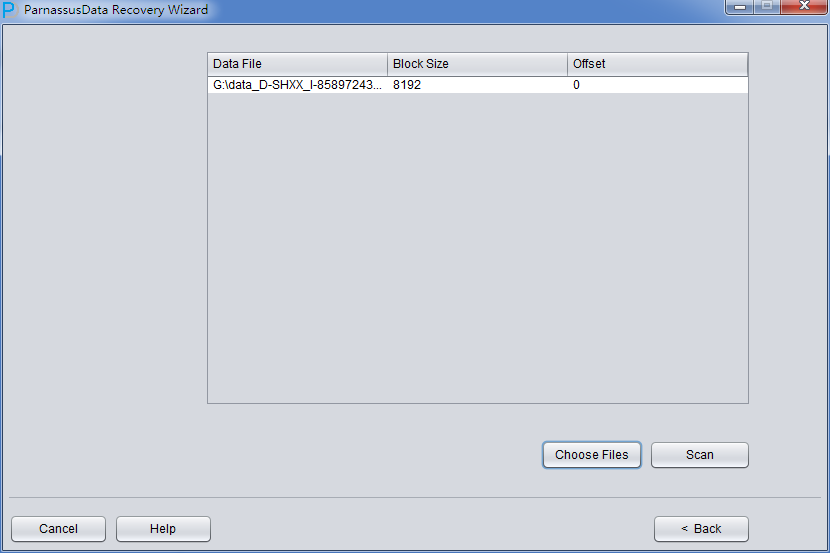
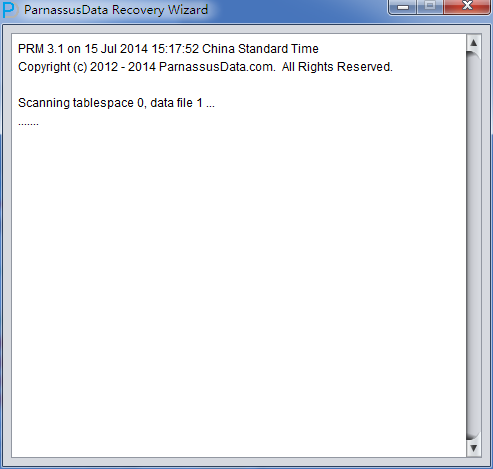
Then scan the table from the segment head/panel. If it fails to find all of the table from segment head, try to use extend scan:
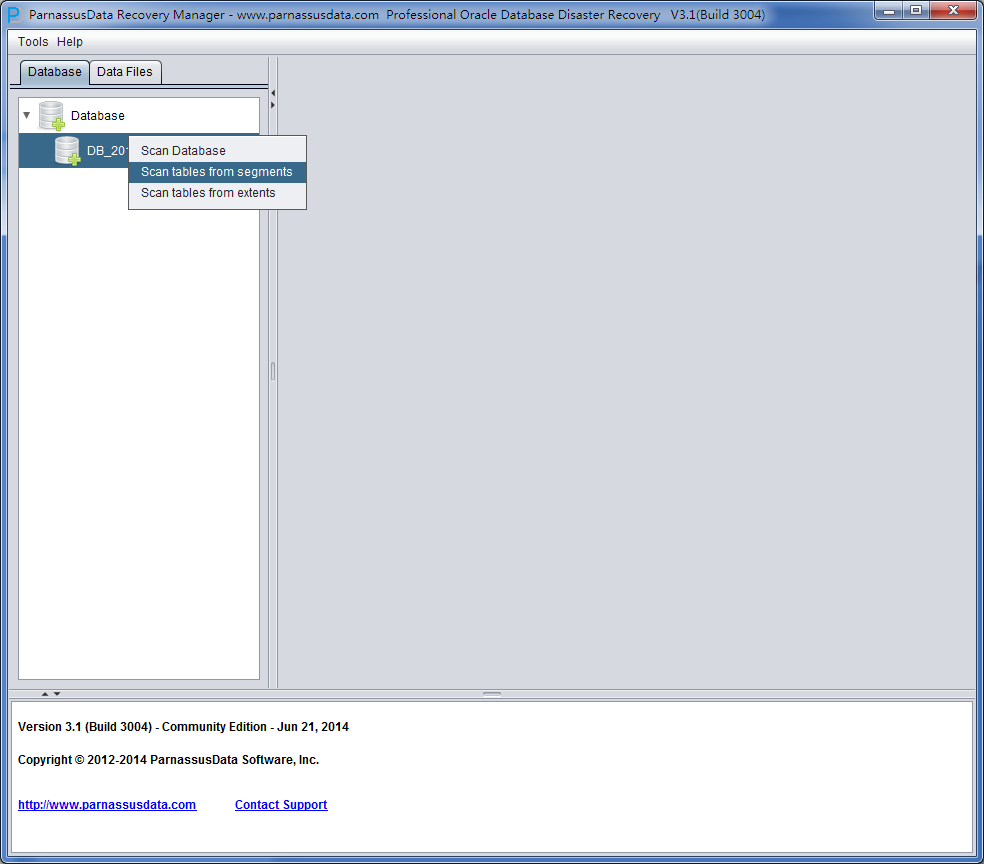
Now you can see lots of tables named OBJXXXXX, which is a combination of “OBJ” and
DATA_OBJECT_ID. We need some technicians who are familiar with schema design and application data, they can match this table with application tables through browsing sample data analysis.
If no one can help clarify the relationship between data and table, try the following methods:
In this case, just the tablespace is dropped and Oracle still works, so we can use FLASHBACK QUERY to get the mapping between DATA_OBJECT_ID and table name.
| SQL> select count(*) from sys.obj$;COUNT(*)
———- 75436
SQL> select count(*) from sys.obj$ as of scn 1895940; select count(*) from sys.obj$ as of scn 1895940 * Error: ORA-01555: Snapshot is too old,
Try to use DBA_HIST_SQL_PLAN of AWR and find the mapping between OBJECT# and OBJECT_NAME in recent 7 days.
SQL> desc DBA_HIST_SQL_PLAN NAME NULL? TYPE —————————————– ——– ———————– DBID NOT NULL NUMBER SQL_ID NOT NULL VARCHAR2(13) PLAN_HASH_VALUE NOT NULL NUMBER ID NOT NULL NUMBER OPERATION VARCHAR2(30) OPTIONS VARCHAR2(30) OBJECT_NODE VARCHAR2(128) OBJECT# NUMBER OBJECT_OWNER VARCHAR2(30) OBJECT_NAME VARCHAR2(31) OBJECT_ALIAS VARCHAR2(65) OBJECT_TYPE VARCHAR2(20) OPTIMIZER VARCHAR2(20) PARENT_ID NUMBER DEPTH NUMBER POSITION NUMBER SEARCH_COLUMNS NUMBER COST NUMBER CARDINALITY NUMBER BYTES NUMBER OTHER_TAG VARCHAR2(35) PARTITION_START VARCHAR2(64) PARTITION_STOP VARCHAR2(64) PARTITION_ID NUMBER OTHER VARCHAR2(4000) DISTRIBUTION VARCHAR2(20) CPU_COST NUMBER IO_COST NUMBER TEMP_SPACE NUMBER ACCESS_PREDICATES VARCHAR2(4000) FILTER_PREDICATES VARCHAR2(4000) PROJECTION VARCHAR2(4000) TIME NUMBER QBLOCK_NAME VARCHAR2(31) REMARKS VARCHAR2(4000) TIMESTAMP DATE OTHER_XML CLOB
For exmaple:
select object_owner,object_name,object# from DBA_HIST_SQL_PLAN where sql_id=’avwjc02vb10j4′
OBJECT_OWNER OBJECT_NAME OBJECT# ——————– —————————————- ———-
PARNASSUSDATA TORDERDETAIL_HIS 78688
Use below scrip for the mapping relationship between OBJECT_ID and OBJECT_NAME
Select * from (select object_name,object# from DBA_HIST_SQL_PLAN UNION select object_name,object# from GV$SQL_PLAN) V1 where V1.OBJECT# IS NOT NULL minus select name,obj# from sys.obj$;
select obj#,dataobj#, object_name from WRH$_SEG_STAT_OBJ where object_name not in (select name from sys.obJ$) order by object_name desc;
another script: SELECT tab1.SQL_ID, current_obj#, tab2.sql_text FROM DBA_HIST_ACTIVE_SESS_HISTORY tab1, dba_hist_sqltext tab2 WHERE tab1.current_obj# NOT IN (SELECT obj# FROM sys.obj$ ) AND current_obj#!=-1 AND tab1.sql_id =tab2.sql_id(+);
|
Attention: Since it relies on AWR repository, the mapping table is not that accurate and exact.
CASE 10: Data Recovery of Dropped Table by mistake.
The application developers of Company D dropped one core application table in ASM without any backup. Oracle has introduced recycle bin feature since 10g. First check whether the dropped table is in the recycle bin or not by viewing the DBA_RECYCLEBINS. If so, flashback to before drop via the recycle bin. Otherwise, use PRM for recovery as soon as possible.
The brief steps of Recovery by PRM:
- OFFLINE the tablespace where the dropped table
- Find the DATA_OBJECT_ID of dropped table by data dictionary query or logminer. If it fails, users have to recognize this table in No-dictionary
- Start PRM, enter No-dictionary mode, and add all datafiles of the dropped tablespace. Then SCAN DATABASE+SCAN TABLE from Extent MAP.
- Locate the data table by DATA_OBJECT_ID in object tree, and insert data back to source database by DataBridge.
| SQL> select count(*) from “MACLEAN”.”TORDERDETAIL_HIS”;COUNT(*)———-984359
SQL> SQL> create table maclean.TORDERDETAIL_HIS1 as select * from maclean.TORDERDETAIL_HIS;
Table created.
SQL> drop table maclean.TORDERDETAIL_HIS;
Table dropped. |
We can get the general DATA_OBJECT_ID by logminer or the method provided in “CASE 9”:
| EXECUTE DBMS_LOGMNR.ADD_LOGFILE( LOGFILENAME => ‘/oracle/logs/log1.f’, OPTIONS => DBMS_LOGMNR.NEW);EXECUTE DBMS_LOGMNR.ADD_LOGFILE( LOGFILENAME => ‘/oracle/logs/log2.f’, OPTIONS => DBMS_LOGMNR.ADDFILE);Execute DBMS_LOGMNR.START_LOGMNR(DBMS_LOGMNR.DICT_FROM_ONLINE_CATALOG+DBMS_LOGMNR.COMMITTED_DATA_ONLY);
SELECT * FROM V$LOGMNR_CONTENTS ;
EXECUTE DBMS_LOGMNR.END_LOGMNR; |
Even no DATA_OBJECT_ID can be obtained, we can still locate the data table that we need to recover through artificial data identification, provided the data table is not much.
First, OFFLINE the tablespace of dropped table.
| SQL> select tablespace_name from dba_segments where segment_name=’TPAYMENT’;TABLESPACE_NAME——————————USERS
SQL> select file_name from dba_data_files where tablespace_name=’USERS’;
FILE_NAME —————————————————————- +DATA1/parnassus/datafile/users.263.843694795
SQL> alter tablespace users offline;
Tablespace altered. |
Start PRM in NON-DICT mode, add the corresponding datafile and select SCAN DATABASE+SCAN TABLE From Extents:
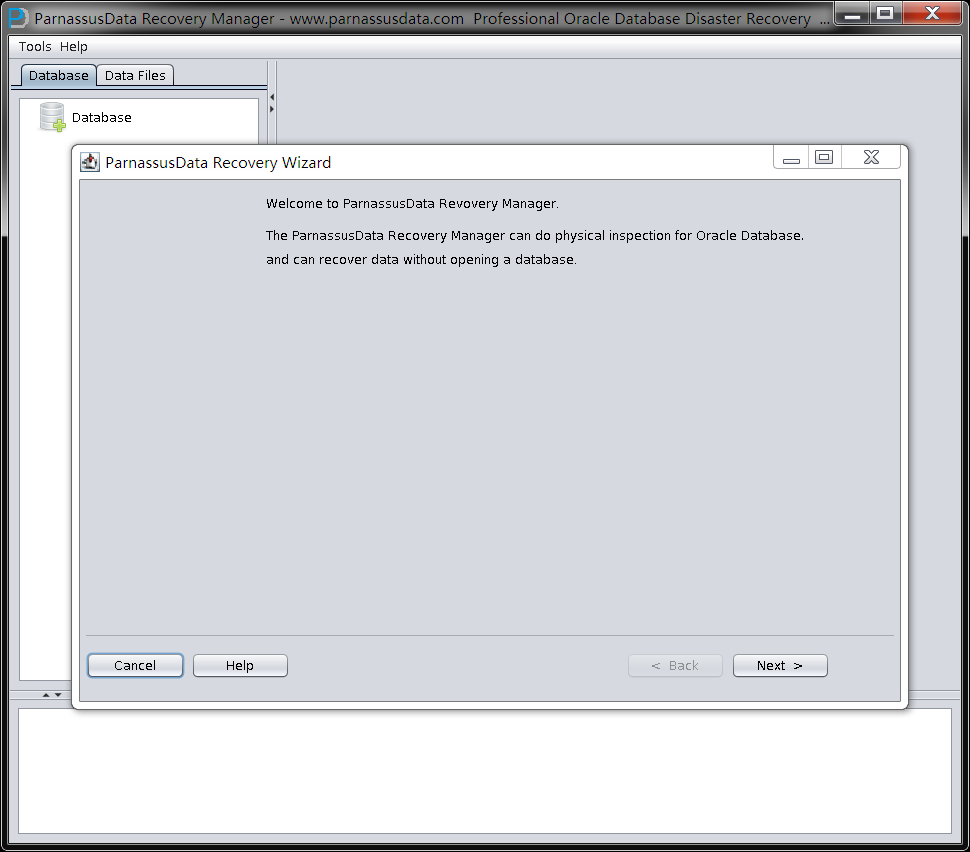
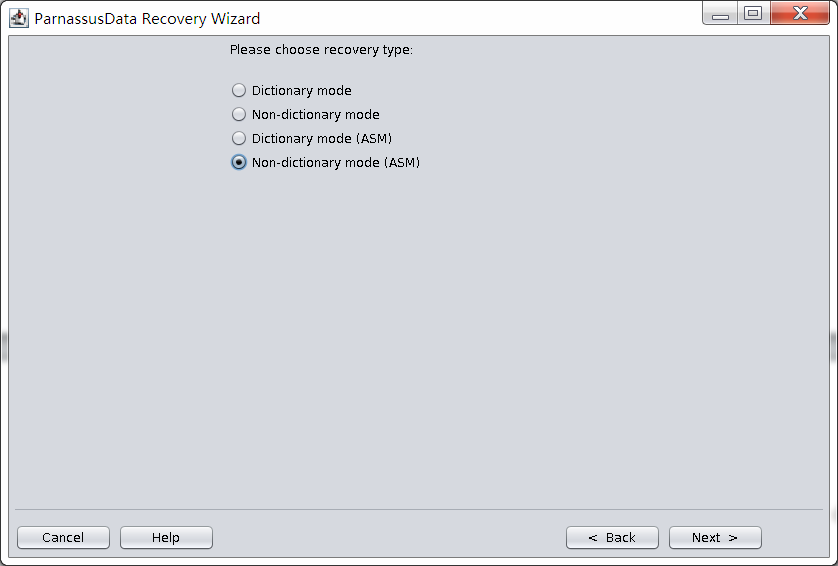
Add all of the related ASM Disks and click ASM Analyze:
Select the character set in Non-Dict mode:

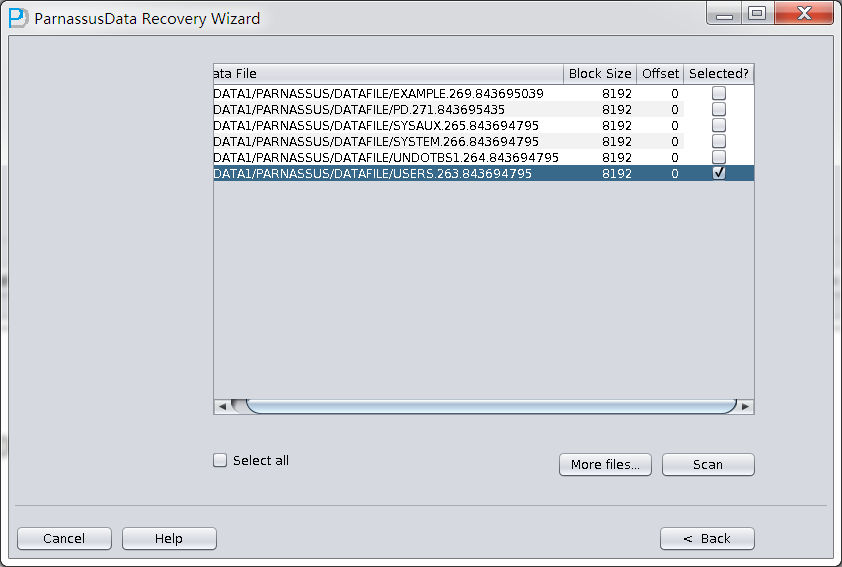
Select the datafile of dropped table, and click scan:
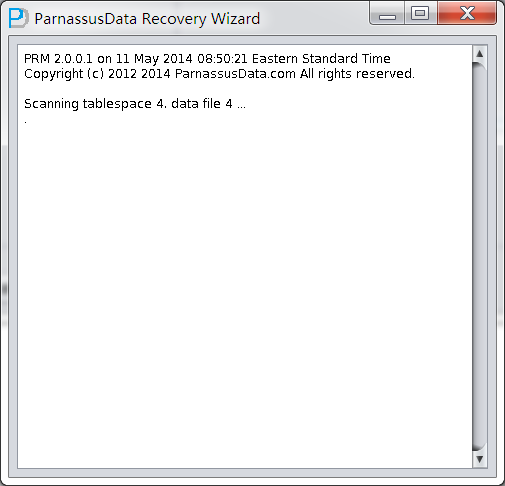
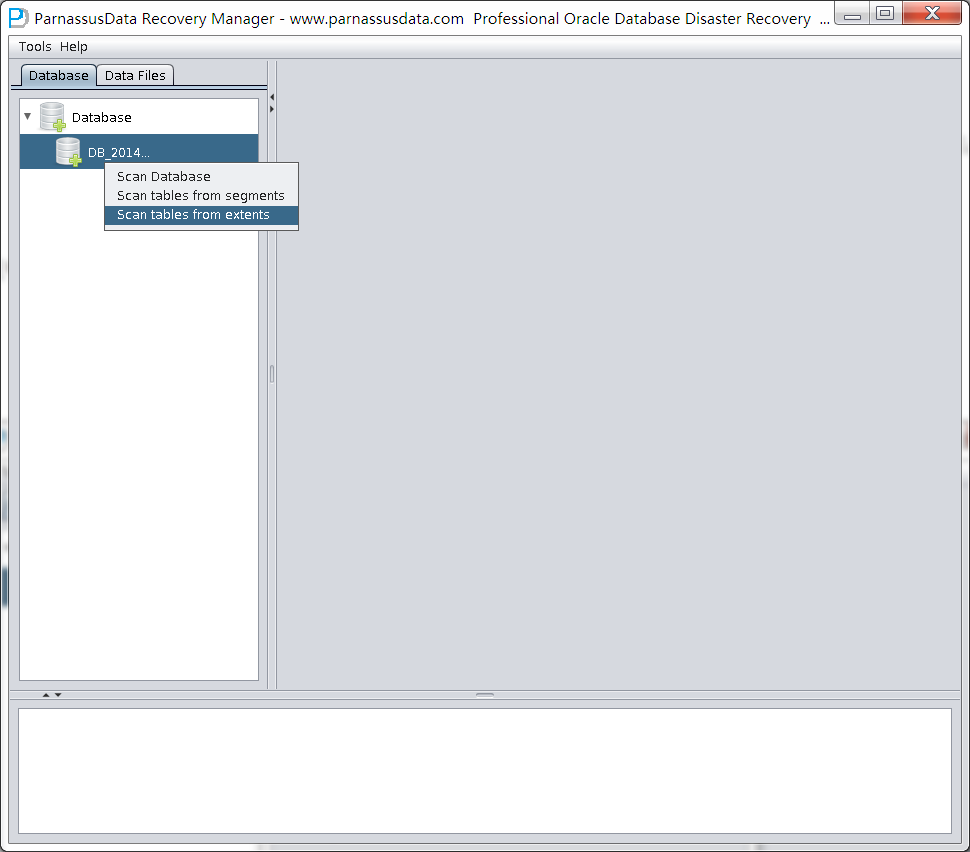
Click the generated database name and right click to select scan tables from extents:
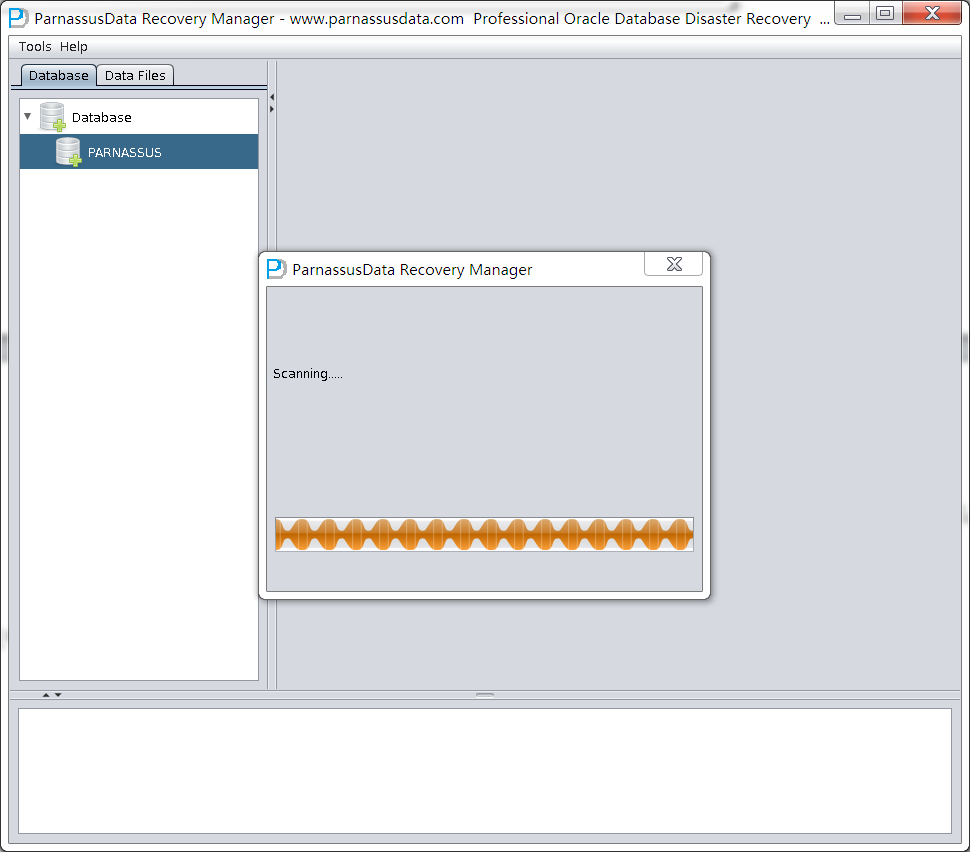
To find that the data of DATA_OBJECT_ID=82641 is mapped to the dropped TORDERDETAIL_HIS table through artificial identification, and pass them back to other tablespace in the source repository by DataBridge.
FAQ
- How to get my database character set information?
You can know your database character set information by Oracle Alert.log.
[oracle@mlab2 trace]$ grep -i character alert_Parnassus.log Database Characterset is US7ASCII
Database Characterset is US7ASCII
alter database character set INTERNAL_CONVERT AL32UTF8
Updating character set in controlfile to AL32UTF8
Synchronizing connection with database character set information Refreshing type attributes with new character set information
Completed: alter database character set INTERNAL_CONVERT AL32UTF8
alter database national character set INTERNAL_CONVERT UTF8
Completed: alter database national character set INTERNAL_CONVERT UTF8 Database Characterset is AL32UTF8
Database Characterset is AL32UTF8
Database Characterset is AL32UTF8
- Why PRM failed with GC ” gc warning: Repeated allocation of very large block (appr.size 512000)”?
So far, most of the problems are caused by usage of Java environments that are not recommended. Especially, it easily leads to such problem to use redhat gcj java on Linux. ParnassusData suggests users use Open JDK 1.6 for PRM, or directly use $JAVA_HOME/bin/java –jar prm.jar to start PRM.
Open JDK for Linux download Link:
| Open jdk x86_64 for Linux 5 | http://pan.baidu.com/s/1qWO740O |
| Tzdata-java x86_64 for Linux 5 | http://pan.baidu.com/s/1gdeiF6r |
| Open jdk x86_64 for Linux 6 | http://pan.baidu.com/s/1mg0thXm |
| Open jdk x86_64 for Linux 6 | http://pan.baidu.com/s/1sjQ7vjf |
| Open jdk x86 for Linux 5 | http://pan.baidu.com/s/1kT1Hey7 |
| Tzdata-java x86 for Linux 5 | http://pan.baidu.com/s/1kT9iBAn |
| Open jdk x86 for Linux 6 | http://pan.baidu.com/s/1sjQ7vjf |
| Tzdata-java x86 for Linux 6 | http://pan.baidu.com/s/1kTE8u8n |
JDK on Other platforms download link:
| AIX JAVA SDK 7 | http://pan.baidu.com/s/1i3JvAlv |
| JDK Windows x86 | http://pan.baidu.com/s/1qW38LhM |
| JDK Windows x86-64 | http://pan.baidu.com/s/1qWDcoOk |
| Solaris JDK 7 x86-64bit | http://pan.baidu.com/s/1gdzgSvh |
| Solaris JDK 7 x86-32bit | http://pan.baidu.com/s/1mgjxFlQ |
| Solaris JDK 7 Sparc | http://pan.baidu.com/s/1pJjX3Ft |
Oracle JDK download link:
http://www.oracle.com/technetwork/java/javasebusiness/downloads/java-archive-d ownloads-javase6-419409.html#jdk-6u45-oth-JPR
- If you find bugs in PRM, how to report the bug to ParnassusData?
Everyone is welcome to report bug to ParnassusData by sending emails to report_bugs@parnassusdata.com. Please enclose the detailed description of operating environment, including OS, Java environment and Oracle database versions, when reporting bug.
- What should I do if PRM failed with the following error?
Error: no `server’ JVM at `D:\Program Files (x86)\Java\jre1.5.0_22\bin\server\jvm.dll’.
If users just installed JAVA Runtime Environment JRE without installing JDK, please start PRM without –server option. This option does not exist in the version before JRE 1.5.
ParnassusData recommends Open JDK 1.6 or above for running PRM.
The download link of JDK 1.6 on various OS: http://www.oracle.com/technetwork/java/javasebusiness/downloads/java-archive-d
ownloads-javase6-419409.html#jdk-6u45-oth-JPR
- Why does PRM display Chinese as messy code?
So far, there are two reasons for Chinese encoding problem:
- The OS does not have Chinese language pack, thus PRM cannot display Chinese correctly
- If OS have installed the necessary language package, please use Open JDK1.6 or above version. There might be some problem in 4.
Find More
Resource: http://www.parnassusdata.com/resources/ Technical Support: service@parnassusdata.com
Sales: sales@parnassusdata.com Download Software: http://www.parnassusdata.com/
Contact: http://www.parnassusdata.com/zh-hans/contact
ParnassusData Corporation, Shanghai, GaoPing Road No. 733. China Phone: (+86) 13764045638
ParnassusData.com
Facebook: http://www.facebook.com/parnassusData Twitter: http://twitter.com/ParnassusData
Weibo: http://weibo.com/parnassusdata
Copyright©2013, ParnassusData and/or its affiliates. All rights reserved. This document is provided for information purposes only and the contents hereof are subject to change without notice. This document is not warranted to be error-free, nor subject to any other warranties or conditions, whether expressed orally or implied in law, including implied warranties and conditions of merchantability or fitness for a particular purpose. We specifically disclaim any liability with respect to this document and no contractual obligations are formed either directly or indirectly by this document. This document may not be reproduced or transmitted in any form or by any means, electronic or mechanical, for any purpose, without our prior written permission.
Oracle and Java are registered trademarks of Oracle and/or its affiliates. Other names may be trademarks of their respective owners.
AMD, Opteron, the AMD logo, and the AMD Opteron logo are trademarks or registered trademarks of Advanced Micro Devices. Intel and Intel Xeon are trademarks or registered trademarks of Intel Corporation. All SPARC trademarks are used under license and are trademarks or registered trademarks of SPARC International, Inc. UNIX is a registered trademark licensed through X/Open Company, Ltd. 0410
Copyright © 2014 ParnassusData Corporation. All Rights Reserved.

Comment