MongoDB 如何更新数组里面的一组对象的属性?

MongoDB 如何更新数组里面的一组对象的属性?


如下面的例子

语法如下:

db.collection.update(
   {  },
   { : { "array.$.field" : value } }
)


db.students.insert ({
  _id: 4,
  grades: [
     { grade: 80, mean: 75, std: 8 },
     { grade: 85, mean: 90, std: 5 },
     { grade: 90, mean: 85, std: 3 }
  ]
})


db.students.update(
   { _id: 4, "grades.grade": 85 },
   { $set: { "grades.$.std" : 6 } }
)

> db.students.insert ({
...   _id: 4,
...   grades: [
...      { grade: 80, mean: 75, std: 8 },
...      { grade: 85, mean: 90, std: 5 },
...      { grade: 90, mean: 85, std: 3 }
...   ]
... })
WriteResult({ "nInserted" : 1 })
>
>
> db.students.update(
...    { _id: 4, "grades.grade": 85 },
...    { $set: { "grades.$.std" : 6 } }
... )
WriteResult({ "nMatched" : 1, "nUpserted" : 0, "nModified" : 1 })
>
>  db.students.find();
{ "_id" : 4, "grades" : [ { "grade" : 80, "mean" : 75, "std" : 8 }, { "grade" : 85, "mean" : 90, "std" : 6 }, { "grade" : 90, "mean" : 85, "std" : 3 } ] }
>
>
>
> db.students.find().pretty();
{
        "_id" : 4,
        "grades" : [
                {
                        "grade" : 80,
                        "mean" : 75,
                        "std" : 8
                },
                {
                        "grade" : 85,
                        "mean" : 90,
                        "std" : 6
                },
                {
                        "grade" : 90,
                        "mean" : 85,
                        "std" : 3
                }
        ]
}

 若要多个filed 匹配则使用


db.students.update(
   {
     _id: 4,
     grades: { $elemMatch: { grade: { $lte: 90 }, mean: { $gt: 80 } } }
   },
   { $set: { "grades.$.std" : 6 } }
)


我有一个文档对象
{
    "DocEntry": 15,
    "UserSign": 1,
    "Status": 0,
    "Users": [
        {
            "UserSign": 1,
            "Status": 0
        },
        {
            "UserSign": 2,
            "Status": 0
        }
    ]
}
如何用db.collection.Update 来更新Users 嵌入文档array里面的所有Status 为1


db.doc1.remove({});
db.doc1.insert( {
    "DocEntry": 15,
    "UserSign": 1,
    "Status": 0,
    "Users": [
        {
            "UserSign": 1,
            "Status": 0
        },
        {
            "UserSign": 2,
            "Status": 0
        }
    ]
});


db.doc1.insert( {
    "DocEntry": 16,
    "UserSign": 1,
    "Status": 0,
    "Users": [
        {
            "UserSign": 1,
            "Status": 0
        },
        {
            "UserSign": 2,
            "Status": 0
        }
    ]
});


You cannot modify multiple array elements in a single update operation. Thus, you'll have to repeat the update in order to migrate documents which need multiple array elements to be modified. You can do this by iterating through each document in the collection, repeatedly applying an update with $elemMatch until the document has all of its relevant comments replaced, e.g.:

db.collection.find().forEach( function(doc) {
  do {
    db.collection.update({_id: doc._id,
                          comments:{$elemMatch:{user:"test",
                                                avatar:{$ne:"new_avatar.jpg"}}}},
                         {$set:{"comments.$.avatar":"new_avatar.jpg"}});
  } while (db.getPrevError().n != 0);
})


无法通过一个update操作更新多个array元素,所以需要写个循环


db.doc1.find().forEach(function(doc) {
  do {
    db.doc1.update( {"Users.Status":0} ,  {$set:{"Users.$.Status":1 }});
  } while (db.getPrevError().n != 0);
})


一个初学者的指南—MongoDB的性能优化 简介

这是MongoDB时间系列的第二部分教程,这篇文章将致力于性能调优的讲解。在我的前一篇文章中,提到了我们的虚拟化项目需求。总之,我们有5000万次的事件,从2012年1月持续到2013年1月,使用下面这个结构进行统计:


{

“_id” : ObjectId(“52cb898bed4bd6c24ae06a9e”),

“created_on” : ISODate(“2012-11-02T01:23:54.010Z”)

“value” : 0.19186609564349055

}

我们要统计最小值,最大值,和平均值以及条目数,离散时间样本如下:

all seconds in a minute

all minutes in an hour

all hours in a day

这是基本测试脚本:

var testFromDates = [

new Date(Date.UTC(2012, 5, 10, 11, 25, 59)),        new Date(Date.UTC(2012, 7, 23, 2, 15, 07)),        new Date(Date.UTC(2012, 9, 25, 7, 18, 46)),        new Date(Date.UTC(2012, 1, 27, 18, 45, 23)),        new Date(Date.UTC(2012, 11, 12, 14, 59, 13))]; function testFromDatesAggregation(matchDeltaMillis, groupDeltaMillis, type, enablePrintResult) {        var aggregationTotalDuration = 0;        var aggregationAndFetchTotalDuration = 0;        testFromDates.forEach(function(testFromDate) {                      var timeInterval = calibrateTimeInterval(testFromDate, matchDeltaMillis);               var fromDate = timeInterval.fromDate;               var toDate = timeInterval.toDate;               var duration = aggregateData(fromDate, toDate, groupDeltaMillis, enablePrintResult);               aggregationTotalDuration += duration.aggregationDuration;               aggregationAndFetchTotalDuration += duration.aggregationAndFetchDuration;                 });        print(type + ” aggregation took:” + aggregationTotalDuration/testFromDates.length + “s”);        if(enablePrintResult) {               print(type + ” aggregation and fetch took:” + aggregationAndFetchTotalDuration/testFromDates.length + “s”);        }} 

这是测试使用的三个用例:

testFromDatesAggregation(ONE_MINUTE_MILLIS, ONE_SECOND_MILLIS, ‘One minute seconds’);

testFromDatesAggregation(ONE_HOUR_MILLIS, ONE_MINUTE_MILLIS, ‘One hour minutes’);

testFromDatesAggregation(ONE_DAY_MILLIS, ONE_HOUR_MILLIS, ‘One year days’);


我们使用五个开始时间戳在给定时间粒度的情况下去统计正在测试的时间间隔。第一个时间戳(例如T1)Sun Jun 10 2012 14:25:00 GMT(格林尼治标准时间)+0300 (GTB Daylight Time)(GTB夏令时)和相关的测试时间间隔如下:

all seconds in a minute:
[ Sun Jun 10 2012 14:25:00 GMT+0300 (GTB Daylight Time)
, Sun Jun 10 2012 14:26:00 GMT+0300 (GTB Daylight Time) )

all minutes in an hour:
[ Sun Jun 10 2012 14:00:00 GMT+0300 (GTB Daylight Time)
, Sun Jun 10 2012 15:00:00 GMT+0300 (GTB Daylight Time) )

all hours in a day:
[ Sun Jun 10 2012 03:00:00 GMT+0300 (GTB Daylight Time)
, Mon Jun 11 2012 03:00:00 GMT+0300 (GTB Daylight Time) )


冷数据库测试

第一个测试时将运行在一个刚打开的mongoDB实例上。每个测试之间我们要重新启动数据库,所以没有索引会预加载。

我们将使用这个结果作为下一个优化技术的参考

精彩马上呈现!


热数据库测试

预加载索引和数据是一项常见的技术,被应用在sql和nosql管理的数据库系统中。

MongoDB为实现此目的提供了相关的命令。但是它不是万能的,不能盲目使用它去解决性能落后的问题,否则会使你数据库的性能急剧下降,所以你必须了解你的数据库并且熟练的使用它。

这些相关的指令可以让我们指定预先加载的项:

==数据

==索引

==数据和索引

我们需要分析数据的大小和我们要怎么去查询,以得到最好的预加载的数据。


数据大小的足迹

MongoDB在分析数据方面功能强大。接下来,我们用下面的命令来检查时间集合事件。

> db.randomData.dataSize()

3200000032

> db.randomData.totalIndexSize()

2717890448

> db.randomData.totalSize()

7133702032


当总规模为7GB的时候,数据大小大约为3GB。我做了一个测试,如果选择预先加载所有的数据和索引,就会打破当前工作站的8GB内存的限制,这会使swap分区和性能大大降低。 


弊大于利

复制这个场景需要重新启动mongoDB服务,运行下面的命令:

db.runCommand({ touch: “randomData”, data: true, index:true });


把这组命令放到脚本文件中,运行脚本文件,看看每次加载所有的数据需要多少时间

D:\wrk\vladmihalcea\vladmihalcea.wordpress.com\mongodb-facts\aggregator\timeseries>mongo random touch_index_data.js

MongoDB shell version: 2.4.6

connecting to: random

Touch {data: true, index: true} took 15.897s

现在重新做这个测试,看看会得到什么结果

可以看到性能大幅下降,通过这个例子你要意识到优化是一件很严肃的事情。你必须明白你在做什么,否则弊大于利。

这是这个特定的使用情况下,快照的内存使用情况


如果想了解更多这个方面的,我建议你花点时间读一些mongoDB存储的工作方式的资料。


预加载数据  

正如我之前所说的,优化技术的选择和使用建立在对当前数据的了解的基础上。前一篇帖子有关于虚拟化项目的介绍,我们只是在匹配阶段使用了索引。在获取数据的时候,我们只是加载数值,并没有索引。因为数据的大小完全适合RAM。我们可以只选择预加载数据,而没有选择索引。

这是一个很好的访问数据的方法,考虑到我们目前收集的索引:


“indexSizes” : {

“_id_” : 1460021024,

“created_on_1” : 1257869424

}


可以看出我们根本用不到id 的索引。在具体的例子中,加载索引实际上有可能是降低性能。所以有时候只加载数据就可以了。


db.runCommand({ touch: “randomData”, data: true, index:false });
D:\wrk\vladmihalcea\vladmihalcea.wordpress.com\mongodb-facts\aggregator\timeseries>mongo random touch_data.jMongoDB shell version: 2.4.6connecting to: random

Touch {data: true} took 14.025s

重新运行所有的测试,产生的结果如下:


可以看出这次的查询是三次中比较好的。但这并不是最好的,我们还可以进一步的改善。

我们可以编写一个预加载工作集,设置为一个后台进程,这种方法会显著的提高性能。

预加载工作集的脚本如下:

load(pwd() + “/../../util/date_util.js”);

load(pwd() + “/aggregate_base_report.js”);

var minDate = new Date(Date.UTC(2012, 0, 1, 0, 0, 0, 0));

var maxDate = new Date(Date.UTC(2013, 0, 1, 0, 0, 0, 0));

var one_year_millis = (maxDate.getTime() – minDate.getTime());

aggregateData(minDate, maxDate, ONE_DAY_MILLIS);


下面的脚本会统计一年的数据和一年中每一天的数据

D:\wrk\vladmihalcea\vladmihalcea.wordpress.com\mongodb-facts\aggregator\timeseries>mongo random aggregate_year_report.js

MongoDB shell version: 2.4.6

connecting to: random

Aggregating from Sun Jan 01 2012 02:00:00 GMT+0200 (GTB Standard Time) to Tue Jan 01 2013 02:00:00 GMT+0200 (GTB Standard Time)

Aggregation took:299.666s

Fetched :366 documents.

重新运行所有的测试会看到最好的结果:

这时可以检查一下当前工作集的内存使用情况

db.serverStatus( { workingSet: 1 } );

“workingSet” : {

“note” : “thisIsAnEstimate”,

“pagesInMemory” : 1130387,

“computationTimeMicros” : 253497,

“overSeconds” : 723


这是一个估计,每个内存页是4k,所以我们估计工作集大约是4 k * 1130387 = 1130387 k = 4.31 gb,,确保了我们当前工作集适合RAM。

预加载和运行的测试对内存的使用也证实了这种情况

总结

和我的前一篇文章的数据比较,在minutes-in-hour 中已经有了五个时间的减少,但是我们还没有完成它。通过这个简单的优化,可以看出它减少了我之前的0.209s和JOOQ Oracle0.02秒的差距。尽管他们的结果已经非常不错了。

我们的结论是,目前的结构不利于我们对大型数据集。我的下一篇文章

将为你带来一种改进压缩数据模型的方法,这将允许我们每个分片存储更多的文件碎片。

代码可以在GitHub 中找到

如果你喜欢我的文章,并且期待及时得到我最新帖子的邮件通知,你只需关注我的博客。


优化MongoDB索引

要在MongoDB上使应用程序运行性能良好,好的索引必不可少。当它将你的索引放在RAM中时,将能使它达到最好的性能。减少索引的大小亦有助于得到更快的查询速度,并通过更小的内存管理更多的数据。


以下是一些用来减小MongoDB索引大小的技巧:

  • 检查索引的大小

首先你应该做的是去了解你的索引的大小。在你做出一些改变并检查这种改变是否能减少索引大小之前,你会想先知道索引目前的大小。理想状态下,你一直在使用着你的监测工具图形化监测索引。

使用Mongo shell时,我们可以通过运行db.stats()命令来得到索引统计数据 :

> db.stats(){

“db” : “examples1”,

“collections” : 6,

“objects” : 403787,

“avgObjSize” : 121.9966467469235,

“dataSize” : 49260660,

“storageSize” : 66695168,

“numExtents” : 20,

“indexes” : 9,

“indexSize” : 48524560,

“fileSize” : 520093696,

“nsSizeMB” : 16,

“ok” : 1

}


  • Indexes : 在 examples1 数据库中的索引数目;
  • indexSize :  在 examples1 数据库中索引的大小

因为每个数据集合( collection )都拥有索引,所以你也可以通过执行 db.collection.stats( ) 来检查它们:

> db.address.stats(){

“ns” : “examples1.address”,

“count” : 3,

“size” : 276,

“avgObjSize” : 92,

“storageSize” : 8192,

“numExtents” : 1,

“nindexes” : 2,

“lastExtentSize” : 8192,

“paddingFactor” : 1,

“flags” : 1,

“totalIndexSize” : 16352,

“indexSizes” : {

“_id_” : 8176,

“_types_1” : 8176

},

“ok” : 1

}


  • totalIndexSize – 在数据集合( collection )所有索引的大小;
  • indexSizes – 由索引名称与大小组成的字典( dictionary )

注意 : 这里所有由执行命令返回的结果都是以bytes为单位。


这些命令都很有用但它们手工使用起来很乏味。我写了一个工具index-stats.py来生成索引统计数据的报告,让事情变得更简单。你可以在Github上的mongodb-tools 项目中找到它。


(virtualenv) mongodb-tools$ ./index-stats.pyChecking DB: examples2.system.indexes

Checking DB: examples2.things

Checking DB: examples1.system.indexes

Checking DB: examples1.address

Checking DB: examples1.typeless_address

Checking DB: examples1.user

Checking DB: examples1.typeless_user


Index Overview

+—————————-+——————————–+———+————-+

|             Collection     |             Index            |  % Size  | Index Size |

+—————————-+——————————–+———-+————+

| examples1.address         | _id_                           | 0.0%    | 7.98K      |

| examples1.address         | _types_1                       | 0.0%    | 7.98K      |

| examples1.typeless_address     | _id_                           | 0.0%    | 7.98K      |

| examples1.typeless_user   | _id_                           | 10.1%  | 6.21M      |

| examples1.typeless_user   | address_id_1                   | 10.1%  | 6.21M      |

| examples1.typeless_user   | typeless_address_ref_1         | 5.9%     | 3.62M      |

| examples1.user            | _id_                           | 10.1%  | 6.21M      |

| examples1.user            | _types_1                       | 6.9%    | 4.24M      |

| examples1.user            | _types_1_address_id_1          | 12.2%  | 7.51M      |

| examples1.user            | _types_1_address_ref_1         | 26.2%    | 16.09M     |

| examples2.things               | _id_                           | 10.1%  | 6.21M      |

| examples2.things               | _types_1                       | 8.4%    | 5.13M      |

+—————————-+——————————–+———-+————+

Top 5 Largest Indexes

+—————————-+——————————–+———-+————+

|        Collection         |              Index             |  % Size  | Index Size |

+—————————-+——————————–+———-+————+

| examples1.user            | _types_1_address_ref_1         | 26.2%  | 16.09M     |

| examples1.user            | _types_1_address_id_ 1        | 12.2%    | 7.51M      |

| examples1.typeless_user   | _id_                           | 10.1%    | 6.21M      |

| examples2.things               | _types_1                       | 8.4%    | 5.13M      |

| examples1.user            | _types_1                       | 6.9%     | 4.24M      |

+—————————-+——————————–+———-+————+

Total Documents: 600016

Total Data Size: 74.77M

Total Index Size: 61.43M

RAM Headroom: 2.84G

Available RAM Headroom: 1.04G


输出的结果展示了总索引大小、每个索引的大小、以及它们的相对大小。此外,报告还指出了在你的所有数据集合( collection )中最大的五个索引。这让检测最大索引、找出能为减少整体大小提供最大贡献的那一个索引变得简便起来。

  • RAM Headroom是你的物理内存–索引大小。一个看起来不错的值意味着你有可用的RAM给索引来装入内存。
  • Available RAM Headroom是空余内存–索引大小。因为这个系统上还有其他进程在消耗内存,所以我没有可用的总RAM Headroom。


统计RAM Headroom数据的想法来自于MongoDB monitoring service,我使用的是ServerDensity.

通过这个输出,我可以第一时间聚焦到examples1.user数据集合( collection )和索引types_1_address_ref_1与types_1_address_id_1 的状况。


2 )删除冗余的索引

如果你已经发布了一段代码并修改了一段时间,最后可能会有索引冗余。如果所有component的部分都不可用,MongoDB能使用Component索引的前缀。在之前的输出:

| examples1.user          | _types_1               |   6.9% |      4.24M |

在以下冗余:

| examples1.user          | _types_1_address_ref_1 |  26.2% |     16.09M |

| examples1.user          | _types_1_address_id_1  |  12.2% |      7.51M |


因为_types_1是这两个索引的前缀。删除它将会为总索引大小节省4.2M的空间,并且当user documents改变时,也只需更新更少的索引。

为了更容易地发现这些索引,你可以从mongodb-tools运行redundant-indexes.py:

(virtualenv)mongodb-tools$ ./redundant-indexes.pyChecking DB: examples2

Checking DB: examples1

Index examples1.user[_types_1] may be redundant with examples1.user[_types_1_address_ref_1]

Index examples1.user[_types_1] may be redundant with examples1.user[_types_1_address_id_1]

Checking DB: local


3 )执行Compact 命令


      如果你正在使用MongoDB 2.0+的版本,你可以执行compact 命令来整理collections和重建索引。执行compact 命令会锁住数据库,所以请在事先确认你清楚地知道你是在什么地方执行这个操作。如果你在Replica sets中执行,那么最简单的事情就是在你的secondaries中执行,每次一个,备份主要的部分到新的secondary中去并在老的primary中执行Compact操作。


4 )MongoDB 2.0 索引改进

      如果你还在使用MongoDB 2.0或者更新版本,升级并重建你的索引将会提供大约25%的空间节省。

请看 Index Performance Enhancements


5 )检查索引规则

      另一件事便是检查你的索引规则。你想要被索引的值小并且提高易查询性( selective)。索引值并不能帮助MongoDB发现你的数据在更快地降低查询速度并增加索引大小。如果你的应用程序正在使用Mapping框架,并且它支持在代码中定义索引,你应该检查看看它到底是如何创建索引的。比如Pyhthon中的MongoEngine使用”_types”来鉴别在同一个数据集合(collection)中的子类。这可能导致索引占用很大的空间并且可能并不增加索引的可查询性(selectivity)。


在我的测试数据中,我最大的索引是:

| examples1.user             | _types_1_address_ref_1 |  26.2%


查看它的数据:


> db.user.findOne(){

“_id” : ObjectId(“4f2ef95c89a40a11c5000002”),

“_types” : [

“User”

],

“address_id” : ObjectId(“4f2ef95c89a40a11c5000000”),

“address_ref” : {

“$ref” : “address”,

“$id” : ObjectId(“4f2ef95c89a40a11c5000000”)

},

“_cls” : “User”

}


你可以看到_types是一个带有类名User值的数组。因为我的代码中没有任何关于User的子类,所以索引这个值将不会对索引的可查询性(selectivity)有任何帮助。另一方面是想想每个相关索引的值都将以”User”作为前缀,这将为导致值增加一些额外的字节并且对索引的可查询性(selectivity)无任何帮助

用以下的代码来删除掉它:

class User(Document):meta {‘index_types’:False}


索引修改为:

| examples1.user             | address_ref_1          |  16.8% |


节约了23%的存储空间。


继续深入挖掘, address_ref_1 是一个Address对象的ReferenceProperty 以上的代码展示了它是一个包含了参考文件和数据集合(collection)所指向的id的字典。如果我们将这个address_idReferenceProperty 改成 ObjectIdProperty你将可以得到额外的空间节省:


| examples1.user             | address_id_1           |   9.5% |      6.21M || examples1.user             | address_ref_1          |  20.9% |


节约了53%。这是因为将索引的值从序列化的字典改为更能被MongoDB高度优化的ObjectId。虽然改变属性的类型的确要求代码的修改,并且你同时会失去由ReferenceProperty 提供的自动de-referencing的功能。但它可以节约大量内存。


总而言之,我们通过调整一些索引的规则降低了61%的存储并改变了一小段代码。


6 )删除/转移旧数据

      在很多应用程序中,一些数据被频繁的访问。如果你有不被你的用户访问的旧数据,那么把它转移到另一个无索引的数据集合(collection)中,或者把它存储在数据库外的某个地方。理想状态下,你的数据库包含并索引可用数据中的工作集。

还有一些其他好的优化方式,你可以从以下找到它们:

你如何优化你的索引呢?

通过Mongolab申请免费的MongoDB测试实例

Mongolab目前提供的免费的MongoDB实例供广大用户测试使用,免费实例的限制是最大500MB。


mongdblab


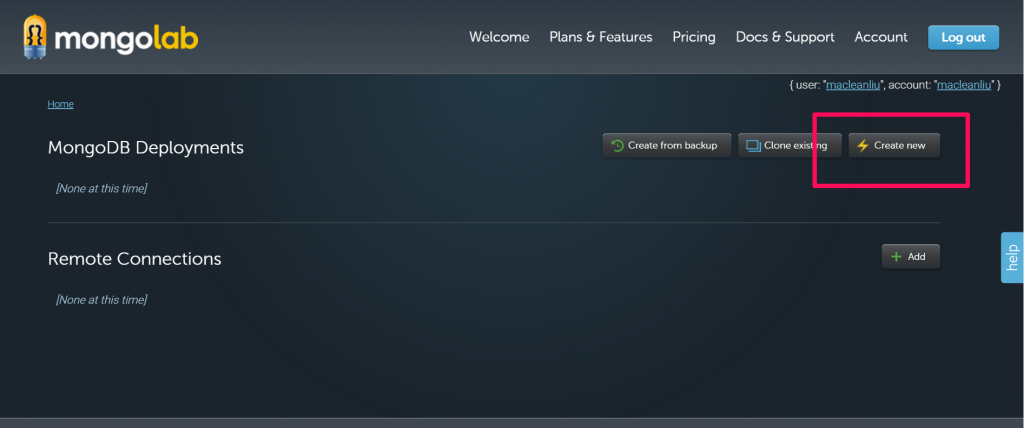
首先到https://mongolab.com 注册一个帐号,之后Login登录, 点击create new

mongdblab1


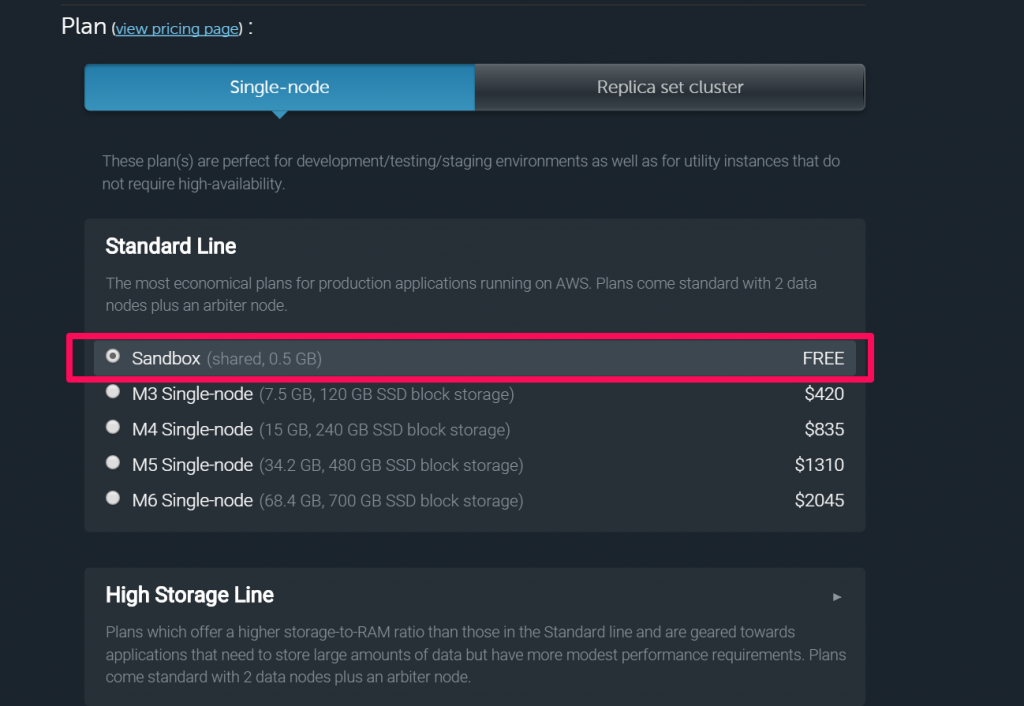
plan中要选择single-node才可以看到free plan的sanbox , cloud provide直接选Amazon AWS

mongodb2

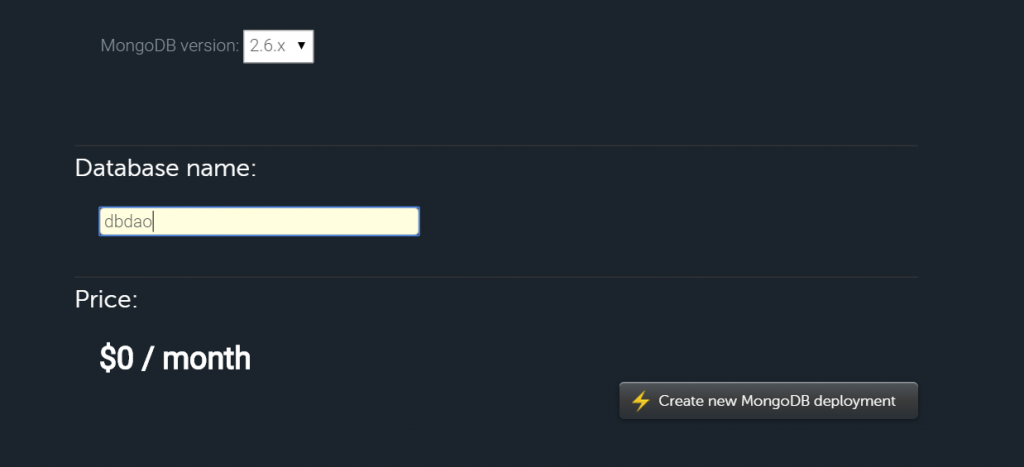
之后点击create new mongodb deployment即可

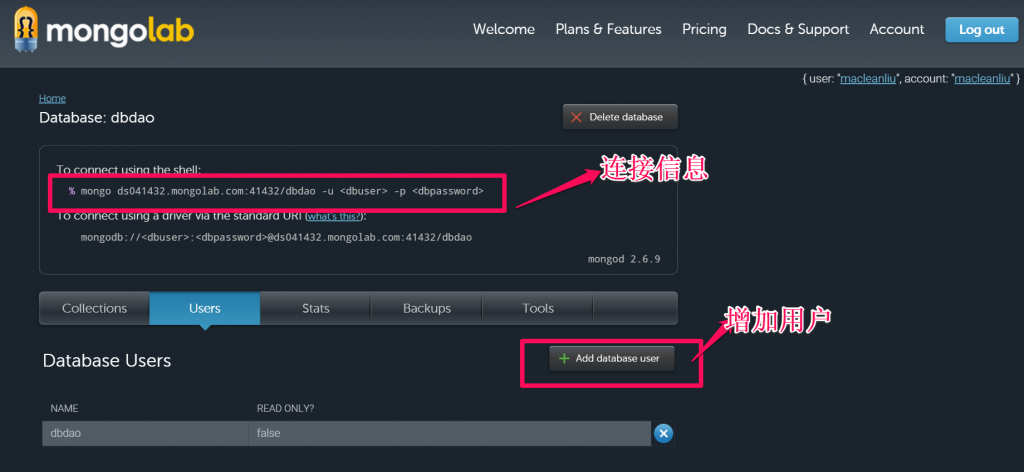
需要手动创建一个mongodb用户:

mongolab4


之后就可以利用该云端mongodb测试实例了:


例如 使用mongo shell连接


[root@ocm ~]# mongo ds041432.mongolab.com:41432/dbdao -u dbdao -p dbdao
MongoDB shell version: 3.0.3
connecting to: ds041432.mongolab.com:41432/dbdao
rs-ds041432:PRIMARY> 

rs-ds041432:PRIMARY> 

rs-ds041432:PRIMARY> db.dbdao.insert({"hello":"world!"});
WriteResult({ "nInserted" : 1 })
rs-ds041432:PRIMARY> db.dbdao.find();
{ "_id" : ObjectId("55672f4076e23efacff7cc07"), "hello" : "world!" }

C100DBA认证讲解 MongoDB replication 原理

C100DBA认证讲解 MongoDB replication 原理

Screen Shot 2015-05-25 at 11.39.46 PM

题目正文:

which of following is true of mechanics of replication in MongoDB?

  1. Clients read from nearest member of a replica set by default
  2. Members of a replica set may replicate data from any other data-bearing member of set .
  3. Operations on the primary are recorded in a capped collection called oplog

翻译:

下面关于Mongodb的replication复制技术细节描述正确的是?

  1. 复制集成员会默认从复制集中最近的成员哪里读取数据
  2. replica set 复制集中的成员可能从其他任何承载数据的节点上复制数据
  3. 在primary上的操作将会被记录到一个capped collection(受限集合)中称之为oplong


Replica set members replicate data continuously after the initial sync. This process keeps the members up to date with all changes to the replica set’s data. In most cases, secondaries synchronize from the primary.

http://docs.mongodb.org/manual/core/replica-set-sync/

==>默认情况下从Primary同步数据,而不是复制集中最近的成员

For a member to sync from another, both members must have the same value for the buildIndexessetting.

Beginning in version 2.2, secondaries avoid syncing from delayed members and hidden members.

从2.2开始secondaries会避免从延迟成员和隐藏成员哪里同步数据,所以复制集中的成员可能从其他任何承载数据的节点上复制数据是错误的


The oplog (operations log) is a special capped collection that keeps a rolling record of all operations that modify the data stored in your databases. MongoDB applies database operations on the primary and then records the operations on the primary’s oplog. The secondary members then copy and apply these operations in an asynchronous process. All replica set members contain a copy of the oplog, in thelocal.oplog.rs collection, which allows them to maintain the current state of the database.

http://docs.mongodb.org/manual/core/replica-set-oplog/

选项Operations on the primary are recorded in a capped collection called oplog是正确的。

C100DBA认证讲解 MongoDB 讲解-quick initiating new replica set member?

C100DBA认证讲解 MongoDB 讲解-quick initiating new replica set member?

Screen Shot 2015-05-25 at 11.15.20 PM


题目正文

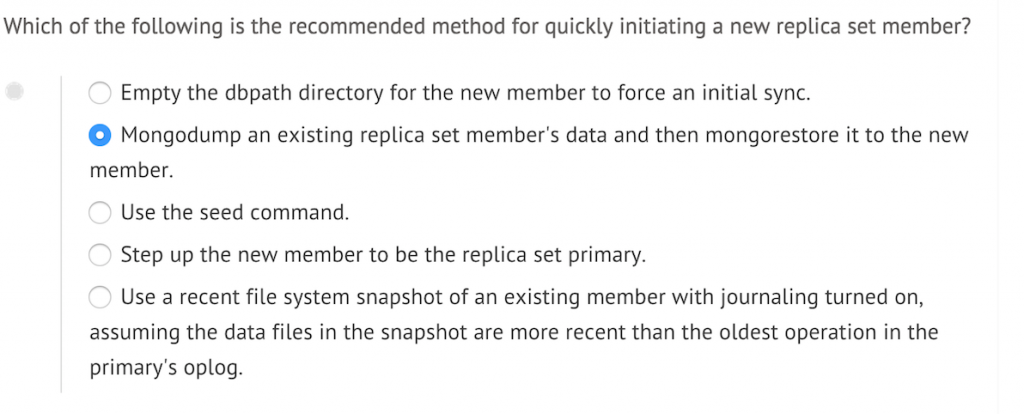
which of the following is the recommended method for quickly initiating a new replica set member?

  1. Empty the dbpath directory for the new member to force an initial sync
  2. Mongodump a existing replica set member’s data and then mongorestore it to the new member
  3. Use the seed command
  4. Step up the new member to be the replica set primary
  5. Use a recent file system snapshot of an existing member with journaling turned on ,assuming the data files in the snapshot are more recent than the oldest operation in the primary’s oplog .


翻译:

以下哪个选项是被推荐的初始化一个新的replica set 复制集成员的?

  1. 为新成员清空dbpath路径下的文件,强制一个初始化同步
  2. mongodump一个replica set Member复制集成员的数据,并mongorestore到新成员
  3. 使用seed 命令
  4. 将新成员配置成replica set中的primary
  5. 使用一个现有成员的文件系统快照且需要启用了journaling ,假设快照中的数据文件要比primary的oplog中的最老的操作更新


官方文档对应的解释:

  • Initial sync occurs when MongoDB creates new databases on a new or restored member, populating the member with the replica set’s data. When a new or restored member joins or rejoins a set, the member waits to receive heartbeats from other members. By default, the member syncs from theclosest member of the set that is either the primary or another secondary with more recent oplog entries. This prevents two secondaries from syncing from each other.
  • Replication occurs continually after initial sync and keeps the member updated with changes to the replica set’s data.

http://docs.mongodb.org/v2.2/core/replication-internals/


Initial Sync

Initial sync copies all the data from one member of the replica set to another member. A member uses initial sync when the member has no data, such as when the member is new, or when the member has data but is missing a history of the set’s replication.

When you perform an initial sync, MongoDB:

  1. Clones all databases. To clone, the mongod queries every collection in each source database and inserts all data into its own copies of these collections. At this time, _id indexes are also built. The clone process only copies valid data, omitting invalid documents.

  2. Applies all changes to the data set. Using the oplog from the source, the mongod updates its data set to reflect the current state of the replica set.

  3. Builds all indexes on all collections (except _id indexes, which were already completed).

    When the mongod finishes building all index builds, the member can transition to a normal state, i.e.secondary.

http://docs.mongodb.org/manual/core/replica-set-sync/

MongoDB replica set演示和实验服务

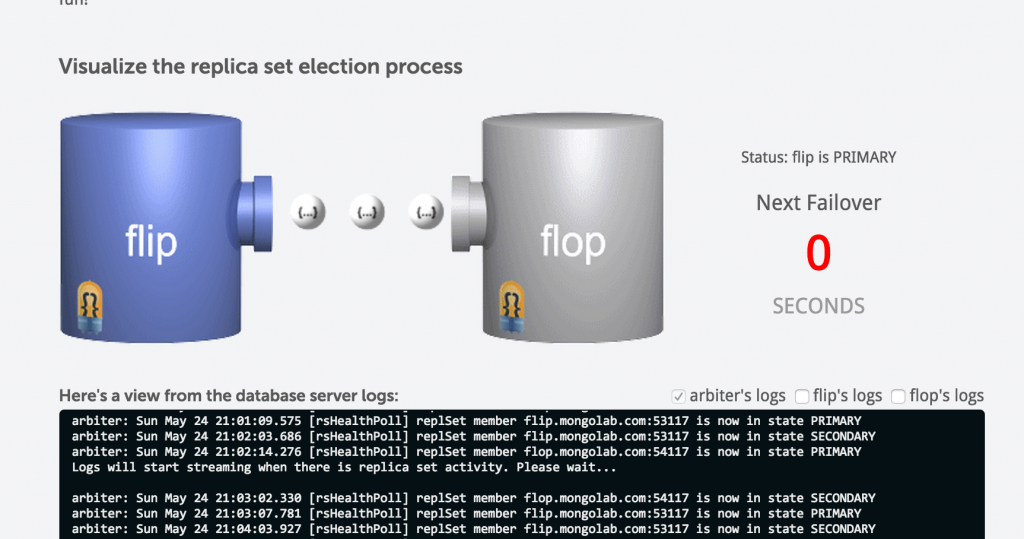
mongolab提供了一个flip-flop 正反器的replica set复制集演示,其通过一个真实的replica set来演示自动的failover。 该真实环境包括三个节点:replica member “flip”和”flop”。每60秒,primary将会自己让自己不可用”step-down”,之后集群将failover到另一个节点上,60秒后再反转回来。


URL: http://mongolab.org/flip-flop/


同时mongolab还提供了一个可视化的replica set  的election过程

Screen Shot 2015-05-25 at 12.07.29 PM


样例日志:

Logs will start streaming when there is replica set activity. Please wait...

arbiter: Sun May 24 20:43:03.373 [rsHealthPoll] replSet member flop.mongolab.com:54117 is now in state SECONDARY
arbiter: Sun May 24 20:43:07.386 [rsHealthPoll] replSet member flip.mongolab.com:53117 is now in state PRIMARY
arbiter: Sun May 24 20:44:03.460 [rsHealthPoll] replSet member flip.mongolab.com:53117 is now in state SECONDARY
arbiter: Sun May 24 20:44:09.545 [rsHealthPoll] replSet member flop.mongolab.com:54117 is now in state PRIMARY
arbiter: Sun May 24 20:45:03.641 [rsHealthPoll] replSet member flop.mongolab.com:54117 is now in state SECONDARY
arbiter: Sun May 24 20:45:13.669 [rsHealthPoll] replSet member flip.mongolab.com:53117 is now in state PRIMARY
arbiter: Sun May 24 20:46:01.764 [rsHealthPoll] DBClientCursor::init call() failed
arbiter: Sun May 24 20:46:01.804 [rsHealthPoll] replSet info flip.mongolab.com:53117 is down (or slow to respond): DBClientBase::findN: transport error: flip.mongolab.com:53117 ns: local.$cmd query: { getnonce: 1 }
arbiter: Sun May 24 20:46:01.805 [rsHealthPoll] replSet member flip.mongolab.com:53117 is now in state DOWN
arbiter: Sun May 24 20:46:03.815 [rsHealthPoll] replSet member flip.mongolab.com:53117 is up
arbiter: Sun May 24 20:46:03.816 [rsHealthPoll] replSet member flip.mongolab.com:53117 is now in state SECONDARY
arbiter: Sun May 24 20:46:07.774 [rsHealthPoll] replSet member flop.mongolab.com:54117 is now in state PRIMARY
arbiter: Sun May 24 20:47:03.863 [rsHealthPoll] replSet member flop.mongolab.com:54117 is now in state SECONDARY
Sun May 24 20:47:03.863 [rsMgr] replSet I don't see a primary and I can't elect myself
arbiter: Sun May 24 20:47:13.910 [rsHealthPoll] replSet member flip.mongolab.com:53117 is now in state PRIMARY
arbiter: Sun May 24 20:48:03.990 [rsHealthPoll] replSet member flip.mongolab.com:53117 is now in state SECONDARY
arbiter: Sun May 24 20:48:07.992 [rsHealthPoll] replSet member flop.mongolab.com:54117 is now in state PRIMARY
arbiter: Sun May 24 20:49:04.080 [rsHealthPoll] replSet member flop.mongolab.com:54117 is now in state SECONDARY
arbiter: Sun May 24 20:49:14.141 [rsHealthPoll] replSet member flip.mongolab.com:53117 is now in state PRIMARY
arbiter: Sun May 24 20:50:04.252 [rsHealthPoll] replSet member flip.mongolab.com:53117 is now in state SECONDARY
arbiter: Sun May 24 20:50:14.265 [rsHealthPoll] replSet member flop.mongolab.com:54117 is now in state PRIMARY
arbiter: Sun May 24 20:51:04.350 [rsHealthPoll] replSet member flop.mongolab.com:54117 is now in state SECONDARY
arbiter: Sun May 24 20:51:14.456 [rsHealthPoll] replSet member flip.mongolab.com:53117 is now in state PRIMARY
arbiter: Sun May 24 20:52:04.569 [rsHealthPoll] replSet member flip.mongolab.com:53117 is now in state SECONDARY
arbiter: Sun May 24 20:52:08.573 [rsHealthPoll] replSet member flop.mongolab.com:54117 is now in state PRIMARY
arbiter: Sun May 24 20:53:02.660 [rsHealthPoll] replSet member flop.mongolab.com:54117 is now in state SECONDARY
arbiter: Sun May 24 20:53:08.675 [rsHealthPoll] replSet member flip.mongolab.com:53117 is now in state PRIMARY
arbiter: Sun May 24 20:54:02.839 [rsHealthPoll] replSet member flip.mongolab.com:53117 is now in state SECONDARY
arbiter: Sun May 24 20:54:12.951 [rsHealthPoll] replSet member flop.mongolab.com:54117 is now in state PRIMARY
arbiter: Sun May 24 20:55:03.255 [rsHealthPoll] replSet member flop.mongolab.com:54117 is now in state SECONDARY
arbiter: Sun May 24 20:55:08.948 [rsHealthPoll] replSet member flip.mongolab.com:53117 is now in state PRIMARY
arbiter: Sun May 24 20:56:03.017 [rsHealthPoll] replSet member flip.mongolab.com:53117 is now in state SECONDARY
arbiter: Sun May 24 20:56:09.024 [rsMgr] replSet I don't see a primary and I can't elect myself


flip-flop 的初衷是为了可视化演示复制集的election过程,让开发者能更清楚了解这一过程,以便能写出更好的客户端连接代码。同时mongolab还给出了一个连接URL:

mongodb://testdbuser:testdbpass@flip.mongolab.com:53117,flop.mongolab.com:54117/testdb

C100DBA MongoDB 讲解 replica set vote

C100DBA MongoDB 讲解 replica set vote

题目中文:

Given a replica set with five data-bearing members, suppose the primary goes down with operations in its oplog that have been copied to only one secondary .

Assuming no other problems occur, which of the following describes what is most likely to happen?

  1. The primary will rollback the operations
  2. The secondary with the most recent oplog will be elected primary
  3. The most recent secondary will roll back the operations following the election
  4. Reads will stale until primary comes backup up

翻译:

对于一个有五个承载数据的成员的replica set 而言,假设primary服务器宕机了,且其oplog中最新的操作信息只成功拷贝到一个secondary上了。

假设没有其他问题发生,以下哪个选项是正确的?

  1. Primary将在恢复时回滚部分操作
  2. 拥有最新的oplog的这个secondary服务器将赢得election并成为primary
  3. 在election后最新的这个secondary会回滚部分操作
  4. 直到primary重新可用,之前读操作将读到过时的数据


关于此问题 官方文档有较明确解释:

A rollback does not occur if the write operations replicate to another member of the replica set before the primary steps down and if that member remains available and accessible to a majority of the replica set.     http://docs.mongodb.org/manual/core/replica-set-rollbacks/

只要primary上的写操作已经复制到某个secondary成员上,secondary成员可用,就可以保证rollback不会发生。


C100DBA MongoDB讲解-update in replication

C100DBA MongoDB讲解-update in replication

题目正文:

Support you execute the following query on the primary of a replica set and that this results in updates to 130 documents in the products collection :


db.products.update( { "year": "2012" } , { "discount" : 0.1} , { multi: true } )


which of the following best describes replication in this case?

  1. Each Secondary executes the same query
  2. Each Secondary executes one operation per document affected
  3. Each Secondary writes a byte-for-byte of data file changes on the primary to its own data files.
  4. It depends on the configuration of the replica set
  5. None of the above describes replication correctly

翻译:

假设你在一个replica set复制集的primary上执行了下面的语句,并更新了130个products collection中的document文档,那么:


db.products.update( { “year”: “2012” } , { “discount” : 0.1} , { multi: true } )

那么如下哪个选项关于在此场景中的replication描述是正确的?

  1. 所有secondary将执行同样的语句
  2. 所有secondary将针对受影响的document一个一个做更新操作(其实oracle的Streams、OGG也是这样)
  3. 所有的secondary都对primary上数据文件的修改一个个字节地做对应的修改 (其实相当于Oracle 物理备库 physical standby)
  4. 取决于实际replica set的配置
  5. 以上说的关于replication 都不对啊


官方文档对于secondary应用oplog的解释是:

Updates to Multiple Documents at Once

The oplog must translate multi-updates into individual operations in order to maintain idempotency. This can use a great deal of oplog space without a corresponding increase in data size or disk use.      http://docs.mongodb.org/manual/core/replica-set-oplog/

即oplog必须将多更新的操作转换成单独的操作 以便维护幂等性idempotency,idempotency的含义是一个操作保证了这个操作无论被执行多少次都降产生同样的结果。

显然答案B是正确的,具体验证需要通过TRACE Secondary 来证明。

但题目中给出的update语句是存在问题的:


> db.products.insert({ year:"2012"});
WriteResult({ "nInserted" : 1 })
> db.products.update( { "year": "2012" } , { "discount" : 0.1} , { multi: true } )
WriteResult({
 "nMatched" : 0,
 "nUpserted" : 0,
 "nModified" : 0,
 "writeError" : {
 "code" : 9,
 "errmsg" : "multi update only works with $ operators"
 }
})
> 

C100DBA MongoDB 讲解-advantage of having delayed replica set member?

C100DBA MongoDB 讲解-advantage of having delayed replica set member?


What is the principal advantage of having a delayed replica set member?

  1. It allows the load on the secondary severs to be more evenly spread
  2. It allows you to perform queries against historical versions of data
  3. It increases write speed to the primary
  4. It makes it easier to upgrade the system without downtime
  5. It provides a window of time to recover from operator error

翻译为:

部署一个有延迟的replica set member复制集成员的主要好处是什么?

  1. 其允许二级服务器上的负载能够被均衡覆盖
  2. 其允许用户查询历史版本的数据 , (注解:其实就相当于是延迟的dataguard standby ,可以查到过去某个时间点的数据)
  3. 其帮助primary节点提供写入的速度
  4. 其帮助系统升级而无需宕机时间更简单方便
  5. 其为操作错误后的恢复提供了一个时间窗口

显然答案是B 其允许用户查询历史版本的数据。

delayed replica set member的配置方法:

z

cfg = rs.conf()
cfg.members[0].priority = 0
cfg.members[0].hidden = true
cfg.members[0].slaveDelay = 3600
rs.reconfig(cfg)

详见 官方文档http://docs.mongodb.org/manual/tutorial/configure-a-delayed-replica-set-member/

主要参数为slaveDelay ,注意slaveDelay的长度必须小于oplog的窗口,如果oplog要比slaveDelay时间短,则延迟的成员将无法成功复制操作。


Because delayed members are a “rolling backup” or a running “historical” snapshot of the data set, they may help you recover from various kinds of human error. For example, a delayed member can make it possible to recover from unsuccessful application upgrades and operator errors including dropped databases and collections.

由于延迟节点是一个 “滚动的备份” 或一个保持着历史快照的数据集, 所以他们可以帮助你从各种人为故障中恢复出数据。 例如如果一个不成功的应用升级或其他操作失误(例如误drop database或collection)时,你可以直接从延迟节点中抽取数据来恢复。


沪ICP备14014813号-2

沪公网安备 31010802001379号