MongoDB sharding collection 与 unique index


MongoDB中对于已经分片的collection ,仅有索引对应的field是shard key is a prefix的情况才可以建unique index唯一索引,否则不能建为唯一索引。
例如:

mongos>  sh.status();
--- Sharding Status --- 
  sharding version: {
        "_id" : 1,
        "minCompatibleVersion" : 5,
        "currentVersion" : 6,
        "clusterId" : ObjectId("554b241f4df23a46a60f6a9c")
}
  shards:
        {  "_id" : "shard0000",  "host" : "shard0.dbdao.com:35001" }
        {  "_id" : "shard0001",  "host" : "shard1.dbdao.com:35001" }
        {  "_id" : "shard0002",  "host" : "shard2.dbdao.com:35001" }
  balancer:
        Currently enabled:  yes
        Currently running:  no
        Failed balancer rounds in last 5 attempts:  0
        Migration Results for the last 24 hours: 
                No recent migrations
  databases:
        {  "_id" : "admin",  "partitioned" : false,  "primary" : "config" }
        {  "_id" : "test_db",  "partitioned" : true,  "primary" : "shard0000" }
                test_db.test_collection
                        shard key: { "_id" : "hashed" }
                        chunks:
                                shard0000       2
                                shard0001       2
                                shard0002       2
                        { "_id" : { "$minKey" : 1 } } -->> { "_id" : NumberLong("-6148914691236517204") } on : shard0000 Timestamp(3, 2) 
                        { "_id" : NumberLong("-6148914691236517204") } -->> { "_id" : NumberLong("-3074457345618258602") } on : shard0000 Timestamp(3, 3) 
                        { "_id" : NumberLong("-3074457345618258602") } -->> { "_id" : NumberLong(0) } on : shard0001 Timestamp(3, 4) 
                        { "_id" : NumberLong(0) } -->> { "_id" : NumberLong("3074457345618258602") } on : shard0001 Timestamp(3, 5) 
                        { "_id" : NumberLong("3074457345618258602") } -->> { "_id" : NumberLong("6148914691236517204") } on : shard0002 Timestamp(3, 6) 
                        { "_id" : NumberLong("6148914691236517204") } -->> { "_id" : { "$maxKey" : 1 } } on : shard0002 Timestamp(3, 7) 
        {  "_id" : "test",  "partitioned" : false,  "primary" : "shard0000" }

mongos> 
mongos> 
mongos> db.test_collection.find();
{ "_id" : ObjectId("554b296c160953211da4b523"), "x" : 2 }
{ "_id" : ObjectId("554b296c160953211da4b522"), "x" : 1 }
{ "_id" : ObjectId("554b296c160953211da4b524"), "x" : 3 }
{ "_id" : ObjectId("554b296c160953211da4b526"), "x" : 5 }
{ "_id" : ObjectId("554b296c160953211da4b529"), "x" : 8 }
{ "_id" : ObjectId("554b296c160953211da4b525"), "x" : 4 }
{ "_id" : ObjectId("554b296c160953211da4b52c"), "x" : 11 }
{ "_id" : ObjectId("554b296c160953211da4b52b"), "x" : 10 }
{ "_id" : ObjectId("554b296c160953211da4b527"), "x" : 6 }
{ "_id" : ObjectId("554b296c160953211da4b52d"), "x" : 12 }
{ "_id" : ObjectId("554b296c160953211da4b52f"), "x" : 14 }
{ "_id" : ObjectId("554b296c160953211da4b528"), "x" : 7 }
{ "_id" : ObjectId("554b296c160953211da4b52e"), "x" : 13 }
{ "_id" : ObjectId("554b296c160953211da4b530"), "x" : 15 }
{ "_id" : ObjectId("554b296c160953211da4b52a"), "x" : 9 }
{ "_id" : ObjectId("554b296c160953211da4b531"), "x" : 16 }
{ "_id" : ObjectId("554b296c160953211da4b532"), "x" : 17 }
{ "_id" : ObjectId("554b296c160953211da4b533"), "x" : 18 }
{ "_id" : ObjectId("554b296c160953211da4b53b"), "x" : 26 }
{ "_id" : ObjectId("554b296c160953211da4b534"), "x" : 19 }
Type "it" for more

mongos> db.test_index.ensureIndex( { x : 1 } , {unique: true} );
{
        "raw" : {
                "shard0.dbdao.com:35001" : {
                        "createdCollectionAutomatically" : true,
                        "numIndexesBefore" : 1,
                        "numIndexesAfter" : 2,
                        "ok" : 1
                }
        },
        "ok" : 1
}
mongos> db.test_index.ensureIndex( { y : 1 } , {unique: true} );
{
        "raw" : {
                "shard0.dbdao.com:35001" : {
                        "createdCollectionAutomatically" : false,
                        "numIndexesBefore" : 2,
                        "numIndexesAfter" : 3,
                        "ok" : 1
                }
        },
        "ok" : 1
}
mongos> sh.shardCollection("test_db.test_index", { x : 1 } );
{
        "ok" : 0,
        "errmsg" : "can't shard collection 'test_db.test_index' with unique index on { y: 1.0 } and proposed shard key { x: 1.0 }. Uniqueness can't be maintained unless shard key is a prefix"
}
mongos> db.test_index.drop();
true


如果分片key是index filed的一部分则可以建立唯一索引

true
mongos> db.test_index.ensureIndex( { x : 1 , y:1 } , {unique: true} );
{
        "raw" : {
                "shard0.dbdao.com:35001" : {
                        "createdCollectionAutomatically" : true,
                        "numIndexesBefore" : 1,
                        "numIndexesAfter" : 2,
                        "ok" : 1
                }
        },
        "ok" : 1
}
mongos> sh.shardCollection("test_db.test_index", { x : 1 } );
{ "collectionsharded" : "test_db.test_index", "ok" : 1 }


建非unique 索引总是可以:


mongos> db.test_index.ensureIndex( { z : 1 }  );
{
        "raw" : {
                "shard0.dbdao.com:35001" : {
                        "createdCollectionAutomatically" : false,
                        "numIndexesBefore" : 2,
                        "numIndexesAfter" : 3,
                        "ok" : 1
                },
                "shard1.dbdao.com:35001" : {
                        "createdCollectionAutomatically" : false,
                        "numIndexesBefore" : 2,
                        "numIndexesAfter" : 2,
                        "note" : "all indexes already exist",
                        "ok" : 1
                },
                "shard2.dbdao.com:35001" : {
                        "createdCollectionAutomatically" : false,
                        "numIndexesBefore" : 2,
                        "numIndexesAfter" : 2,
                        "note" : "all indexes already exist",
                        "ok" : 1
                }
        },
        "ok" : 1
}
mongos> db.test_index.getIndexes();
[
 {
 "v" : 1,
 "key" : {
 "_id" : 1
 },
 "name" : "_id_",
 "ns" : "test_db.test_index"
 },
 {
 "v" : 1,
 "unique" : true,
 "key" : {
 "x" : 1,
 "y" : 1
 },
 "name" : "x_1_y_1",
 "ns" : "test_db.test_index"
 },
 {
 "v" : 1,
 "key" : {
 "z" : 1
 },
 "name" : "z_1",
 "ns" : "test_db.test_index"
 }
]


mongos> db.test_index.drop();
true
mongos> 
mongos> db.test_index.ensureIndex( { x : 1 } , {unique: true} );
{
 "raw" : {
 "shard0.dbdao.com:35001" : {
 "createdCollectionAutomatically" : true,
 "numIndexesBefore" : 1,
 "numIndexesAfter" : 2,
 "ok" : 1
 }
 },
 "ok" : 1
}
mongos> sh.shardCollection("test_db.test_index", { x : 1 } );
{ "collectionsharded" : "test_db.test_index", "ok" : 1 }
mongos> for (var i = 1; i <= 500; i++) db.test_collection.insert( { x : i , y:i+1} );
WriteResult({ "nInserted" : 1 })
mongos> db.test_index.ensureIndex( { x : 1 , y:1 } , {unique: true} );
{
 "raw" : {
 "shard0.dbdao.com:35001" : {
 "createdCollectionAutomatically" : false,
 "numIndexesBefore" : 2,
 "numIndexesAfter" : 3,
 "ok" : 1
 },
 "shard1.dbdao.com:35001" : {
 "createdCollectionAutomatically" : false,
 "numIndexesBefore" : 2,
 "numIndexesAfter" : 3,
 "ok" : 1
 },
 "shard2.dbdao.com:35001" : {
 "createdCollectionAutomatically" : false,
 "numIndexesBefore" : 2,
 "numIndexesAfter" : 3,
 "ok" : 1
 }
 },
 "ok" : 1
}

总结:

MongoDB中对于已经分片的collection ,仅有索引对应的field是shard key is a prefix的情况才可以建unique index唯一索引,否则不能建为唯一索引。

对于shard collection建立non-unique index总是可以的


” A attempt to create a unique index in previously sharded collection will result in an error message”

这句话说得是不严谨的, 如果创建的unique index 以shard key作为prefix的话那么是可以被创建了,仅仅当index prefix和shard key没关系时是会报错的
 

E11000 duplicate key & mongorestore

mongorestore 可以将mongodump工具导出的数据导入到其他mongodb数据库中。 由于mongoDB中有_id字段总是作为主键存在,所以对于一般不会覆盖完全相同(包括_id)也相同的数据,因为如果导入的数据有重复的_id,那么会触发E11000 duplicate key错误。


例如


ac:~ maclean$ mongo
MongoDB shell version: 3.0.2
connecting to: test
> db.abc
db.abc
> db.duptest.insert({_id:10,x:10});
WriteResult({ "nInserted" : 1 })
> 
> 

ac:~ maclean$ mongodump -h localhost -p 27017  -d test -c duptest  --out duptest 
2015-05-11T22:22:36.743+0800	writing test.duptest to duptest/test/duptest.bson
2015-05-11T22:22:36.744+0800	writing test.duptest metadata to duptest/test/duptest.metadata.json
2015-05-11T22:22:36.745+0800	done dumping test.duptest

MongoDB shell version: 3.0.2
connecting to: test
> db.duptest.update({_id:10},{x:20});
WriteResult({ "nMatched" : 1, "nUpserted" : 0, "nModified" : 1 })
> db.duptest.find();
{ "_id" : 10, "x" : 20 }
> 


ac:~ maclean$ mongorestore -h localhost -p 27017 duptest/
2015-05-11T22:23:32.355+0800	building a list of dbs and collections to restore from duptest/ dir
2015-05-11T22:23:32.356+0800	reading metadata file from duptest/test/duptest.metadata.json
2015-05-11T22:23:32.356+0800	restoring test.duptest from file duptest/test/duptest.bson
2015-05-11T22:23:32.357+0800	error: E11000 duplicate key error index: test.duptest.$_id_ dup key: { : 10.0 }
2015-05-11T22:23:32.357+0800	restoring indexes for collection test.duptest from metadata
2015-05-11T22:23:32.358+0800	finished restoring test.duptest
2015-05-11T22:23:32.358+0800	done
ac:~ maclean$ mongo
MongoDB shell version: 3.0.2
connecting to: test
> db.duptest.find();
{ "_id" : 10, "x" : 20 }

MongoDB获取命令行启动参数getCmdLineOpts

MongoDB获取命令行启动参数的方法; 有时候希望知道启动mongd的启动参数,可以使用如下命令获得:

 use admin
db.runCommand("getCmdLineOpts")

例如
> use admin
switched to db admin
> db.runCommand("getCmdLineOpts")
{
	"argv" : [
		"/usr/local/opt/mongodb/bin/mongod",
		"--config",
		"/usr/local/etc/mongod.conf"
	],
	"parsed" : {
		"config" : "/usr/local/etc/mongod.conf",
		"net" : {
			"bindIp" : "127.0.0.1"
		},
		"storage" : {
			"dbPath" : "/usr/local/var/mongodb"
		},
		"systemLog" : {
			"destination" : "file",
			"logAppend" : true,
			"path" : "/usr/local/var/log/mongodb/mongo.log"
		}
	},
	"ok" : 1


如何在Ubuntu上安装MongoDB 3.0.2 WiredTiger

安装mongodb 3.0.2

操作系统是Ubuntu 14.04.1 LTS \n \l

主要步骤如下:

sudo apt-key adv --keyserver hkp://keyserver.ubuntu.com:80 --recv 7F0CEB10
sudo echo "deb http://repo.mongodb.org/apt/ubuntu "$(lsb_release -sc)"/mongodb-org/3.0 multiverse" | sudo tee /etc/apt/sources.list.d/mongodb-org-3.0.list
sudo apt-get update
sudo apt-get install -y mongodb-org
sudo service mongod start


安装详细步骤如下

root@dbdao-Inspiron-560s:~# sudo apt-key adv --keyserver hkp://keyserver.ubuntu.com:80 --recv 7F0CEB10
Executing: gpg --ignore-time-conflict --no-options --no-default-keyring --homedir /tmp/tmp.08FbwQ9cDM --no-auto-check-trustdb --trust-model always --keyring /etc/apt/trusted.gpg --primary-keyring /etc/apt/trusted.gpg --keyserver hkp://keyserver.ubuntu.com:80 --recv 7F0CEB10
gpg: requesting key 7F0CEB10 from hkp server keyserver.ubuntu.com
gpg: key 7F0CEB10: public key "Richard Kreuter <richard@10gen.com>" imported
gpg: Total number processed: 1
gpg:               imported: 1  (RSA: 1)

root@dbdao-Inspiron-560s:~# echo "deb http://repo.mongodb.org/apt/ubuntu "$(lsb_release -sc)"/mongodb-org/3.0 multiverse" | sudo tee /etc/apt/sources.list.d/mongodb-org-3.0.list
deb http://repo.mongodb.org/apt/ubuntu trusty/mongodb-org/3.0 multiverse


sudo apt-get update
sudo apt-get install -y mongodb-org


之后创建wiredTiger使用的存储目录并修改必要的参数


sudo mkdir -p /m01/mondata
 sudo chown mongodb:mongodb /m01/mondata
 sudo echo "storageEngine = wiredTiger" >> /etc/mongod.conf 

 修改 sudo vi /etc/mongod.conf 

 dbpath=/var/lib/mongodb

 修改为

 dbpath=/m01/mondata


修改/etc/security/limits.conf 加入如下内容 : sudo vi /etc/security/limits.conf

* soft nproc 1024
root soft nproc unlimited

* soft nofile 64000 # 加入的内容
* hard nofile 64000 # 加入的内容

修改/etc/rc.local 如下sudo vi /etc/rc.local


touch /var/lock/subsys/local

if test -f /sys/kernel/mm/transparent_hugepage/enabled; then # ↑加入的内容
 echo never > /sys/kernel/mm/transparent_hugepage/enabled # │
fi # │
if test -f /sys/kernel/mm/transparent_hugepage/defrag; then # │
 echo never > /sys/kernel/mm/transparent_hugepage/defrag # │
fi 


修改 /etc/init/mongod.conf , 加入 sudo vi /etc/init/mongod.conf

在pre-start script 这一行下面加入下面的内容

 if [ -f /sys/kernel/mm/transparent_hugepage/enabled ]; then
 echo never > /sys/kernel/mm/transparent_hugepage/enabled
 fi
 if [ -f /sys/kernel/mm/transparent_hugepage/defrag ]; then
 echo never > /sys/kernel/mm/transparent_hugepage/defrag
 fi


sudo service mongod restart

以上重启了mongod的daemon进程

之后可以使用mongo 命令行操作


MongoDB示例数据导入Sample Data

基于github 项目https://github.com/tmcnab/northwind-mongo, 一个简单的MongoDB 示例数据加载方法,步骤很简单。

确保你的系统中已经已经安装mongodb server并在运行中

1、下载示例数据 northwind-mongo-master.zip https://www.askmac.cn/wp-content/uploads/2015/05/northwind-mongo-master.zip

2、解压  unzip northwind-mongo-master.zip

3、切换到对应目录 cd  northwind-mongo-master

运行./mongo-import.sh  会将对应的数据加载到MongoDB northwind DB中


ac:northwind-mongo-master maclean$ ./mongo-import.sh 
2015-05-09T21:40:15.956+0800	connected to: localhost
2015-05-09T21:40:16.140+0800	imported 8 documents
2015-05-09T21:40:16.152+0800	connected to: localhost
2015-05-09T21:40:16.160+0800	imported 91 documents
2015-05-09T21:40:16.171+0800	connected to: localhost
2015-05-09T21:40:16.173+0800	imported 49 documents
2015-05-09T21:40:16.186+0800	connected to: localhost
2015-05-09T21:40:16.186+0800	Failed: read error on entry #2: line 3, column 404: bare " in non-quoted-field
2015-05-09T21:40:16.186+0800	imported 0 documents
2015-05-09T21:40:16.199+0800	connected to: localhost
2015-05-09T21:40:16.234+0800	Failed: read error on entry #3179: line 3189, column 404: bare " in non-quoted-field
2015-05-09T21:40:16.234+0800	imported 0 documents
2015-05-09T21:40:16.245+0800	connected to: localhost
2015-05-09T21:40:16.286+0800	imported 2155 documents
2015-05-09T21:40:16.299+0800	connected to: localhost
2015-05-09T21:40:16.341+0800	imported 830 documents
2015-05-09T21:40:16.356+0800	connected to: localhost
2015-05-09T21:40:16.361+0800	imported 77 documents
2015-05-09T21:40:16.374+0800	connected to: localhost
2015-05-09T21:40:16.376+0800	imported 4 documents
2015-05-09T21:40:16.397+0800	connected to: localhost
2015-05-09T21:40:16.401+0800	imported 3 documents
2015-05-09T21:40:16.419+0800	connected to: localhost
2015-05-09T21:40:16.423+0800	imported 29 documents
2015-05-09T21:40:16.435+0800	connected to: localhost
2015-05-09T21:40:16.438+0800	imported 53 documents


ac:northwind-mongo-master maclean$ mongo
MongoDB shell version: 3.0.2
connecting to: test
> show dbs
Northwind  0.078GB
admin      0.078GB
local      0.078GB
reporting  1.953GB
test       0.203GB
> 
> use Northwind
switched to db Northwind
> show collections
categories
customers
employee-territories
employees
order-details
orders
products
regions
shippers
suppliers
system.indexes
territories
> 
> db.orders.find();


以上完成了MongoDB样例数据加载

常见问题解答:MongoDB原理

常见问题解答 MongoDB原理,翻译基于mongoDB 官方文档 http://docs.mongodb.org/manual/faq/fundamentals/

本文档主要介绍mongodb使用的基础上层问题以及使用的概略。 如果在本文中没有找到你关心的问题解答,mongoDB官方建议你去mail list提问 ,或者阅读这份更完整的FAQ


MongoDB是什么类型的数据库?


MongoDB是面向文档的数据库管理系统DBMS(显然mongodb不是oracle那样的RDBMS,而仅仅是DBMS)。 想想一下MySQL中没有任何关系型数据库的表,而由JSON类型的对象组成数据模型的样子会师如何的?


值得注意的是,MongoDB既不支持JOIN(连接)也不支持transaction(事务)。Significantly, MongoDB supports neither joins nor transactions.


但是请注意MongDB有着大量其他优良的特性,如二级索引、功能丰富的查询语言以及对每一个单个文档文件的原子写保证以及完全一致性的读取。

此外,例如master-salve replication 自动故障切换的主从复制技术和通过自动的基于范围的分区来实现的内建的横向扩展。

mongodb的document基于BSON格式,BSON是一种二进制对象格式,内容形式上类似于JSON。


Mongodb数据库中有table表的概念吗?


mongodb中存放数据的集合中没有table,但有很类似于table和column的概念; mongodb中将数据均存放在collections中,collections很类似于RDBMS关系型数据库中的table表。  一个collections存放有一个或多个document,document对应于RDBMS中的一个记录或者一行数据,每一个文档均有一个或者多个field字段,其对应于关系型数据库中的column。

collection与关系型数据库中的表有着几个重大的区别:

一个collection中的每一个document可能都有着不同的field或不同的field顺序,例如:

对于关系型数据库而言 emp表(empno int,empname varchar2(200)),则emp表的每一行数据都是如下的形式  :


empno empname 
10    "mike"
20    "tom"
30    "maclean"

如果上述数据有违反emp表结构设计的数据,例如希望多存一个字段salary都是非法的,RDBMS将不允许这类非法操作被执行,会直接报错。


而对于MongoDB数据库而言,并不在意固定的模式设计,collection中可以存放field顺序、结构完全不同的数据:


> db.dbdao_t1.insert({empno:10,enpname:"maclean",salary:90000});
WriteResult({ "nInserted" : 1 })
> db.dbdao_t1.insert({itemno:20,itemname:"box"});
WriteResult({ "nInserted" : 1 })
> 
> db.dbdao_t1.insert({exam_id:"1z0-043",score:100});
WriteResult({ "nInserted" : 1 })
> db.dbdao_t1.find();
{ "_id" : ObjectId("554f065b92269e7fc2fa83f0"), "empno" : 10, "enpname" : "maclean", "salary" : 90000 }
{ "_id" : ObjectId("554f067092269e7fc2fa83f1"), "itemno" : 20, "itemname" : "box" }
{ "_id" : ObjectId("554f068792269e7fc2fa83f2"), "exam_id" : "1z0-043", "score" : 100 }


以上插入了3行结构完全不同的数据到同一个collection中。MongoDB这样的设计让开发变得十分迅速,因为对于MongoDB的适应场景往往是那些需要快速实现系统的互联网或移动应用程序,其要求开发速度尽可能快,使用MongoDB由于其动态模式的特性,开发人员无法花初始时间在考虑数据结构上;而且后续修改现有的数据结构也异常简单,对于传统的RDBMS而言如果你要给表加字段或做修改字段,都可能需要一定的维护窗口时间;试想一下你在2015年开发一个热门概念的Web项目,对于项目本身而言尽可能快地实现功能和让用户进驻可能是你比别人早获得风险投资的重要一环,在这个前提下代码的健壮性、性能并发等因素均会靠边站。MongoDB的产生正是基于这个大投资环境。


MongoDB数据库中有模式Schema吗?


MongoDB中采用动态模式(Dynamic Schema)。用户可以随意创建collection,而不需要定义结构。collections中的每一个document不需要一定是同样的field顺序、个数、类型、名称。实际上就是不存在什么结构而言,你想插入到collection中的document可以是任何形式的field顺序、个数、类型、名称,不存在RDBMS中的alter table的需求和功能。

在mongoDB实践中,一个collection中的document文件其中大量存放的数据应当是同质的,显然不该将员工数据和商品数据放在同一个collection里。当然mongodb没有硬性要求这一点。MongoDB的灵活数据模式意味着模式的迁移和扩展在实践中都非常容易。这些都是为了更敏捷地基于MongoDB开发应用而存在。


使用何种语言与mongodb交互?


几乎对应所有的主流编程语言,Mongodb都有了对应的客户端驱动。具体可以参考这个语言和驱动列表。


MongoDB支持SQL语言吗?


不支持

但是MongoDB有一大堆自有的丰富的动态查询语言


MongDB的经典适用场景是那些?


由于mongodb的定位是为了通用场景设计的数据库,所以其适合于大多数的用户场景。例如内容管理系统content management systems,移动应用mobile applications,游戏gaming,电子商务
e-commerce,数据分析analytics,数据归档和日志记录等

不要把MongoDB使用在必须要用到sql,Join或者多对象事务的场景里


MongoDB支持ACID吗?


首先明确的是MongoDB 不支持多文档事务multi-document transactions.

但是,MongoDB提供对单个文件的原子操作。10gen认为这种文件级别document-level的原子操作已经足够满足解决那些在关系型数据库里要求事务ACID才能解决的问题了。

举个例子来说在MongoDB,用户可以将数据嵌入到一个document的嵌套队列或嵌套文档中,并通过一个简单的原子操作来更新整个文档。而关系型数据库中需要多个表的多个行数据才能表达如mongodb中一个document的数据,这就需要支持事务以便保证更新数据是原子操作。

MongoDB允许客户端读取被刚插入或刚更新而没有被提交commit的文档document,无论当时是write concern还是journaling配置。 结果是应用程序将观察到2种现象:

  1. 对于有多并发读写的系统,MongoDB将允许客户端读取到那些写操作还没有彻底返回的写操作的结果
  2. 若Mongd在写操作对应的日志提交前就异常终止,甚至当写返回成功了,在mongd重启后查询可能找不到该写操作

其他数据库当中将这种隔离语义 叫做 read uncommited 读未提交。 对于所有的插入和更新,MongDB以以下级别的隔离性修改每一个document文档:客户端永远不会看到单个文档被修改的中间状态, 也就是说客户端要么看到一个文档修改前的样子,要么看到一个文档修改后的样子,客户端不会看到一个文档被修改了一半的样子,例如 { _id:1,empno:20, empname:”maclean”} ,这个document被update为{_id:1, empno:30, empname:”macleanliu”},客户端要么看到前者 要么看到后者,而不会读取到{_id:1, empno:30, empname:”maclean”} 。

但是对于多文档的操作multi-document  operations,MongoDB并不提供任何多个文档的隔离性或者事务。

当一个独立的mongod实例返回了一个成功记录的写关注write concern,这意味着数据被完全提交到磁盘上,即便mongod进程意外终止了,下次重启时也能保证这些数据确实可以被找回。

对于一个复制集replica set而言,写操作仅仅在复制写操作并提交到位于主复制集成员的journal日志中后才是持久的。MongoDB定期提交commit数据到journal日志无论是否是写关注的journaled write concern, 参数commitIntervalMs 可以用来控制mongod多久提交一次。


MongoDB会需要使用大量内存吗?


mongodb并不需要大量的内存。 mongodb是可以运行在内存并不大的机器上的。

MongoDB自动使用服务器上的剩余空闲内存作为其缓存。系统资源监控可能显示MongoDB使用大量内存, 但其使用是动态的。 若其他应用进程需要大量的服务器内存,MongoDB会退让内存给其他进程。


从底层技术上来说,操作系统虚拟内存子系统管理MongoDB的内存。这意味着MongoDB会尽可能使用其所能使用的空闲内存,必要的时候也会使用swap。 当然在内存够多的情况下, MongoDB可以获得更佳的性能。


我如何为MMAPv1 配置缓存大小

mongoDB中mmapv1的内存配置是自动搞定的,用户无法调整。mongodb使用内存映射文件来尽可能使用所有空闲内存。就像操作系统利用文件系统内存那样。

对于MongoDB 3.0以后引入的WiredTiger引擎,用户可以配置一些内存参数,包括storage.wiredTiger.engineConfig.cacheSizeGB –wiredTigerCacheSizeGB。


MongoDB需要为应用级缓存配置独立的缓存层吗?


不需要,在MongoDB数据库中一个文档的表现类与其在应用程序内存中的表现差不多。这意味着数据库中存放的数据形式不仅仅在磁盘的持久层中是有效的,其对应的在应用程序缓存中也是有效的。这也就让在应用程序中搞一个独立的缓存层变得不必要了。

这与关系型数据库不同,关系型数据库中缓存数据的成本较高。关系型数据库首先要将数据转换为对象的表现形式,之后应用程序才能读取并可以将已转换的数据放到独立缓存中。若这些转换数据要求先做一些JOIN操作,则此过程增加了额外的成本;这让关系型数据库中的缓存层变得更重要。


MongoDB支持缓存吗?

是的, MongoDB 尽可能将最近使用过的数据缓存起来。 若用户为查询创建了索引且工作数据集合在内存里放得下,那么MongoDB 尽可能让所有查询基于内存走。

但MongoDB目前不支持查询缓存(缓存查询结果),MongoDB所有的查询均基于数据文件中的collections或index索引。


MongoDB中写磁盘是立即的,还是懒惰的?

默认情况下写操作会每100毫秒被记录到journal 日志。基于此,只要写操作已经被同步到journal种了, 即便你把MongoDB所在服务器的电源拔了,数据还是不会丢失。 这和oracle中只要commit提交写入到磁盘,那么事务就不会丢失类似。 可以通过设置参数commitIntervalMs来控制写操作被提交到日志的提交的频率。

journal提交几乎是立即实时的,而MongoDB写数据文件则和Oracle数据库的DBWR进程写数据文件一样是 异步的、懒惰的。 官方文档描述MongoDB可能会登上60秒才把数据实际写入数据文件。由于先写日志的机制,所以数据持久性不会因为惰性写而被影响,因为journal日志中有足够的数据来保证崩溃恢复(在这里mongodb官方文档使用了和oracle一样的关键词  crash recovery.)可以通过修改参数 syncPeriodSecs来修改写入数据文件的频率。


MongoDB的源代码使用何种语言编写?

MongoDB主要基于C++实现, 客户端库程序则由各个客户端语言实现。当然部分驱动使用C语言作为扩展以便获得最佳性能。


32bit位的MongoDB有什么限制吗?

在MongoDB 3.0以后对于32位平台包括windows和linux,mongodb的商业版本将不再支持这些32位平台 。 而仅仅支持64位的linux和windows。

32位版本的mongodb不支持wiredTiger存储引擎。

当运行32位的mongodb,则数据库的总大小,包括数据和索引的总和大小上线是2GB。  所以,不要在32位平台上部署mongoDB(实际maclean也不建议在windows上部署和学习MonoDB,linux总是最佳平台)。

64位版本的Mongodb,在实际上没有存储大小的限制。 对于产品环境的使用,当然建议也几乎只能使用64位操作系统+64位MongoDB版本。


注意:在32位mongodb中默认禁用journaling,因为启用了journaling后会进一步限制32位数据库的大小。


MongoDB 配置Sharding Cluster 基于Ubuntu

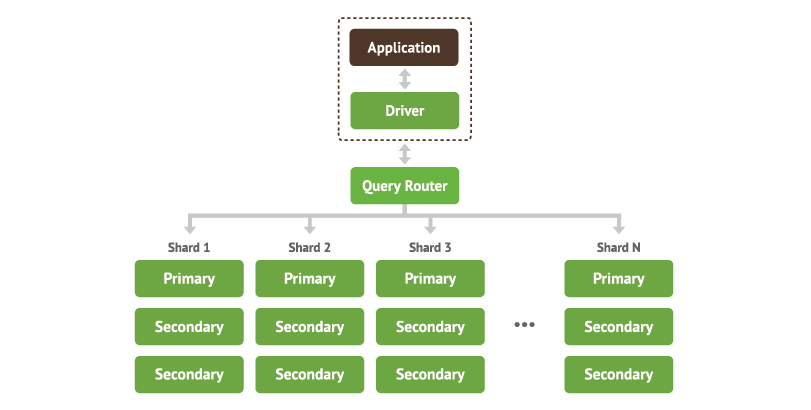
本教程基于Ubuntu 14.04.2 LTS \n \l和mongoDB 3.0, 配置了3个 Config Servers(在产品环境中被要求),2个Query Router查询分发(最少1个必要),和3个shard Server(最少2个)。

注意确保在所有上述Server上已经安装了MongoDB 3.0以上版本,否则首先安装MongoDB,要在Ubuntu上安装MongoDB可以按照这个教程,《升级MongoDB到3.0.2并启用wiredTiger存储引擎 基于ubuntu 14.04》,https://www.askmac.cn/archives/upgrade-to-mongodb-302-wiredtiger.html

how-to-do-mongodb-sharding


以下是HOSTNAME 和 IP 列表,注意本文的网络拓扑按照如下配置,如果与之不同则需要相应修改

 10.132.24.62    config0.dbdao.com
 10.132.24.60    config1.dbdao.com
 10.132.24.61    config2.dbdao.com
 10.132.24.59    query0.dbdao.com 
 10.132.24.63    query1.dbdao.com 
 10.132.24.64    shard0.dbdao.com 
 10.132.24.65    shard1.dbdao.com 
 10.132.24.67    shard2.dbdao.com 

第一步配置config server


需要在配置query router和shard server前配置3个 mongoDB config server:
以下需要在3个 mongoDB config server上均需以root用户执行

以下在三个config server上配置目录


 mkdir -p /m01/mongo-metadata
 chown mongodb:mongodb /m01/mongo-metadata


在三个config server上分别执行,注意 IP要一一对应

 config0: mongod --configsvr --dbpath /m01/mongo-metadata --bind_ip 10.132.24.62 --port 35001
 config1: mongod --configsvr --dbpath /m01/mongo-metadata --bind_ip 10.132.24.60 --port 35001
 config2: mongod --configsvr --dbpath /m01/mongo-metadata --bind_ip 10.132.24.61 --port 35001


第二步配置Query Router Instances

分别在2个Query Router服务器上执行下列的命令


确保2个Query Router服务器上的mongd服务已经关闭

su - root 
 service mongod stop
 启动mongos


在2个Query Router服务器上执行下列命令
su - root 

 mongos --configdb config0.dbdao.com:35001,config1.dbdao.com:35001,config2.dbdao.com:35001

 第三步 增加shard到集群


注意这里没有配置Replication Set RS ,如果需要配置replica-set可以关注maclean今后的文章。

以root用户在三个sharding server上执行下面的命令:


 service mongod stop
 mkdir -p /m01/mongo-data
 chown mongodb:mongodb /m01/mongo-data
 
以下是针对不同server分别执行


shard0:  mongod --dbpath /m01/mongo-data --bind_ip 10.132.24.64 --port 35001 --storageEngine  wiredTiger
shard1:  mongod --dbpath /m01/mongo-data --bind_ip 10.132.24.65 --port 35001 --storageEngine  wiredTiger
shard2:  mongod --dbpath /m01/mongo-data --bind_ip 10.132.24.67 --port 35001 --storageEngine  wiredTiger


之后登陆query router来增加shard

sh.addShard( "shard0.dbdao.com:35001" )
sh.addShard( "shard1.dbdao.com:35001" )
sh.addShard( "shard2.dbdao.com:35001" )


之后可以在DB级别启用sharding

mongo query0.dbdao.com:27017

 use test_db
db
show dbs
sh.enableSharding("test_db")

mongos> db.databases.find()
{ "_id" : "admin", "partitioned" : false, "primary" : "config" }
{ "_id" : "test_db", "partitioned" : true, "primary" : "shard0000" }


在collection级别启用sharding

mongo query0.dbdao.com:27017
use test_db


db.test_collection.ensureIndex( { _id : "hashed" } )


mongos> db.test_collection.ensureIndex( { _id : "hashed" } )
{
        "raw" : {
                "shard0.dbdao.com:35001" : {
                        "createdCollectionAutomatically" : true,
                        "numIndexesBefore" : 1,
                        "numIndexesAfter" : 2,
                        "ok" : 1
                }
        },
        "ok" : 1
}
mongos> sh.shardCollection("test_db.test_collection", { "_id": "hashed" } )

{ "collectionsharded" : "test_db.test_collection", "ok" : 1 }
mongos> 
mongos> use test_db
switched to db test_db
mongos> for (var i = 1; i <= 500; i++) db.test_collection.insert( { x : i } ) WriteResult({ "nInserted" : 1 }) mongos> db.test_collection.find();
{ "_id" : ObjectId("554b296c160953211da4b523"), "x" : 2 }
{ "_id" : ObjectId("554b296c160953211da4b522"), "x" : 1 }
{ "_id" : ObjectId("554b296c160953211da4b524"), "x" : 3 }
{ "_id" : ObjectId("554b296c160953211da4b526"), "x" : 5 }
{ "_id" : ObjectId("554b296c160953211da4b529"), "x" : 8 }
{ "_id" : ObjectId("554b296c160953211da4b525"), "x" : 4 }
{ "_id" : ObjectId("554b296c160953211da4b52c"), "x" : 11 }
{ "_id" : ObjectId("554b296c160953211da4b52b"), "x" : 10 }
{ "_id" : ObjectId("554b296c160953211da4b527"), "x" : 6 }
{ "_id" : ObjectId("554b296c160953211da4b52d"), "x" : 12 }
{ "_id" : ObjectId("554b296c160953211da4b52f"), "x" : 14 }
{ "_id" : ObjectId("554b296c160953211da4b528"), "x" : 7 }
{ "_id" : ObjectId("554b296c160953211da4b52e"), "x" : 13 }
{ "_id" : ObjectId("554b296c160953211da4b530"), "x" : 15 }
{ "_id" : ObjectId("554b296c160953211da4b52a"), "x" : 9 }
{ "_id" : ObjectId("554b296c160953211da4b531"), "x" : 16 }
{ "_id" : ObjectId("554b296c160953211da4b532"), "x" : 17 }
{ "_id" : ObjectId("554b296c160953211da4b533"), "x" : 18 }
{ "_id" : ObjectId("554b296c160953211da4b53b"), "x" : 26 }
{ "_id" : ObjectId("554b296c160953211da4b534"), "x" : 19 }
Type "it" for more
mongos> db.test_collection.count();
500


mongos> sh.status();
--- Sharding Status --- 
  sharding version: {
        "_id" : 1,
        "minCompatibleVersion" : 5,
        "currentVersion" : 6,
        "clusterId" : ObjectId("554b241f4df23a46a60f6a9c")
}
  shards:
        {  "_id" : "shard0000",  "host" : "shard0.dbdao.com:35001" }
        {  "_id" : "shard0001",  "host" : "shard1.dbdao.com:35001" }
        {  "_id" : "shard0002",  "host" : "shard2.dbdao.com:35001" }
  balancer:
        Currently enabled:  yes
        Currently running:  no
        Failed balancer rounds in last 5 attempts:  0
        Migration Results for the last 24 hours: 
                2 : Success
                1 : Failed with error 'could not acquire collection lock for test_db.test_collection to migrate chunk [{ : MinKey },{ : MaxKey }) :: caused by :: Lock for migrating chunk [{ : MinKey }, { : MaxKey }) in test_db.test_collection is taken.', from shard0000 to shard0002
  databases:
        {  "_id" : "admin",  "partitioned" : false,  "primary" : "config" }
        {  "_id" : "test_db",  "partitioned" : true,  "primary" : "shard0000" }
                test_db.test_collection
                        shard key: { "_id" : "hashed" }
                        chunks:
                                shard0000       2
                                shard0001       2
                                shard0002       2
                        { "_id" : { "$minKey" : 1 } } -->> { "_id" : NumberLong("-6148914691236517204") } on : shard0000 Timestamp(3, 2) 
                        { "_id" : NumberLong("-6148914691236517204") } -->> { "_id" : NumberLong("-3074457345618258602") } on : shard0000 Timestamp(3, 3) 
                        { "_id" : NumberLong("-3074457345618258602") } -->> { "_id" : NumberLong(0) } on : shard0001 Timestamp(3, 4) 
                        { "_id" : NumberLong(0) } -->> { "_id" : NumberLong("3074457345618258602") } on : shard0001 Timestamp(3, 5) 
                        { "_id" : NumberLong("3074457345618258602") } -->> { "_id" : NumberLong("6148914691236517204") } on : shard0002 Timestamp(3, 6) 
                        { "_id" : NumberLong("6148914691236517204") } -->> { "_id" : { "$maxKey" : 1 } } on : shard0002 Timestamp(3, 7) 

> use test_db;
switched to db test_db						
> db.serverStatus();
{
        "host" : "shard1.dbdao.com:35001",
> db.test_collection.count();
171


> db.serverStatus();
{
        "host" : "shard0.dbdao.com:35001",


> use test_db;
switched to db test_db
> 
> db.test_collection.count();
169

>  db.serverStatus();
{
        "host" : "shard2.dbdao.com:35001",


> use test_db;
switched to db test_db
> db.test_collection.count();
160


以上三个sharding server的数据分别为 171、169、160 , 正好为总数500.

MongoDB中的unique constraint/index

Mongodb中可以使用ensureIndex/createIndex+unique:true来创建unique index。

The unique constraint on indexes ensures that only one document can have a value for a field in acollection. For sharded collections these unique indexes cannot enforce uniqueness because insert and indexing operations are local to each shard.

MongoDB does not support creating new unique indexes in sharded collections and will not allow you to shard collections with unique indexes on fields other than the _id field.


对于unique index理解起来很简单 就是为了让field保持唯一,但需要注意对于sharded collections而言无法对_id意外的field做unique index。

MongoDB db.collection. ensureIndex 和 db.collection.createIndex

注意从mongoDB 3.0开始ensureIndex被废弃,今后都仅仅是db.collection.createIndex的一个别名。

db.collection.createIndex主要分成2部分: KEY和OPTION。

KEY:


> db.dbdao_product.ensureIndex({x:1});
{
	"createdCollectionAutomatically" : false,
	"numIndexesBefore" : 1,
	"numIndexesAfter" : 2,
	"ok" : 1
}


> db.dbdao_product.find({x:200});
{ "_id" : ObjectId("5524face073d738e116afc2c"), "x" : 200, "name" : "askmac.cn", "name1" : "askmac.cn", "name2" : "askmac.cn", "name3" : "askmac.cn" }
{ "_id" : ObjectId("5524face073d738e116afc2d"), "x" : 200, "name" : "askmac.cn", "name1" : "askmac.cn", "name2" : "askmac.cn", "name3" : "askmac.cn" }
> 
> db.dbdao_product.find({x:200}).explain();
{
	"queryPlanner" : {
		"plannerVersion" : 1,
		"namespace" : "test.dbdao_product",
		"indexFilterSet" : false,
		"parsedQuery" : {
			"x" : {
				"$eq" : 200
			}
		},
		"winningPlan" : {
			"stage" : "FETCH",
			"inputStage" : {
				"stage" : "IXSCAN",
				"keyPattern" : {
					"x" : 1
				},
				"indexName" : "x_1",
				"isMultiKey" : false,
				"direction" : "forward",
				"indexBounds" : {
					"x" : [
						"[200.0, 200.0]"
					]
				}
			}
		},
		"rejectedPlans" : [ ]
	},
	"serverInfo" : {
		"host" : "dbdao-Inspiron-560s",
		"port" : 27017,
		"version" : "3.0.2",
		"gitVersion" : "6201872043ecbbc0a4cc169b5482dcf385fc464f"
	},
	"ok" : 1
}


dropDups 参数在mongodb 3.0.2中被废弃, 该参数的用意是在创建unique的索引时若遇到duplicate重复document,则仅仅保持_ID最小的哪一个document:
A unique index cannot be created on a key that has duplicate values. If you would like to create the index anyway, keeping the first document the database indexes and deleting all subsequent documents that have duplicate values, add the dropDups option.


例如

MongoDB shell version: 3.0.2
connecting to: test


> db.dupme.insert({x:1,y:1});
WriteResult({ "nInserted" : 1 })
> db.dupme.insert({x:1,y:1});
WriteResult({ "nInserted" : 1 })
> db.dupme.insert({x:1,y:1});
WriteResult({ "nInserted" : 1 })
> db.dupme.insert({x:1,y:1});
WriteResult({ "nInserted" : 1 })
> 
> db.dupme.find();
{ "_id" : ObjectId("552524627501a28814fdddc7"), "x" : 1, "y" : 1 }
{ "_id" : ObjectId("552524637501a28814fdddc8"), "x" : 1, "y" : 1 }
{ "_id" : ObjectId("552524657501a28814fdddc9"), "x" : 1, "y" : 1 }
{ "_id" : ObjectId("552524667501a28814fdddca"), "x" : 1, "y" : 1 }
> 


> db.dupme.ensureIndex({x:1},{unique:true, dropDups:true});
{
	"createdCollectionAutomatically" : false,
	"numIndexesBefore" : 1,
	"errmsg" : "exception: E11000 duplicate key error collection: test.dupme index: x_1 dup key: { : 1.0 }",
	"code" : 11000,
	"ok" : 0
}


> db.dupme.ensureIndex({x:1},{unique:true, dropDups:true});
{
	"createdCollectionAutomatically" : false,
	"numIndexesBefore" : 1,
	"errmsg" : "exception: E11000 duplicate key error collection: test.dupme index: x_1 dup key: { : 1.0 }",
	"code" : 11000,
	"ok" : 0
}


以上由于我们测试的版本是mongodb 3.0.2,所以直接忽略了dropDups参数。


在mongodb中 primary key主键是自动创建的且被分配给_id字段,用户不指定_id,那么mongodb会自动分配给你。_id字段总是被索引的且总是唯一的。 用户无法改变这一点,这是mongodb自己控制的。


> db.dbdao_foo.insert({a:3,b:2,c:1,d:4,e:2});
WriteResult({ "nInserted" : 1 })
> db.dbdao_foo.ensureIndex({a:1});
{
	"createdCollectionAutomatically" : false,
	"numIndexesBefore" : 1,
	"numIndexesAfter" : 2,
	"ok" : 1
}
> db.dbdao_foo.ensureIndex({b:1});
{
	"createdCollectionAutomatically" : false,
	"numIndexesBefore" : 2,
	"numIndexesAfter" : 3,
	"ok" : 1
}
> db.dbdao_foo.ensureIndex({c:1});
{
	"createdCollectionAutomatically" : false,
	"numIndexesBefore" : 3,
	"numIndexesAfter" : 4,
	"ok" : 1
}

如上面的例子中 虽然针对a、b、c字段建了索引,但实际上主键总是_id。

升级MongoDB到3.0.2并启用wiredTiger存储引擎 基于ubuntu 14.04

升级MongoDB到3.0.2并启用wiredTiger存储引擎

首先对mongodb 3.0之前的数据进行备份:


for (var i = 1; i <= 50000; i++) {
 db.dbdao.insert( { x : i , name: "dbdao.com" , name1:"dbdao.com", name2:"dbdao.com", name3:"dbdao.com"} )
}

root@dbdao-Inspiron-560s:~# mongodump --out dbdao
connected to: 127.0.0.1
Wed Apr 8 03:41:12.499 all dbs
Wed Apr 8 03:41:12.500 DATABASE: test to dbdao/test
Wed Apr 8 03:41:12.513 test.system.indexes to dbdao/test/system.indexes.bson
Wed Apr 8 03:41:12.514 1 objects
Wed Apr 8 03:41:12.514 test.dbdao to dbdao/test/dbdao.bson
Wed Apr 8 03:41:12.564 50000 objects
Wed Apr 8 03:41:12.564 Metadata for test.dbdao to dbdao/test/dbdao.metadata.json

以上dbdao是用户自己定义的一个备份目录。


之后安装mongodb 3.0.2


操作系统是Ubuntu 14.04.1 LTS \n \l

主要步骤如下:

sudo apt-key adv --keyserver hkp://keyserver.ubuntu.com:80 --recv 7F0CEB10
echo "deb http://repo.mongodb.org/apt/ubuntu "$(lsb_release -sc)"/mongodb-org/3.0 multiverse" | sudo tee /etc/apt/sources.list.d/mongodb-org-3.0.list
sudo apt-get update
sudo apt-get install -y mongodb-org
sudo service mongod start


安装详细步骤如下

root@dbdao-Inspiron-560s:~# sudo apt-key adv --keyserver hkp://keyserver.ubuntu.com:80 --recv 7F0CEB10
Executing: gpg --ignore-time-conflict --no-options --no-default-keyring --homedir /tmp/tmp.08FbwQ9cDM --no-auto-check-trustdb --trust-model always --keyring /etc/apt/trusted.gpg --primary-keyring /etc/apt/trusted.gpg --keyserver hkp://keyserver.ubuntu.com:80 --recv 7F0CEB10
gpg: requesting key 7F0CEB10 from hkp server keyserver.ubuntu.com
gpg: key 7F0CEB10: public key "Richard Kreuter <richard@10gen.com>" imported
gpg: Total number processed: 1
gpg:               imported: 1  (RSA: 1)

root@dbdao-Inspiron-560s:~# echo "deb http://repo.mongodb.org/apt/ubuntu "$(lsb_release -sc)"/mongodb-org/3.0 multiverse" | sudo tee /etc/apt/sources.list.d/mongodb-org-3.0.list
deb http://repo.mongodb.org/apt/ubuntu trusty/mongodb-org/3.0 multiverse


sudo apt-get update
sudo apt-get install -y mongodb-org


之后创建wiredTiger使用的存储目录并修改必要的参数


sudo mkdir -p /m01/mondata
 sudo chown mongodb:mongodb /m01/mondata
 sudo echo "storageEngine = wiredTiger" >> /etc/mongod.conf 

 修改 sudo vi /etc/mongod.conf 

 dbpath=/var/lib/mongodb

 修改为

 dbpath=/m01/mondata

root@dbdao-Inspiron-560s:~# mongo
MongoDB shell version: 3.0.2
connecting to: test
Server has startup warnings: 
2015-04-08T04:02:11.903-0400 I CONTROL [initandlisten] 
2015-04-08T04:02:11.903-0400 I CONTROL [initandlisten] ** WARNING: /sys/kernel/mm/transparent_hugepage/enabled is 'always'.
2015-04-08T04:02:11.903-0400 I CONTROL [initandlisten] ** We suggest setting it to 'never'
2015-04-08T04:02:11.903-0400 I CONTROL [initandlisten] 
2015-04-08T04:02:11.903-0400 I CONTROL [initandlisten] ** WARNING: /sys/kernel/mm/transparent_hugepage/defrag is 'always'.
2015-04-08T04:02:11.903-0400 I CONTROL [initandlisten] ** We suggest setting it to 'never'
2015-04-08T04:02:11.903-0400 I CONTROL [initandlisten] 
> db.dbdao.count();
50000


修改/etc/security/limits.conf 加入如下内容 : sudo vi /etc/security/limits.conf

* soft nproc 1024
root soft nproc unlimited

* soft nofile 64000 # 加入的内容
* hard nofile 64000 # 加入的内容

修改/etc/rc.local 如下sudo vi /etc/rc.local


touch /var/lock/subsys/local

if test -f /sys/kernel/mm/transparent_hugepage/enabled; then # ↑加入的内容
 echo never > /sys/kernel/mm/transparent_hugepage/enabled # │
fi # │
if test -f /sys/kernel/mm/transparent_hugepage/defrag; then # │
 echo never > /sys/kernel/mm/transparent_hugepage/defrag # │
fi 


修改 /etc/init/mongod.conf , 加入 vi /etc/init/mongod.conf

在pre-start script 这一行下面加入下面的内容

 if [ -f /sys/kernel/mm/transparent_hugepage/enabled ]; then
 echo never > /sys/kernel/mm/transparent_hugepage/enabled
 fi
 if [ -f /sys/kernel/mm/transparent_hugepage/defrag ]; then
 echo never > /sys/kernel/mm/transparent_hugepage/defrag
 fi


之后导入先前的数据,并启动mongodb @wiredTiger

dfsds

root@dbdao-Inspiron-560s:/var/lib/mongodb# sudo service mongod restart
mongod start/running, process 6983
root@dbdao-Inspiron-560s:/var/lib/mongodb# sudo service mongod status
mongod start/running, process 6983


root@dbdao-Inspiron-560s:/m01/mondata# cd /m01/mondata/


root@dbdao-Inspiron-560s:/m01/mondata# ls -l
total 132
-rw-r--r-- 1 mongodb nogroup 16384 Apr 8 04:03 collection-0-1898341878753293233.wt
-rw-r--r-- 1 mongodb nogroup 16384 Apr 8 04:03 index-1-1898341878753293233.wt
drwxr-xr-x 2 mongodb nogroup 4096 Apr 8 04:02 journal
-rw-r--r-- 1 mongodb nogroup 16384 Apr 8 04:03 _mdb_catalog.wt
-rwxr-xr-x 1 mongodb nogroup 5 Apr 8 04:02 mongod.lock
-rw-r--r-- 1 mongodb nogroup 16384 Apr 8 04:04 sizeStorer.wt
-rw-r--r-- 1 mongodb nogroup 95 Apr 8 04:02 storage.bson
-rw-r--r-- 1 mongodb nogroup 46 Apr 8 04:02 WiredTiger
-rw-r--r-- 1 mongodb nogroup 495 Apr 8 04:02 WiredTiger.basecfg
-rw-r--r-- 1 mongodb nogroup 21 Apr 8 04:02 WiredTiger.lock
-rw-r--r-- 1 mongodb nogroup 874 Apr 8 04:04 WiredTiger.turtle
-rw-r--r-- 1 mongodb nogroup 40960 Apr 8 04:04 WiredTiger.wt

通过命令 echo "db.serverStatus()"| mongo|grep wiredTiger 可以确认是否启用了wiredTiger

root@dbdao-Inspiron-560s:/m01/mondata# echo "db.serverStatus()"| mongo|grep wiredTiger
 "name" : "wiredTiger"
 "wiredTiger" : {


使用mongorestore 导入之前导出的数据

root@dbdao-Inspiron-560s:~# mongorestore dbdao/
2015-04-08T04:12:18.779-0400 building a list of dbs and collections to restore from dbdao/ dir
2015-04-08T04:12:18.779-0400 reading metadata file from dbdao/test/dbdao.metadata.json
2015-04-08T04:12:18.780-0400 restoring test.dbdao from file dbdao/test/dbdao.bson
2015-04-08T04:12:19.904-0400 restoring indexes for collection test.dbdao from metadata
2015-04-08T04:12:19.905-0400 finished restoring test.dbdao
2015-04-08T04:12:19.905-0400 done

root@dbdao-Inspiron-560s:~# mongo
MongoDB shell version: 3.0.2
connecting to: test

> db.dbdao.count();
50000

以上完成了mongodb单个节点下的升级,升级后启用了mongodb 3.0最新的wiredTiger存储引擎。
总的来说mongodb的升级要比oracle这类传统RDBMS要简单得多。

沪ICP备14014813号-2

沪公网安备 31010802001379号